Add SLO
SLOs help define and measure the reliability and performance of a service. You can configure an SLO in Site24x7 by setting up SLIs and defining targets based on availability and performance. This is considered an advanced monitor.
All SLO-supported plans let you create up to 20 SLOs with certain limitations. If you need additional SLOs, please contact support.
How does it work?
Adding a service-level objective (SLO) ensures your service stays aligned with its performance goals, providing a proactive approach to incident management and operational efficiency. Follow the steps below to set up and monitor your SLO effectively:
- Define objectives: Establish clear SLOs for availability and performance based on desired service quality.
- Configure SLIs: Choose appropriate service-level indicators (SLI)s, such as availability or performance, to measure service quality. Specify metrics such as resource type, evaluation method, and thresholds to track reliability.
- Set targets and time windows: Define the time window and target percentage for achieving the SLO. Include business hours to align calculations with operational needs.
- Apply configurations: Link your SLO to configuration profiles, tags, IT automation templates, and alert settings to ensure appropriate notifications and automated actions for state changes or attribute updates.
- Monitor SLO compliance: Continuously measure service reliability against the SLO target to ensure compliance. Notifications are triggered when thresholds are exceeded, helping maintain service quality.
Add an SLO
- Log in to Site24x7.
- Click Home > SLO.
- Click the + button to add an SLO.
NoteIf you are adding your SLO for the first time, click the Add an SLO monitor button.
-
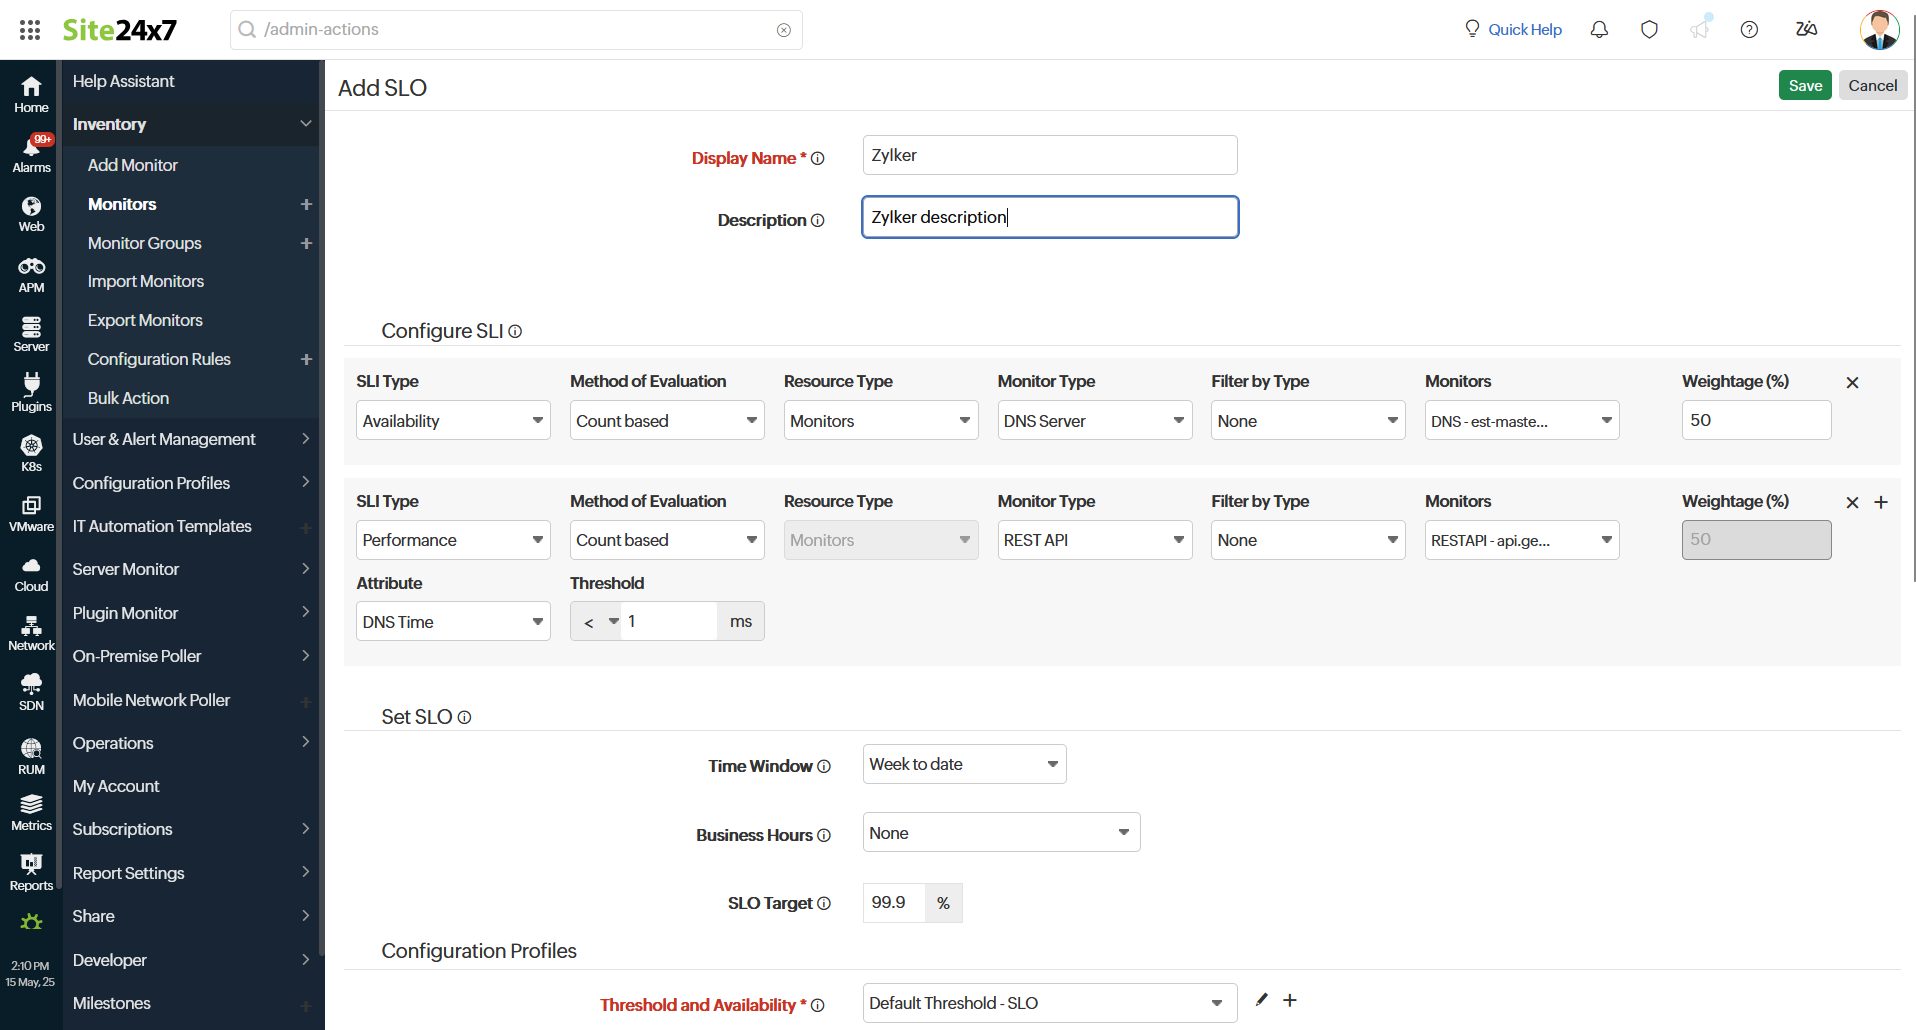
Specify the basic details to add an SLO:

-
Display Name: Provide an appropriate name for the SLO.
-
Description: Provide a detailed description for your SLO.
NoteBy default, the SLO frequency is set to one day.
-
- Configure SLI:
- SLI Type: Choose the SLI type based on your requirements.
If you select Availability, please specify the following options:- Method of Evaluation: Choose the desired method of evaluation from the drop-down list, which includes Count-based, Time-based, and Time-slice-based.
NoteLearn more about calculations based on evaluation.
- Resource Type: Choose the appropriate resource type from the drop-down list, which includes monitors and monitor groups.
- If you choose Monitor, then select your preferred Monitor Type and the specific Monitors you wish to configure for SLI.
- If you opt for Monitor Group, select the desired Monitor Group that you want to configure for SLI.
- Filter by Type: Filter your SLIs based on the below options.
- Monitor Group: Select this option to add monitors or monitor groups in an SLI.
- Tags: Select this option to add SLIs based on the tags assigned to your monitors for the chosen monitor type.
- None: Select this option if you don’t want to apply any filters and choose monitors and monitor groups of the selected monitor type.
NoteThe drop-down options will vary based on your selection in Filter by Type. If you select Monitor Group, the drop-down will display Monitor Groups. If you select Tags, it will display Tags. If you select None, it will list the Monitors.
-
Weightage: The default value of weightage is internally set to 100. The weightage will be evenly distributed to total 100 if multiple SLIs are added.
- Method of Evaluation: Choose the desired method of evaluation from the drop-down list, which includes Count-based, Time-based, and Time-slice-based.
- If you select Performance, please specify the above options along with the below fields.
-
Choose the Attribute and Threshold, based on which your SLI will be calculated.
Note- The Performance SLI type applies only to resource Monitors.
- You can up-to 5 SLIs, and the weightage will change based on the number of SLIs.
- You can add up to 1,500 monitors per SLI.
- Aggregation: This option is displayed when the SLI Type is Performance and the Method of Evaluation is Time-Slice based. You can select the aggregation type as minimum, maximum, sum, average, or 95th percentile for the given attribute and monitor threshold.
-
- SLI Type: Choose the SLI type based on your requirements.
-
Set SLO: This section tracks a service's reliability over a specified time window to determine whether the SLO target is met.
-
Time Window: Select the time window to measure service reliability.
-
Business Hours: Choose the relevant business hours for your operations. Calculations will be based on the chosen time period to ensure accuracy.
-
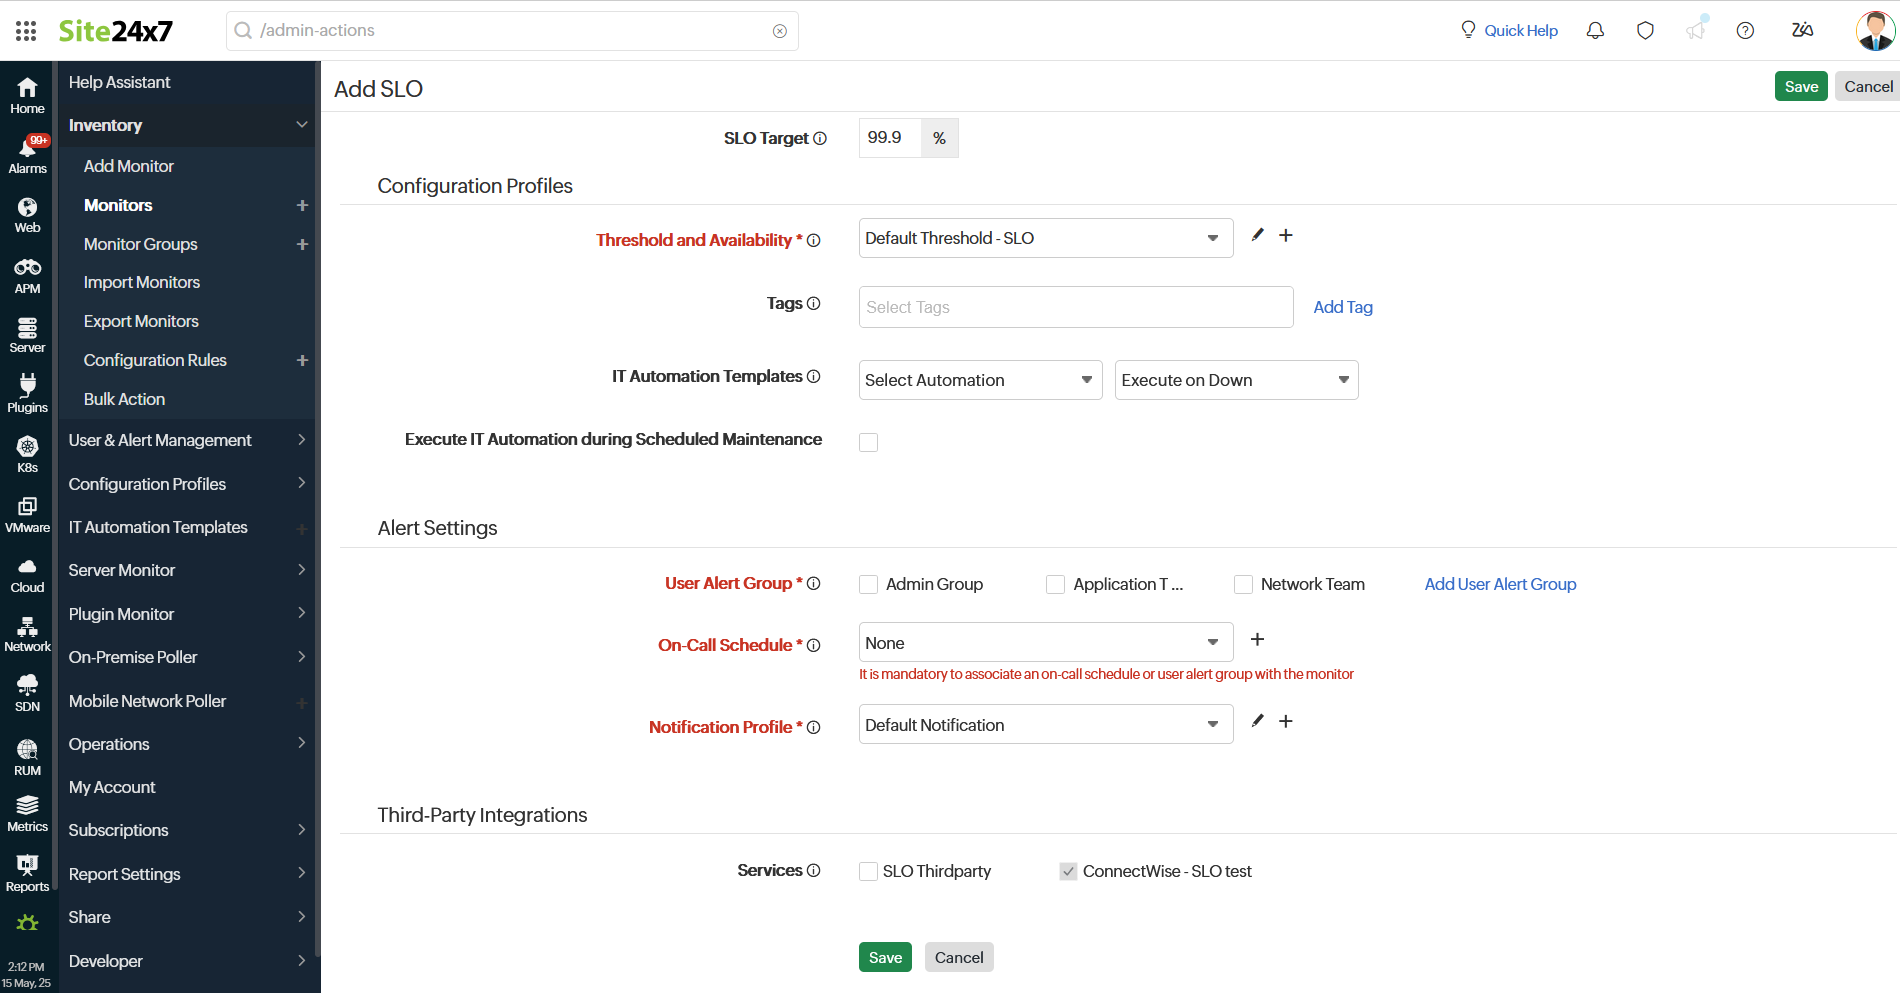
SLO Target: Specify the target percentage for achieving service reliability within the specified time window.
-
- Configuration Profiles:

- Threshold and Availability: Choose a threshold profile from the drop-down menu or select the default threshold settings to receive notifications when resources exceed the configured limits. Learn more about thresholds.
To create a customized threshold and availability profile, please refer to the section on Threshold and Availability. - Tags: Associate your monitor with predefined Tag(s) to help organize and manage your monitors creatively.
- IT Automation Templates: Choose the automation actions to be executed when the SLO is Down, Trouble, or Up, or when there is any status or attribute change. The defined action will execute upon a state change, and selected user groups will receive alerts. Learn more about IT Automation.
-
Execute IT Automation during Scheduled Maintenance: Configuring a scheduled maintenance window allows you to suppress alerts for select IT resources during routine maintenance tasks. Select the check box to enable the option to execute IT automation—script executions, server commands, and more—during this period.
- Threshold and Availability: Choose a threshold profile from the drop-down menu or select the default threshold settings to receive notifications when resources exceed the configured limits. Learn more about thresholds.
-
-
User Alert Group: Select the user group that needs to be alerted during an outage. Learn more about user group alerts.
-
On-Call Schedule: The On-Call Schedule option ensures that notifications are sent to assignees during specific shift hours, helping them respond quickly to alerts or incidents. Choose an On-Call of your preference from the drop-down.
-
Notification Profile: Choose a notification profile from the drop-down menu or select the default available profile. A notification profile helps to configure when and who needs to be notified in case of downtime.
NoteYou can receive alerts for monitors linked to user groups, regardless of the configured On-Call shift.
-
-
Third-party Integrations: Associate your monitor with a pre-configured third-party service. Doing so lets you push your monitor alarms to selected services and facilitates improved incident management.
NoteIf you haven't set up any third-party integrations yet, navigate to Admin > Third-Party Integration to create one.
- Click Save to add a SLO.
