Notification Profile
The Notification Profile helps you configure status-based alerting period and notification medium options for Down/Trouble/Critical notification delays. You can opt to receive alerts at multiple frequencies configured in the persistent alerts section through the third-party services supported in Site24x7 along with email, SMS, voice call, and push notifications. Moreover, it will provide you with the option to set multiple escalation times, upon crossing which escalation alerts will be raised.
Use cases
- If a monitor goes into a Down state, you can configure the notification profile to send alerts based on your on-call schedule. For example, you can route alerts via SMS and voice call to the on-call technician between 6pm and 8am, while restricting alerts to email during business hours.
- If a website occasionally experiences brief network glitches, you can configure the notification profile to alert only after three consecutive failures preventing false alerts.
- When a database monitor turns Critical, a preconfigured IT automation will to restart the service. The Notification Profile, with the Notify as Down/Trouble after executing associated IT Automation(s) option enabled, checks if the status returns to Up. If it does, alerts are suppressed; otherwise, an alert is sent to indicate the issue persists.
Add a Notification Profile
- Login to Site24x7 client.
- Click Admin > Configuration Profiles > Notification Profile.
- Select Add Notification Profile in the Notification Profile screen.
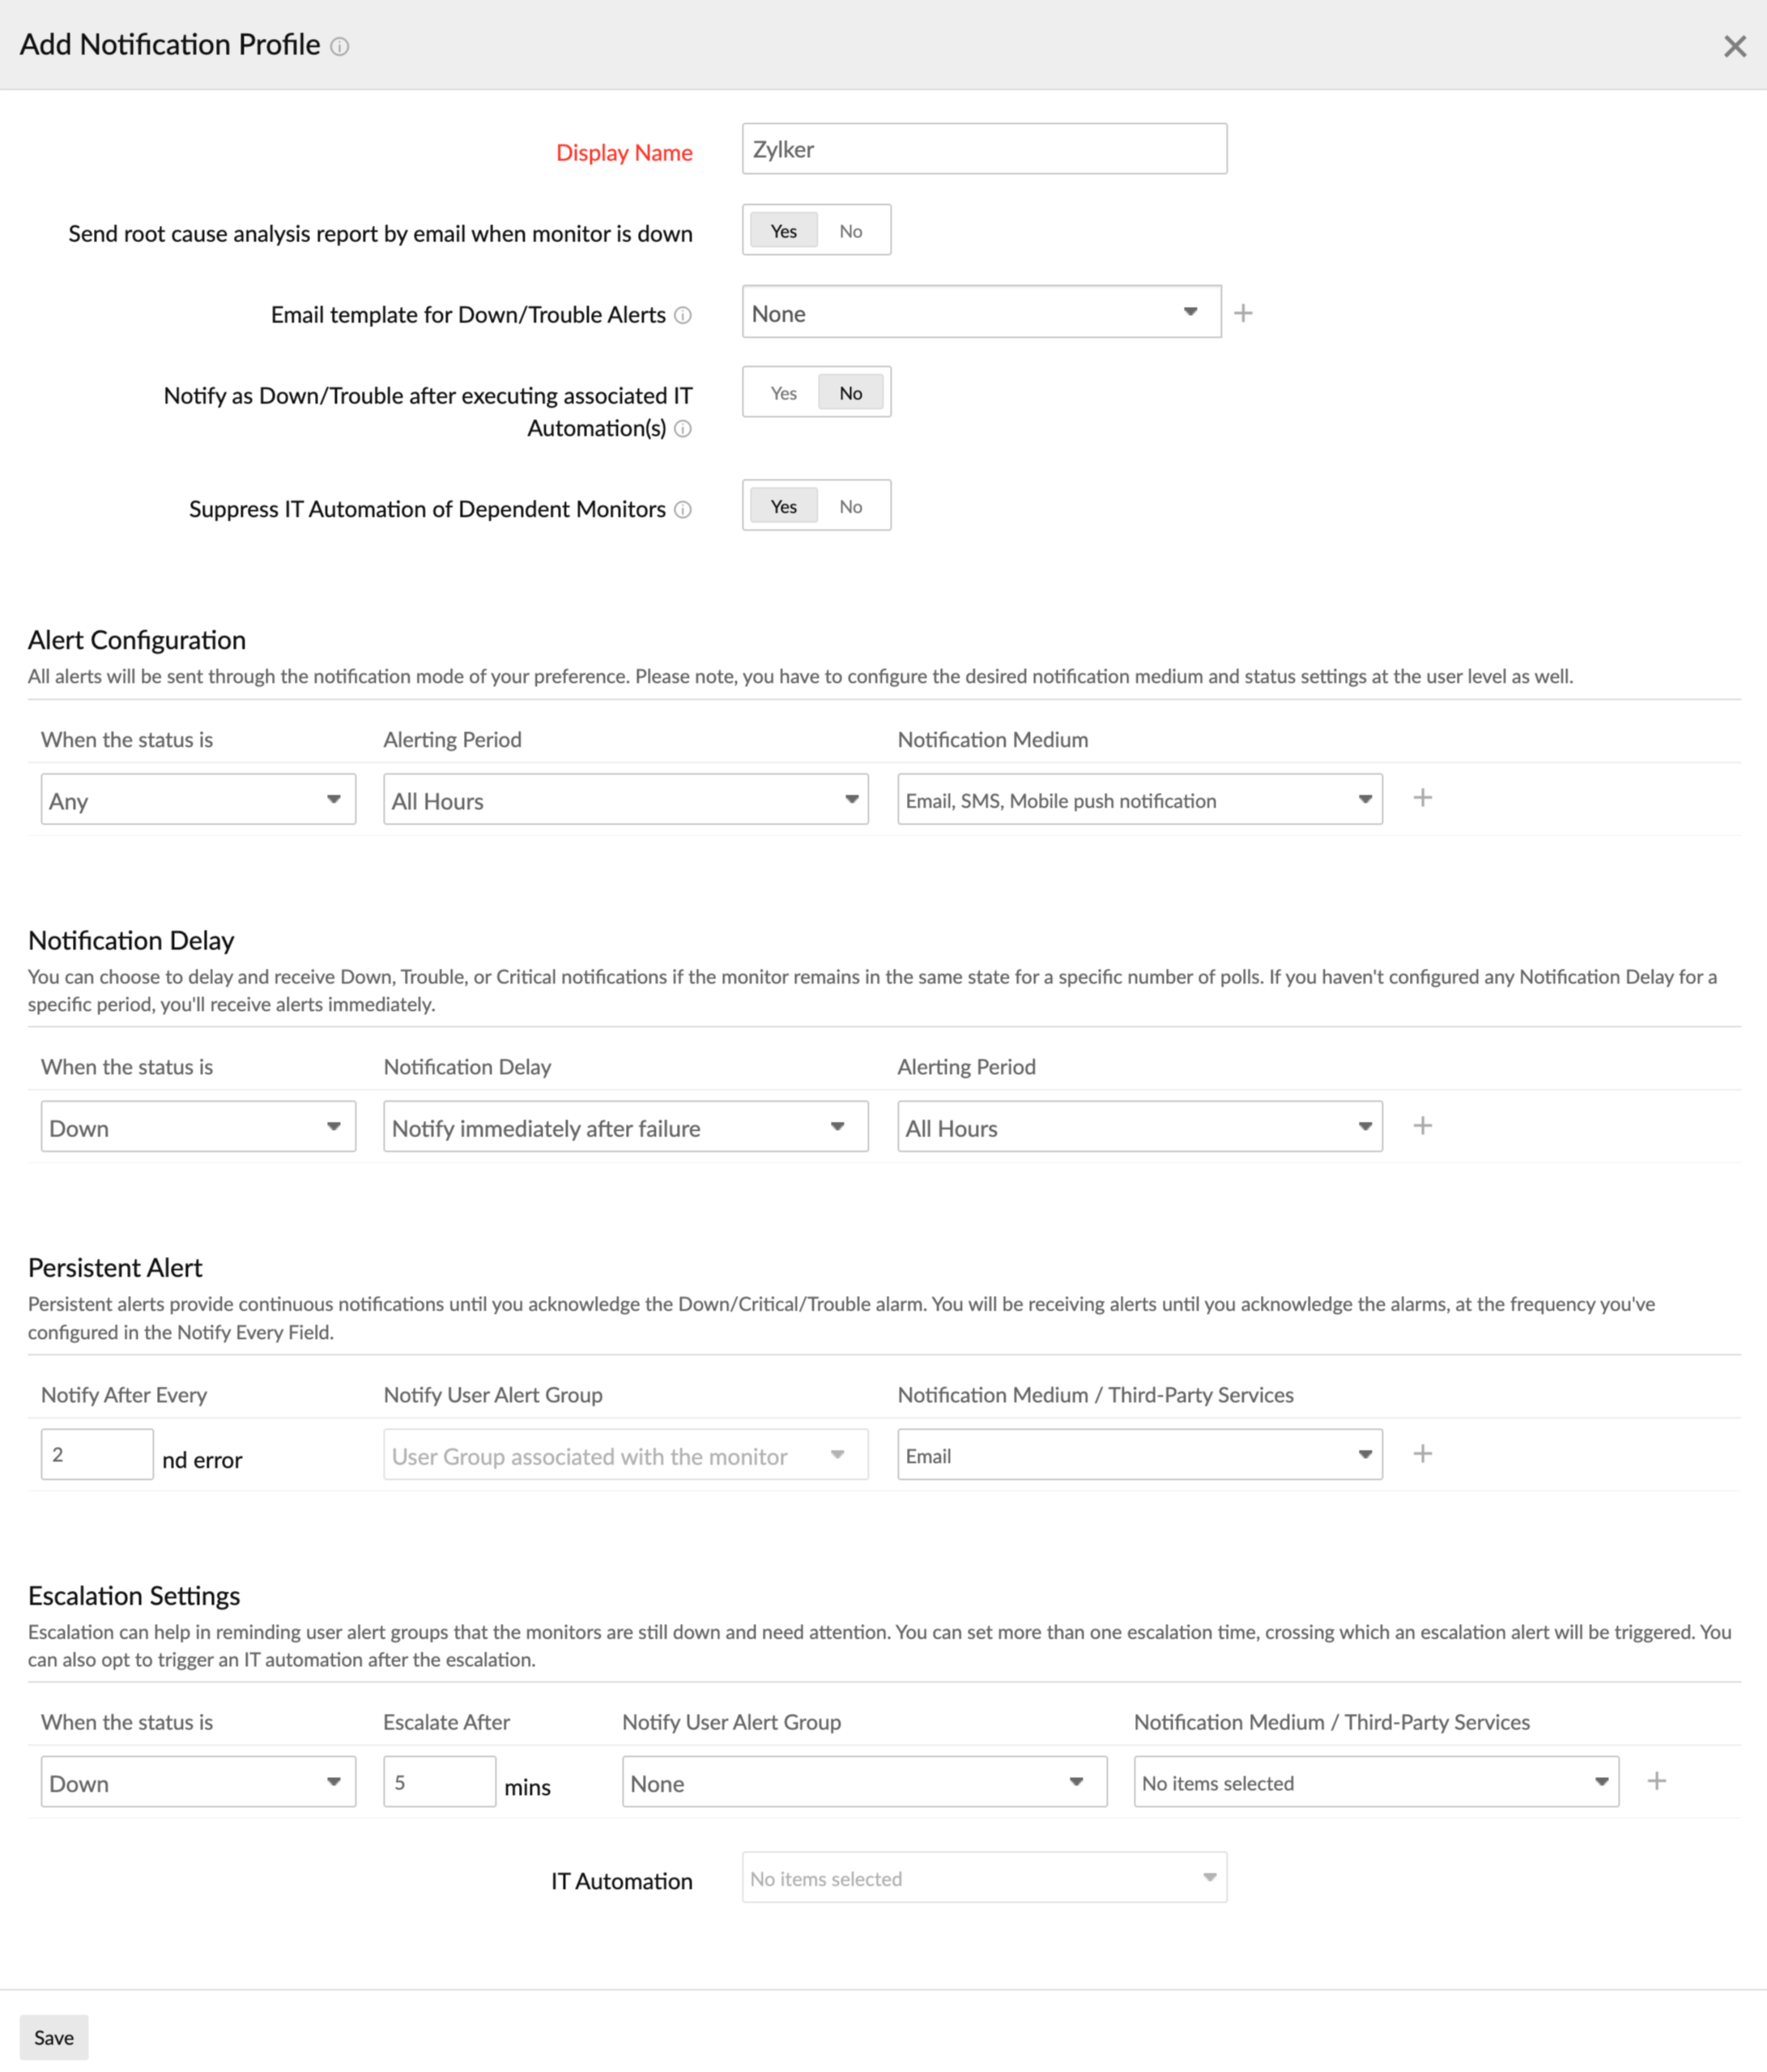
- Specify the following details to add a Notification Profile:
- Display Name: Specify a name for the notification profile.
- Send Root Cause Analysis Report by email when monitor is down: Enable the toggle button to receive the exact reason for the monitor outage. You'll receive a complete root cause analysis report for the outage via an email.
- Email Template for Down/Trouble Alerts: Choose the email template from the drop down list for alert report.
NoteTo create and customize your own email template, refer Email Template.
- Notification Template: Select a Notification Template to define how alerts are formatted and sent to your integrated third-party tool. The selected template determines the incident template structure and custom field mapping based on the external system’s configuration. Learn how to add a notification template.
NoteFor the ITSM tool ServiceDesk Plus Cloud, only one Notification Template can be selected per Notification Profile.
- Notify Down/Trouble status after executing IT automations associated to the monitor: Based on conditions like change in the monitor's status or attributes, you'll be able to automate monitor level actions.
- By default, the option is set to No. Alerts will be triggered normally during a Down/Trouble status.
- If it is set to Yes, Site24x7 will perform a data collection immediately after the intended automation is executed and check for the status of the monitor. If the monitor is Up, no alerts will be triggered, but the poll data will be recorded in the log report. However, even after executing the specified Action, if your monitor still faces an outage, you'll be immediately alerted about the Down/Trouble status.
- Suppress IT Automation of dependent monitors: Suppress execution of IT automation for monitors when the status of the dependent resource is Down.
- Alert Configuration: Configure alert notification modes of your preference. You can also configure the business hours and the status changes for which you would like to receive alerts.
By default, alerts will be sent for all the status changes during all hours.
- When the status is: Choose the status for which you'd wish to receive alert notifications using the drop-down.
- Alerting Period: Choose the business hours during which you'd like to get notified. Site24x7 provides two options, Within and Outside to set your alert notification-related time preferences. For instance, if your business hours are from 9 am to 5 pm and you want to receive alert notifications during that time, you can choose Within. To receive notifications after the business hours (5 am-9 pm), you can choose Outside.
- Notification Medium: Configure the notification medium of your preference. You can choose more than one notification mode.
Conditions
- You can choose the same status, alerting period, and notification medium only once.
- You can configure a combination of only two different alerting periods and a notification medium for a status.
Note- In the notification profile, you can opt to suppress alerts via email, SMS, voice call, or push notifications.
- You have to configure the desired notification medium and status settings at the user level as well.
- Notification Delay: You can use this option to choose to delay receiving alert notifications for Down, Trouble, or Critical status changes for a specific number of polls. If you're not configuring the notification delay, you'll start receiving alert notifications immediately.
- When the status is: Choose the status for which you'd wish to receive delayed alert notifications.
- Notification Delay: Choose when you'd wish to receive the alerts. For instance, you can specify whether you want to receive an alert immediately after the first failure or whether you'd like to wait till consecutive failures arise.
- Alerting Period: Configure the business hours during which you'd like to receive the delayed notifications.
Conditions
- You can choose the same notification delay and time combination for one status only once.
- You can choose the same status and notification delay combination only twice.
- For a particular status, you can configure notification delay only ten times.
- Persistent Alert: Obtain continuous notifications until you acknowledge the Down/Critical/Trouble alarms with Persistent Alerts. You can receive alerts based on the poll count you've configured in the Notify After Every field.
- Notify After Every: Specify the error count after which you'd wish to receive the alert notifications. For instance, if the error count you've specified is 7, then you'll be notified for every 7th error. In this case, the first notification will be for the 7th error, then for the 14th error, and so on.
- Notify User Alert Group: The User Alert group which you've selected in the Add Monitor page will be added here by default.
- Notification Medium/Third-Party services: Choose the medium through which you'd wish to receive the alert notifications. You can also choose any of the third-party services which are supported by Site24x7.
Conditions
- The number of persistent alerts available for a monitor for downtime is 30.
- Notify After Every should be within the range of 0 to 60.
- You can configure a maximum of five persistent alerts.
- Persistent alerts will be triggered for Trouble, Critical, and Down.
Acknowledging persistent alerts
To acknowledge alarms, you need to assign a technician from the Alarms page. Once an alarm is acknowledged the persistent alarms can be suppressed. However, you will continue to receive escalation alerts based on the configurations in the Notification Profile.
- Escalation Settings: Escalation acts as notifications to user alert groups about the monitors that are still down and need to be resolved. You can set more than one escalation time, crossing which an escalation alert will be triggered. You can also opt to trigger an IT automation after the escalation. If the status of your monitors shifts from trouble/critical/down to up, it will trigger an 'up' alert immediately to update that the monitor is performing better. Conversely, if the status changes to a higher severity level, such as from trouble/critical to down, an update alert will be sent as per the configured time in your escalation settings.
After the alerts indicating the monitor's status changes have been sent, the countdown for the next status change will begin anew from zero to the time you have configured.- When the status is: Choose a status for which you want to configure the details.
- Escalate After: Specify the time (in minutes) after which you'd wish to receive the escalation notifications.
- Notify User Alert Group: Specify the User Alert group to be notified.
- Notification Medium/Third-Party services: Choose the medium through which you'd wish to receive the escalation notifications. You can also choose any of the third-party services supported by Site24x7.
- IT Automation: Choose the IT Automation of your preference. The IT Automation configured will be executed for all escalation duration specified under Escalate After.
Conditions
- Escalate After should be within the range of 0 to 1440 minutes.
- You can configure up to nine different escalation settings.
Attribute Alert Group setting will be applied for persistent- and status-change-related alerts alone. It won't be applicable for escalation alert.
NoteLearn how to configure business hours with On-Call Schedule.
- Click Save.
- The Notification profile created will be automatically listed in Notification Profile screen along with the other notification profiles already created.
- Users with custom roles can use the View My Resources option to filter and view resources they created.
- A default Notification Profile is also listed in Notification Profile screen. As it is mandatory for each resource like Website, Web Page Analyzer, DNS, FTP etc to associate itself with a notification profile, you can also choose this default profile available instead of customizing one.
Edit a Notification Profile
- Click the profile which you want to edit.
- Edit the parameters which needs to be changed in Edit a Notification Profile window.
- Click Save.
Note
Admins with Group level access can not edit/ modify profiles created by other users, but will have read-only permission.
Delete a Notification Profile
- Click the profile in the Notification Profile screen which needs to be deleted.
- This will navigate to Edit a Notification Profile window.
- Click Delete.