On-Premise Poller Group
The On-Premise Poller Group is a collection of On-Premise Pollers designed to distribute monitoring workloads efficiently. It simplifies the allocation of monitors across selected On-Premise Pollers and can include both primary and standby On-Premise Pollers.
How it helps
Balanced workloads: The On-Premise Poller Group evenly distributes workloads among On-Premise Pollers and monitors their CPU and memory usage to prevent any On-Premise Poller from being overwhelmed.
Continuous monitoring: If a primary On-Premise Poller becomes unavailable, a standby On-Premise Poller is automatically promoted to take over, ensuring uninterrupted monitoring.
Efficient MSP operations: It allows MSP admins to efficiently manage On-Premise Pollers by creating On-Premise Poller Groups and assigning them to specific customers, ensuring consistent monitoring of their resources.
Prerequisites for adding an On-Premise Poller to an On-Premise Poller Group
To migrate an existing On-Premise Poller to an On-Premise Poller Group, follow the steps outlined in the Migrate to the On-Premise Poller Group document.
To add a new On-Premise Poller to an On-Premise Poller Group, ensure the following prerequisites are met.
- The On-Premise Poller should not have any monitors associated with it.
- The On-Premise Poller should not be included in any user-defined location profile.
- The On-Premise Poller should not be in a down state.
- The On-Premise Poller should not be part of another On-Premise Poller Group.
- If the On-Premise Poller is a primary On-Premise Poller with high availability, neither the primary nor the high availability On-Premise Poller can be added to the On-Premise Poller Group.
- Super admins, admins, MSP admins, and MSP customers can add an On-Premise Poller Group.
- Ensure that all On-Premise Pollers in an On-Premise Poller Group are on the same network.
- The On-Premise Poller version should be 6.5.0 or above.
If you want to upgrade or auto-upgrade On-Premise Pollers to the latest version, follow the steps in this document.
Supported monitors
Below, you'll find a list of VMware infrastructure components and internet services that an On-Premise Poller Group can monitor.
|
VMware infrastructure |
Backups |
|
Websites
|
|
|
Nutanix infrastructure |
Adding an On-Premise Poller Group
- Log in to your Site24x7 account.
- Add an On-Premise Poller, if you haven't added one yet.
- Once the On-Premise Poller is installed, click Admin > On-Premise Poller Group.
- Click the plus + symbol beside On-Premise Poller Group.
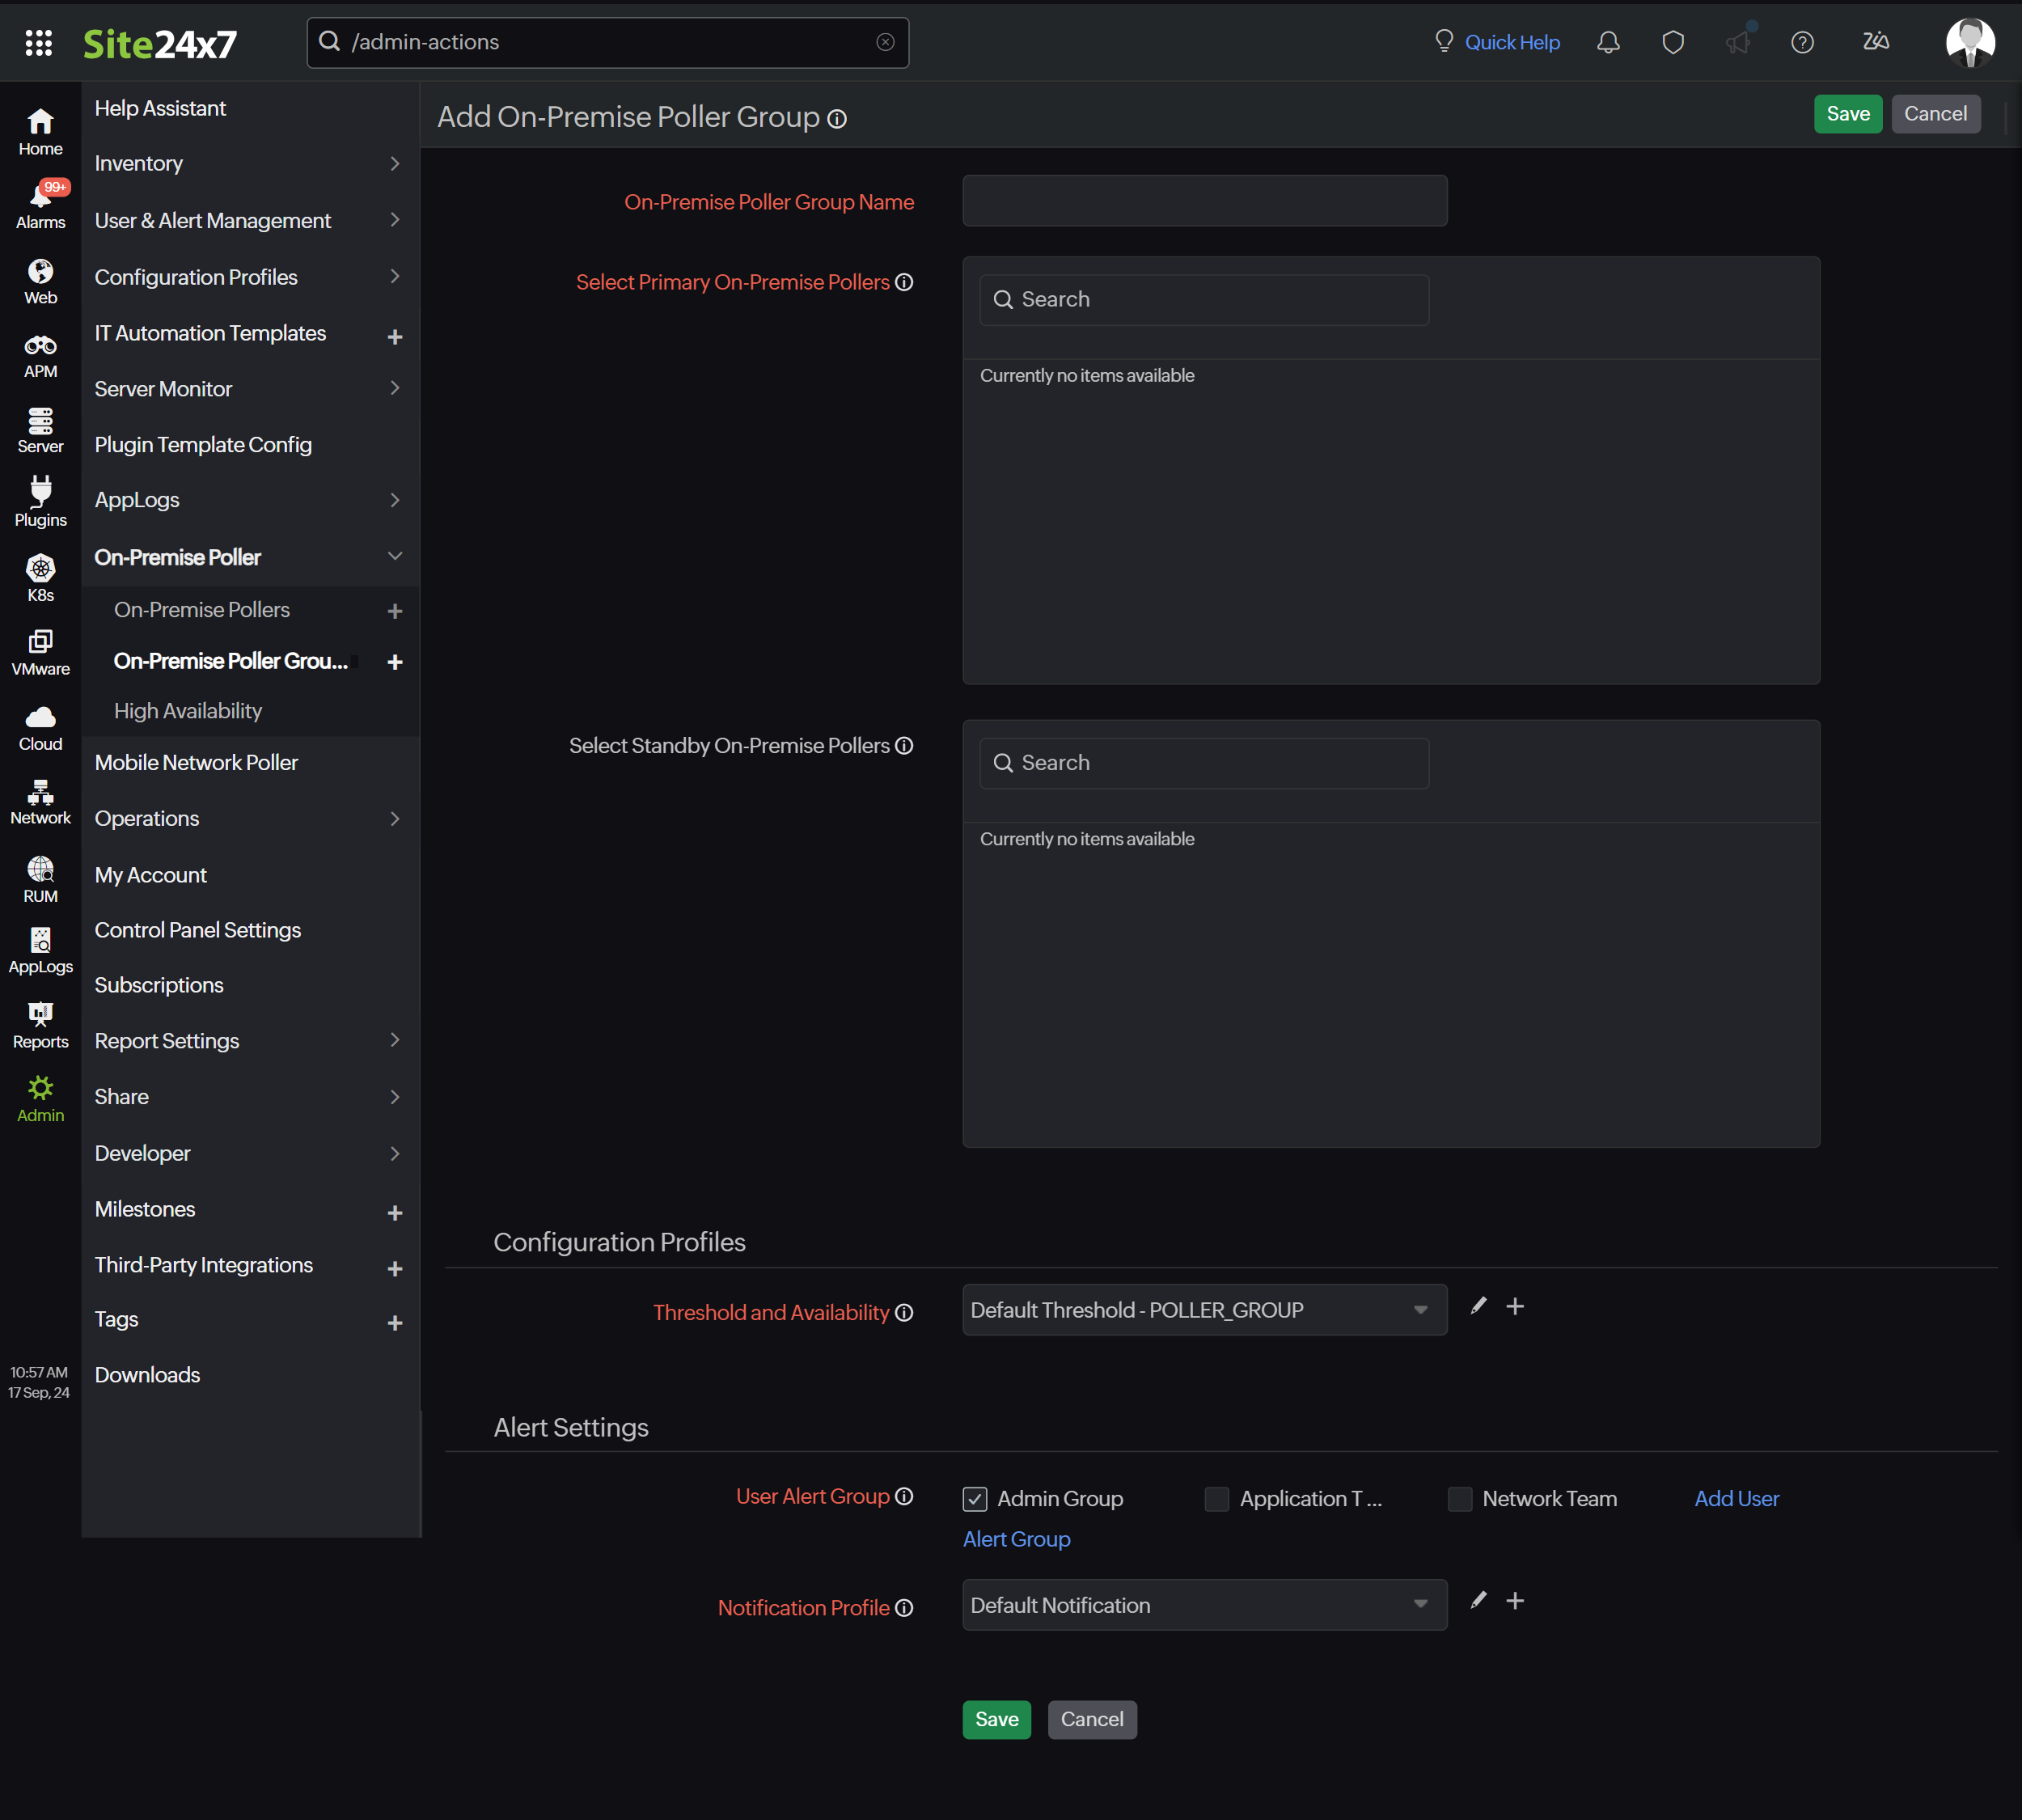
- Specify the following information to add the On-Premise Poller to an On-Premise Poller Group:
- On-Premise Poller Group Name: Specify a name to identify the On-Premise Poller Group.
- Select Primary On-Premise Pollers: Search or choose the On-Premise Poller which you wish to add to the group as a primary On-Premise Poller.
- Select Standby On-Premise Pollers: Search or choose the On-Premise Poller which you wish to add to the group as a standby On-Premise Poller. Including a standby On-Premise Poller is recommended.
Note: When a primary On-Premise Poller goes down, its monitoring resources will be taken over by the standby On-Premise Poller, which will then become the new primary On-Premise Poller. The original primary On-Premise Poller will switch to standby mode, even while in a down state.
- Configuration Profiles:
- Customer Name: This drop-down, which lists the associated MSP customer, will be visible only to the MSP admin. When choosing this option, the On-Premise Poller Group will be propagated to selected customers.
- Threshold and availability: You can edit the Threshold Profile of your On-Premise Poller Group monitor either through the Configuration Profile or by following the steps below:
- Navigate to On-Premise Poller > On-Premise Poller Group.
- Select the On-Premise Poller Group you want to edit.
- Edit the parameters that needs to be changed.
- Click Save.
NoteIf an On-Premise Poller is added to the On-Premise Poller Group, the down alert for the individual On-Premise Poller will be suppressed. Instead, the alert will be sent from the On-Premise Poller Group.
- Alert Settings:
- Notification Profile: Notification profiles help to configure when and who gets notified in case of downtime. Choose a notification profile from the drop-down list, use the default profile available, or create a custom notification profile.
- User Alert Group: Select the user group that needs to be alerted during an outage, or add multiple users to a group.
- Click Save.
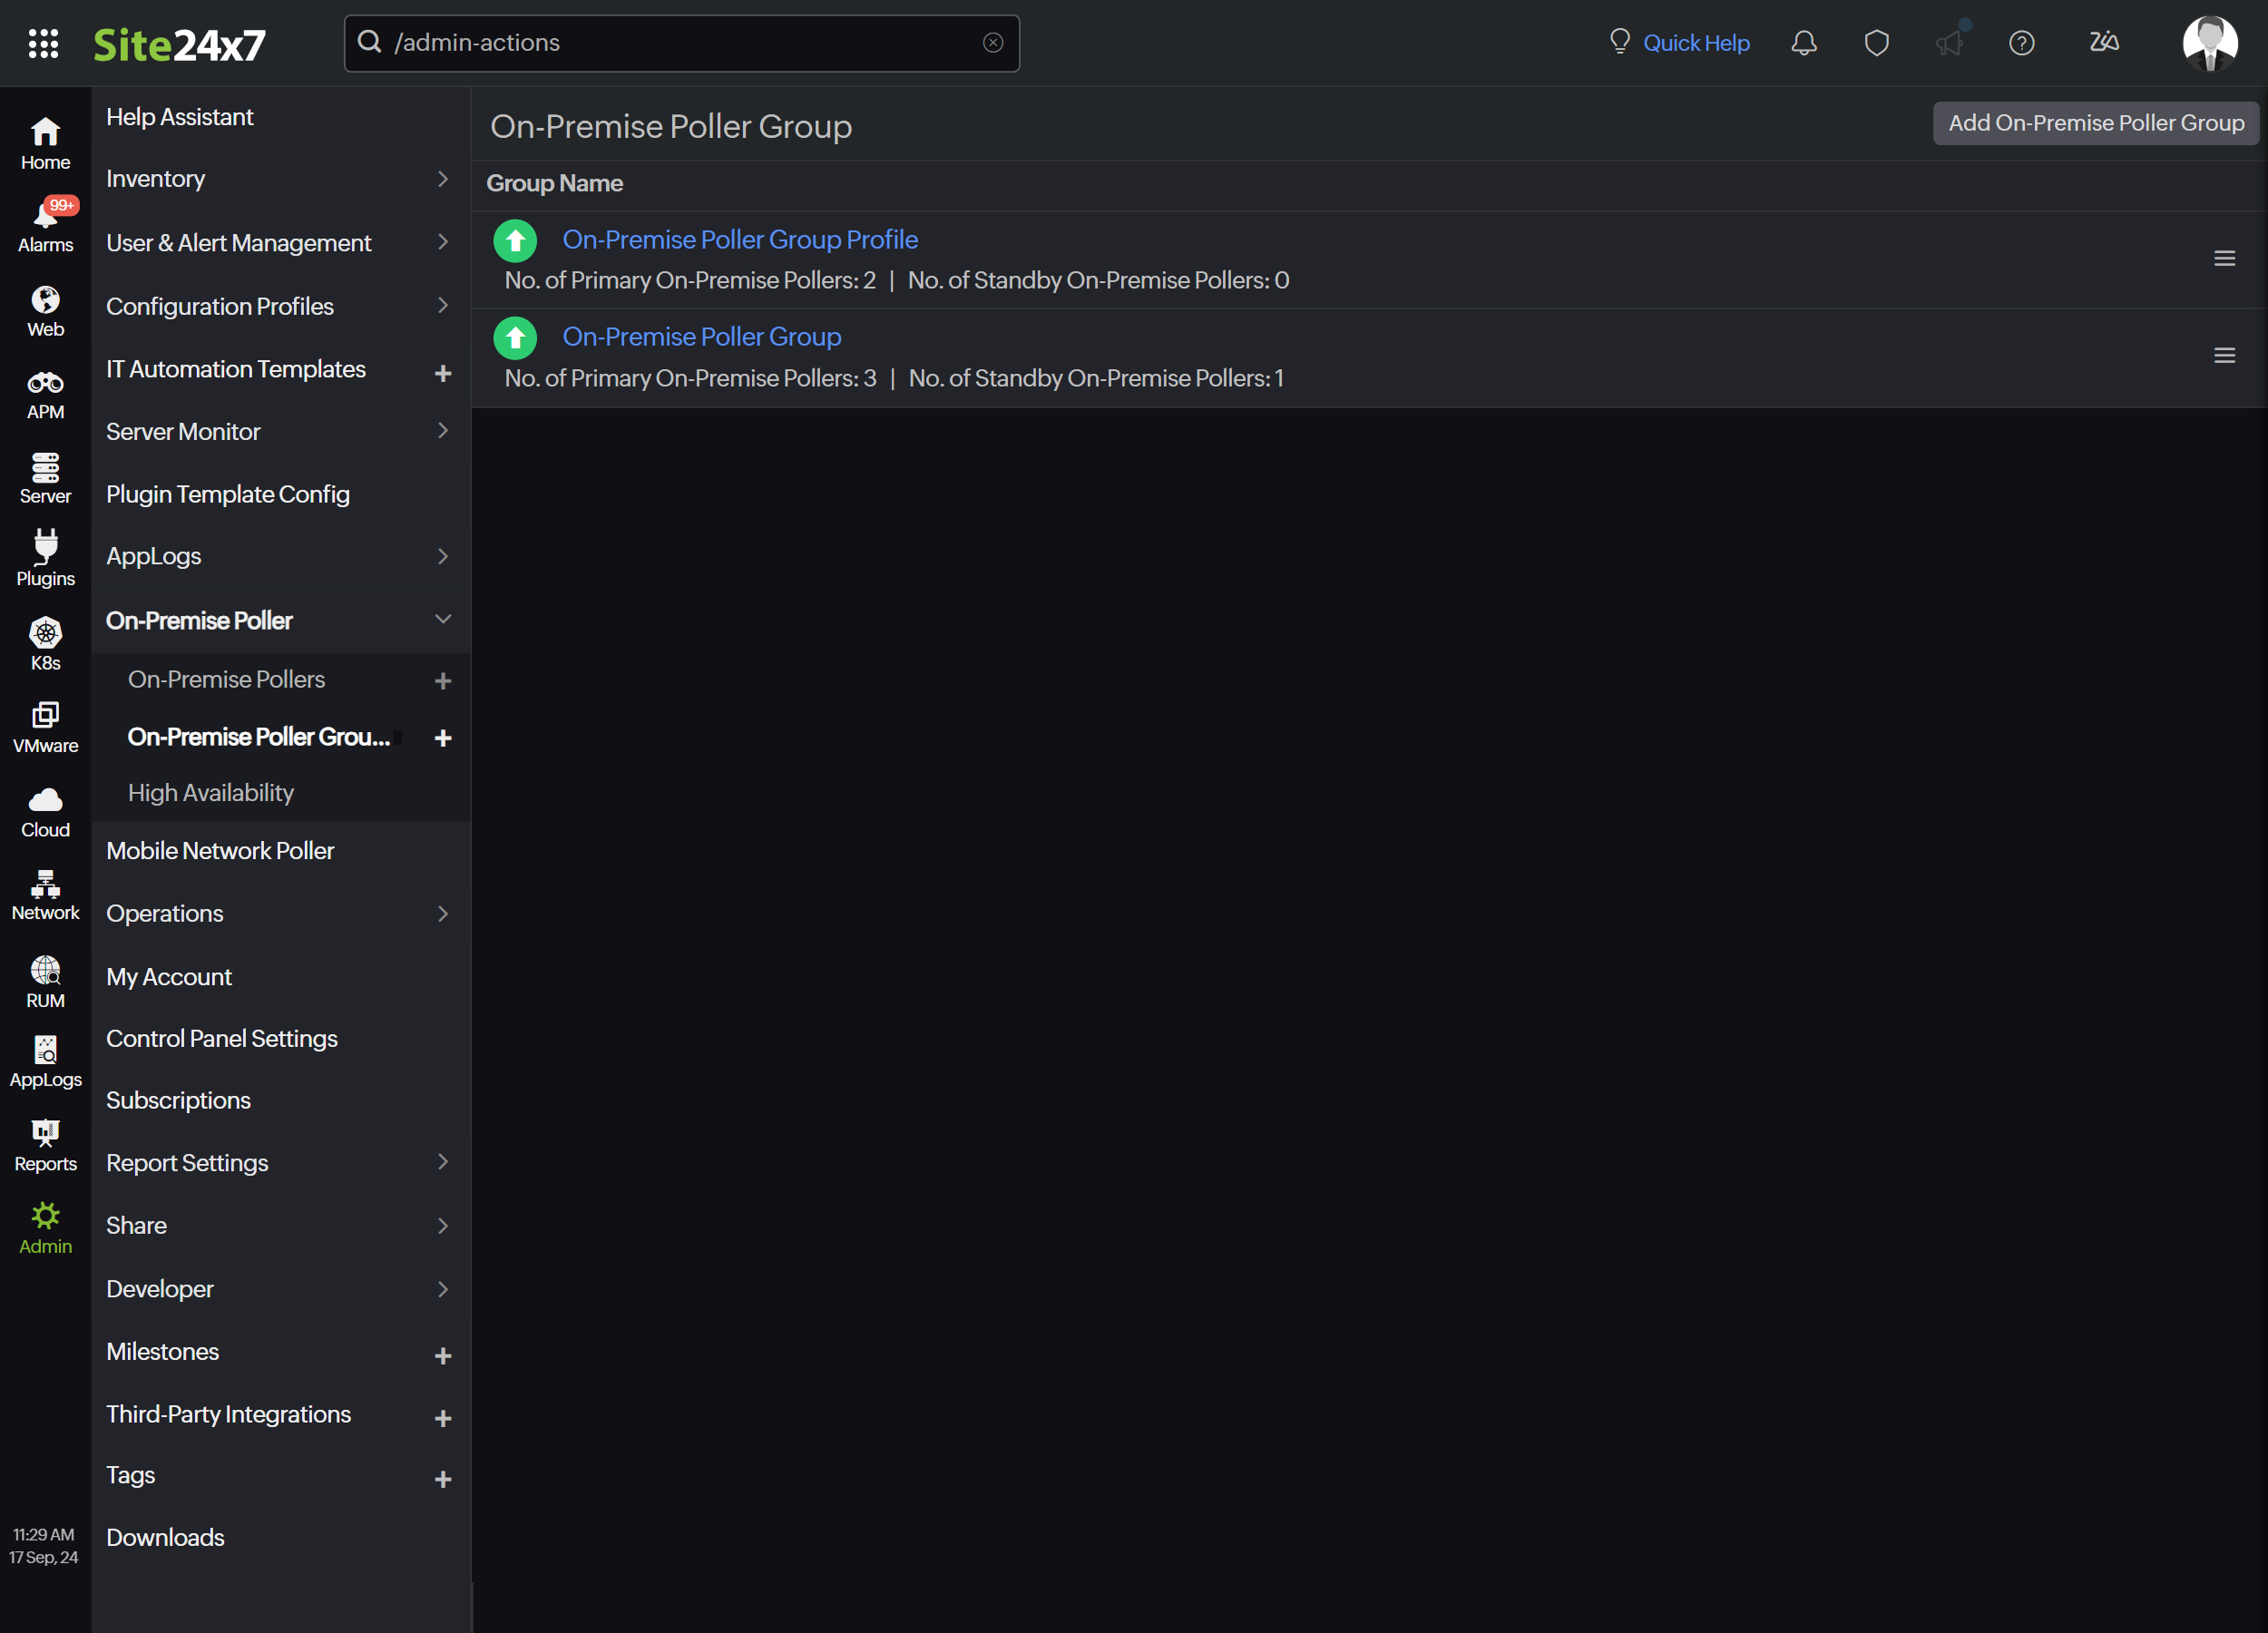
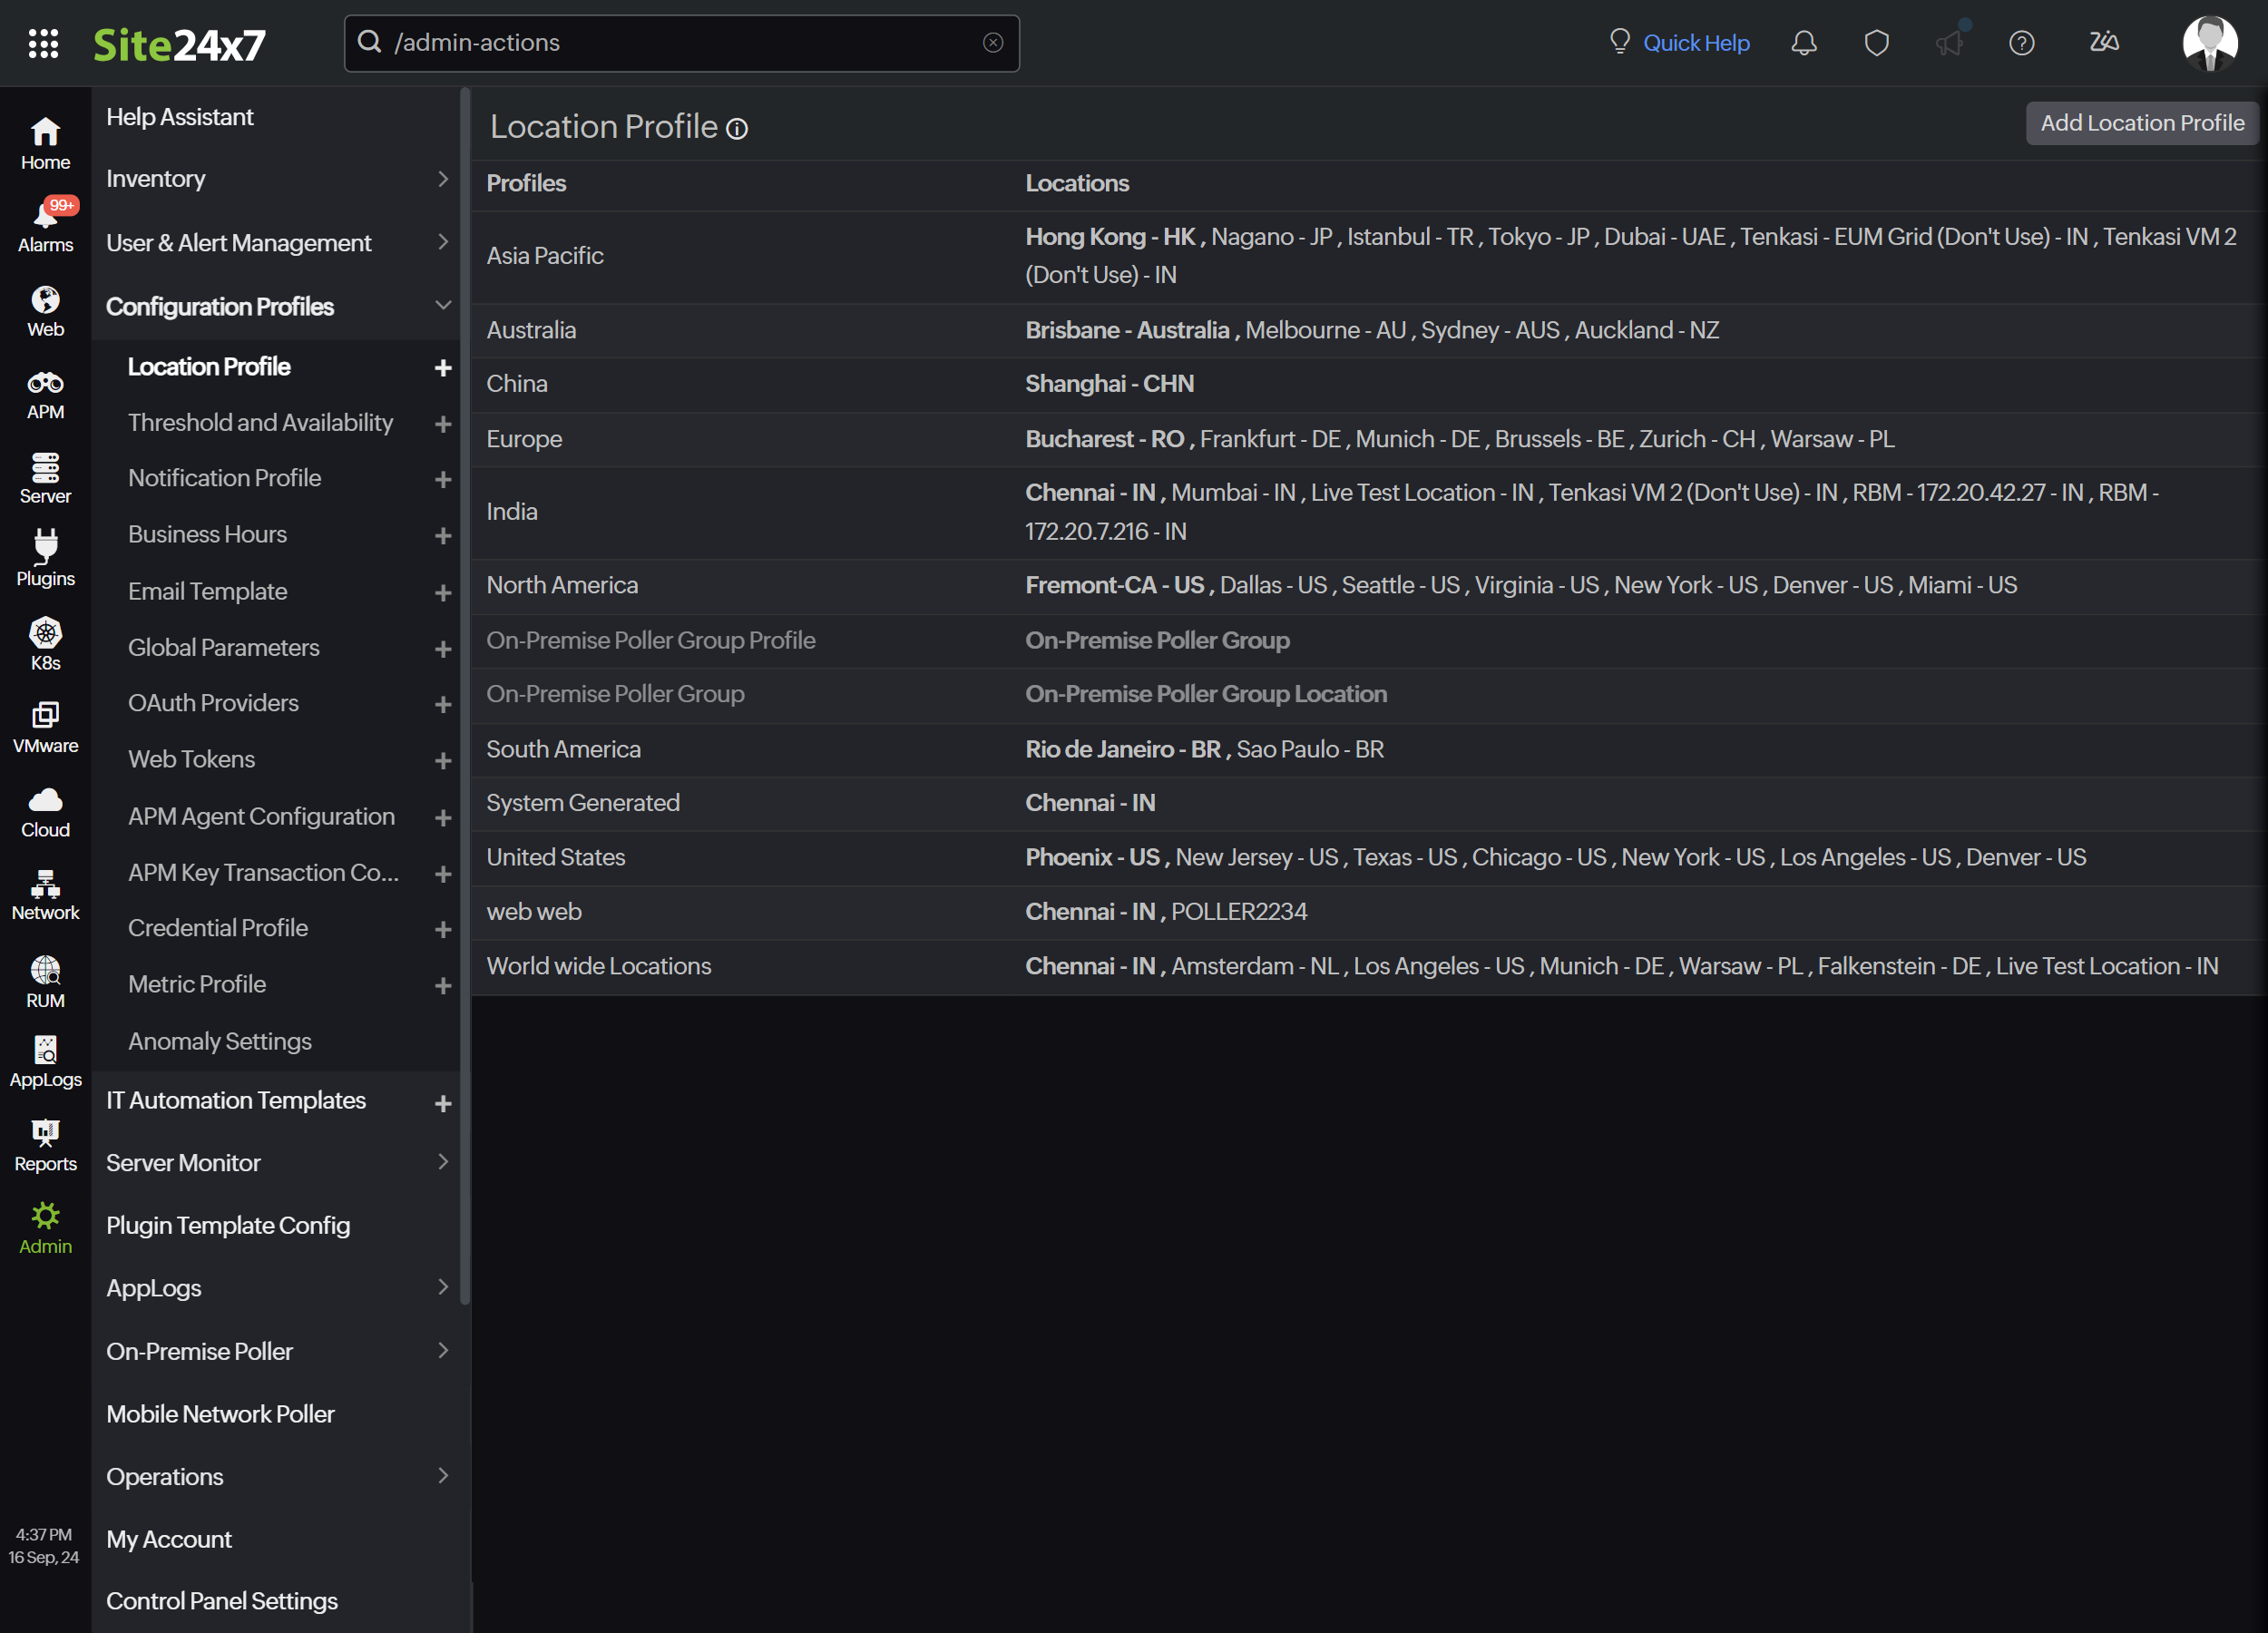
Location Profile: If you add an On-Premise Poller to the group, only the On-Premise Poller Group will be listed, and the individual On-Premise Poller associated with it will not be visible in the Location Profile list.
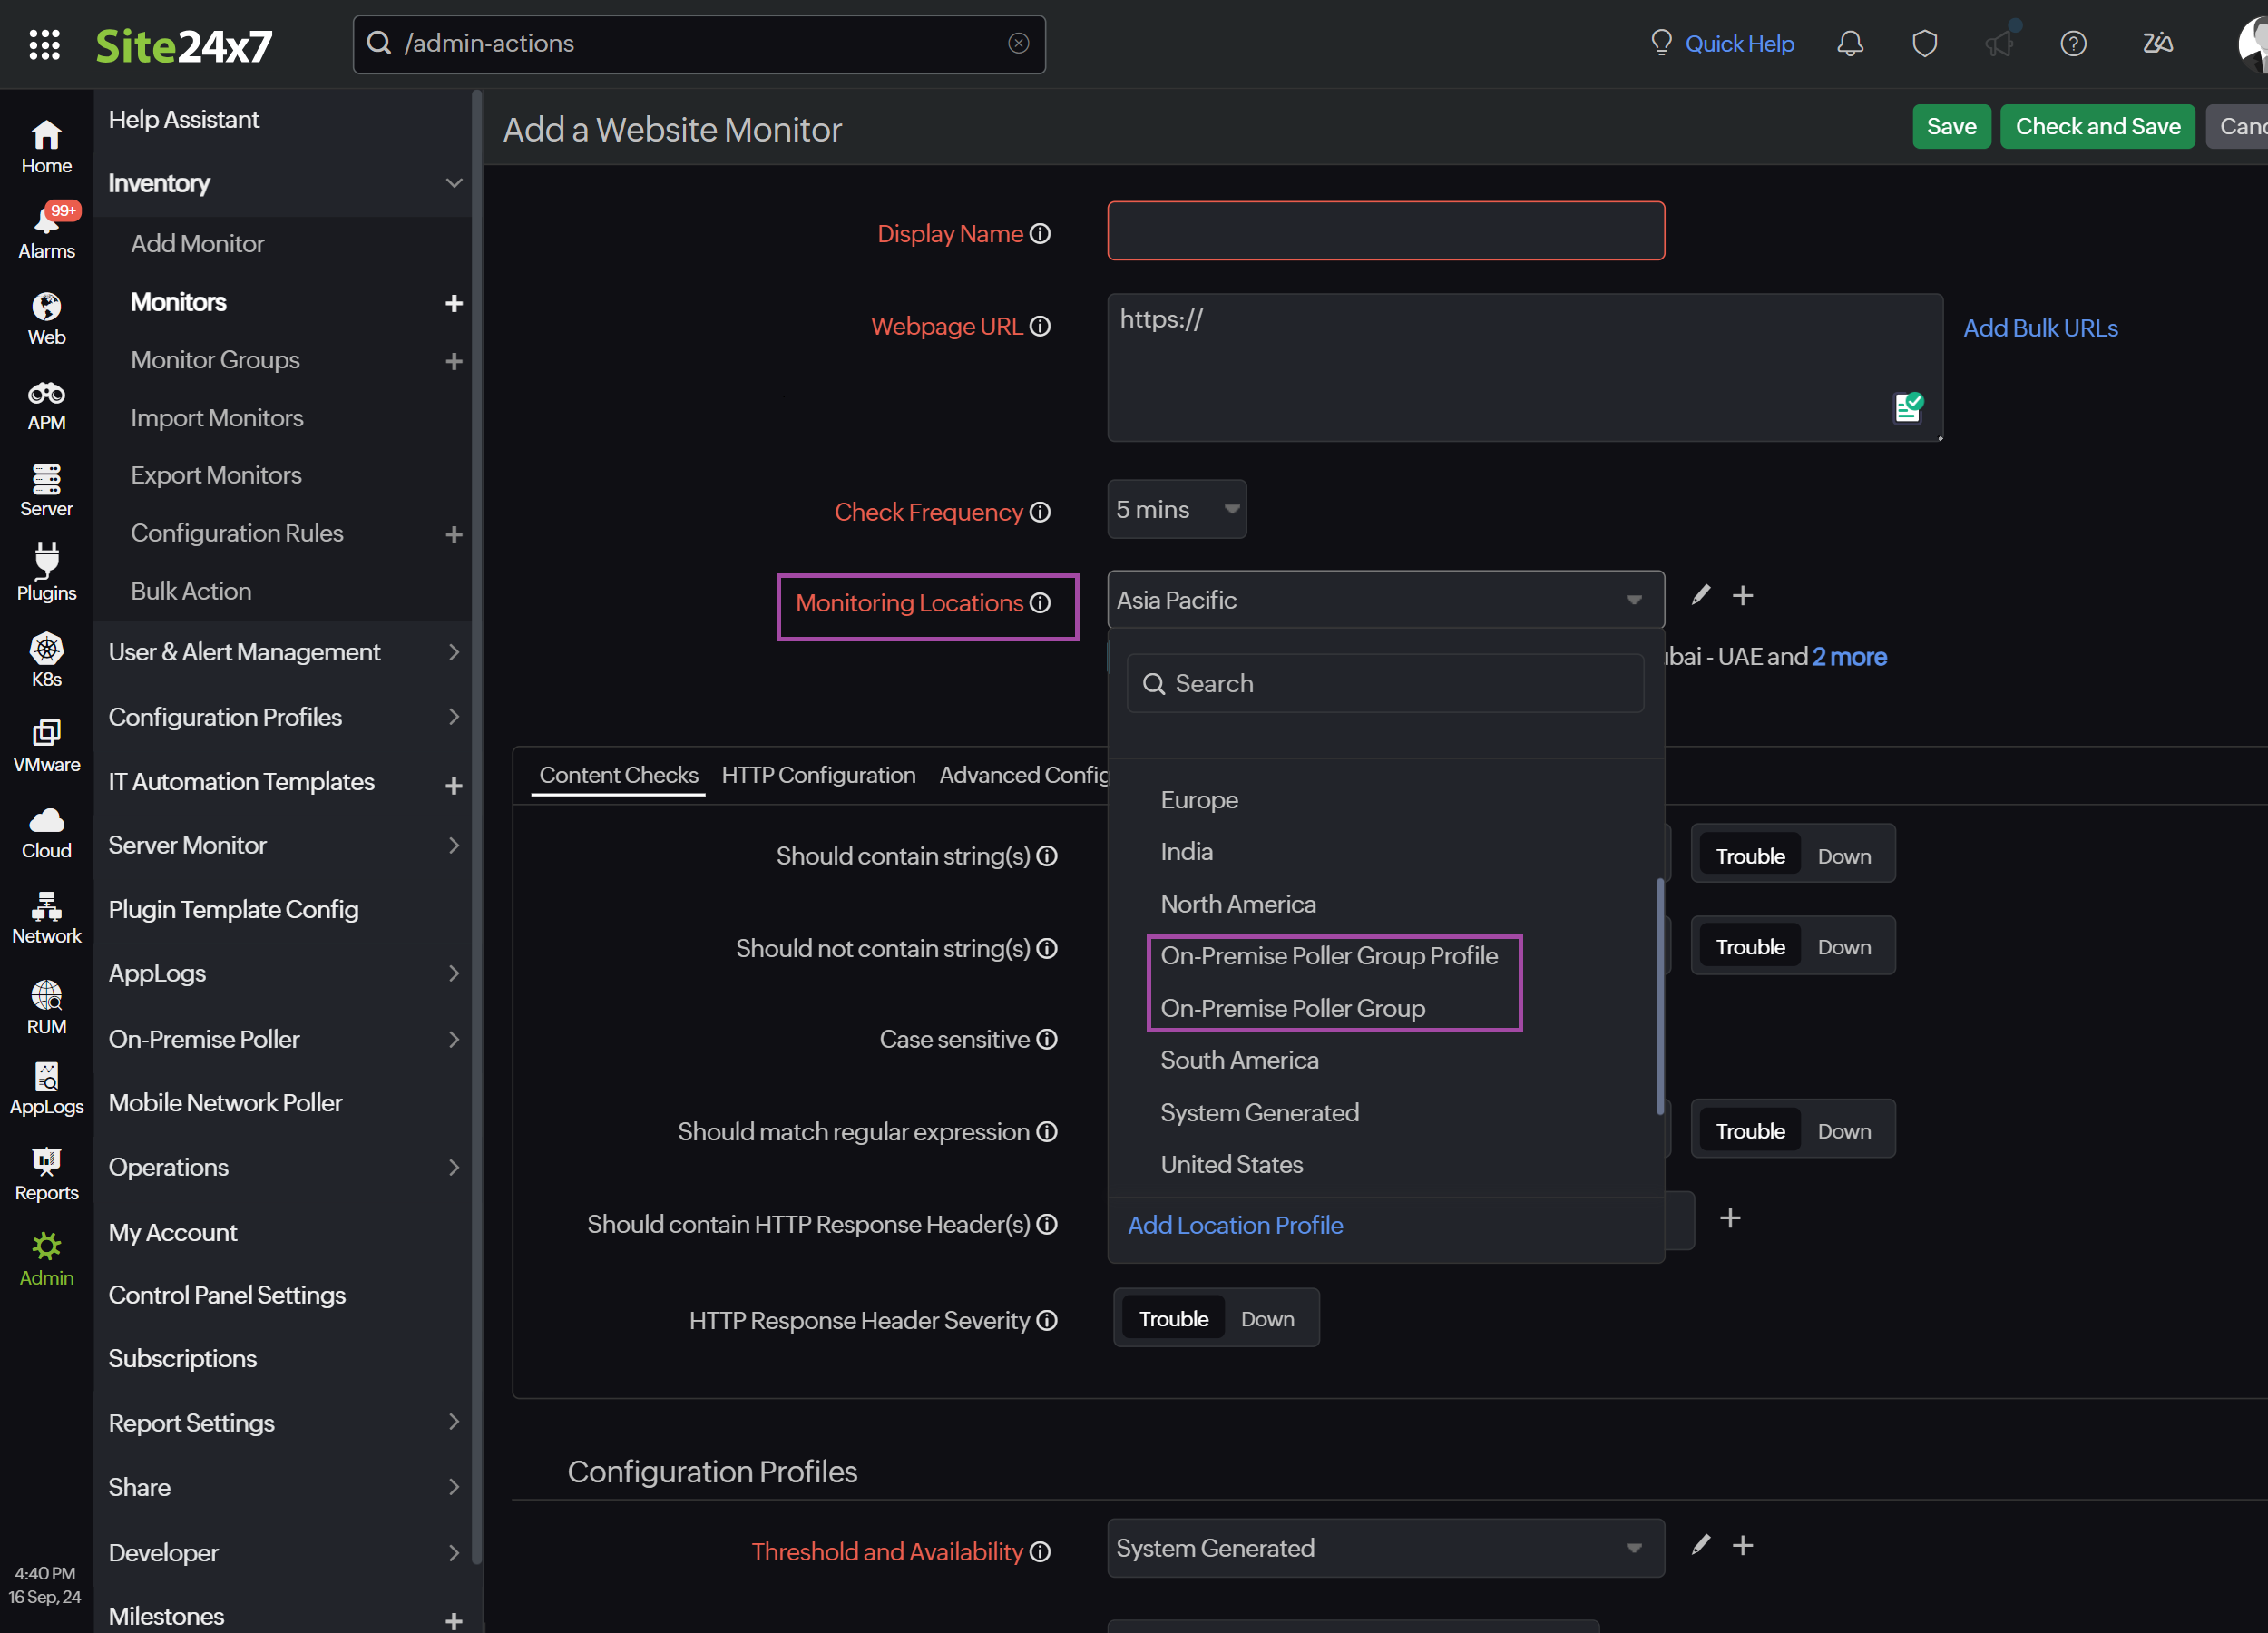
MSP admins can allow their customers to choose the On-Premise Poller Group as their monitoring location by following these steps:
- Select the customer name from the drop-down menu in the configuration profile. When this option is selected, the On-Premise Poller Group will be propagated to the selected customers.
- When adding a monitor, the customer can choose the On-Premise Poller Group as their monitoring location. The screenshot below shows the Monitoring Locations drop-down listing the On-Premise Poller Group for the MSP customer.
Editing an On-Premise Poller Group
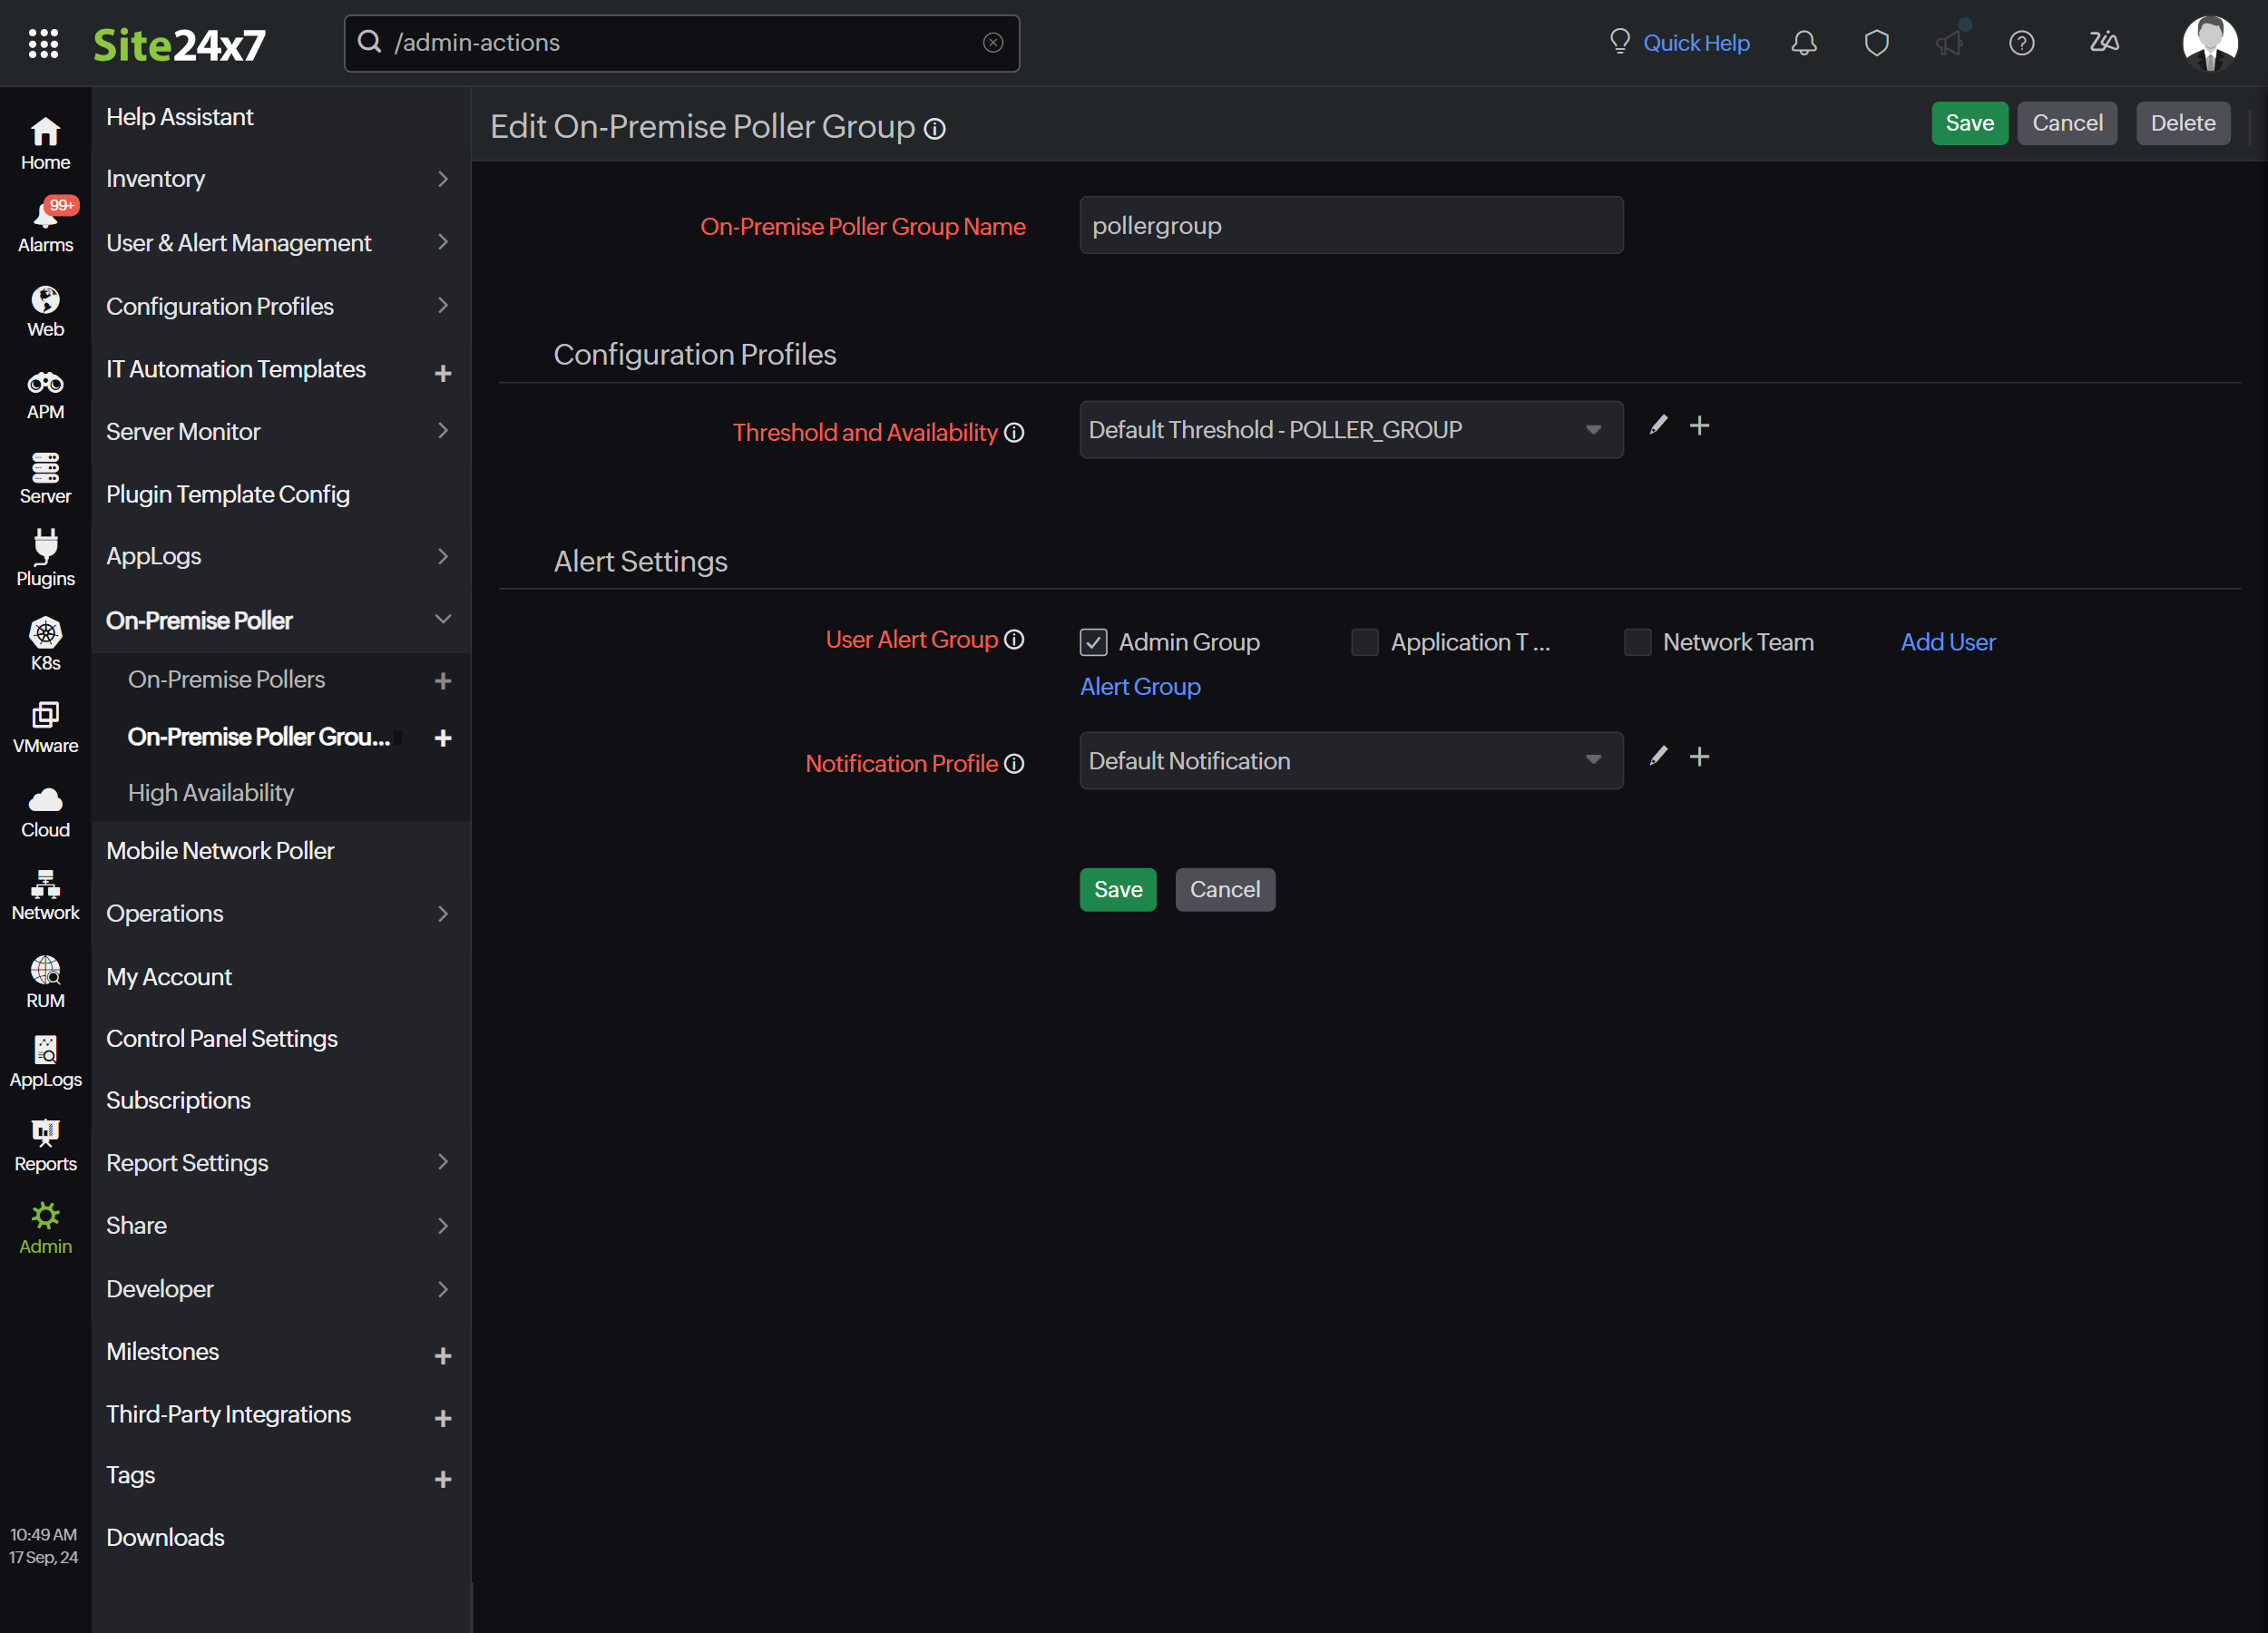
You can edit an On-Premise Poller Group to update its display name and make configuration changes. For this:
- Go to Admin > On-Premise Poller > On-Premise Poller Group.
- From the list of On-Premise Poller Groups, click the hamburger icon
 next to the desired On-Premise Poller Group and click Edit.
 - On the Edit On-Premise Poller page, you can edit the On-Premise Poller Group Name and User Alert Group details.
Adding a new On-Premise Poller to an On-Premise Poller Group
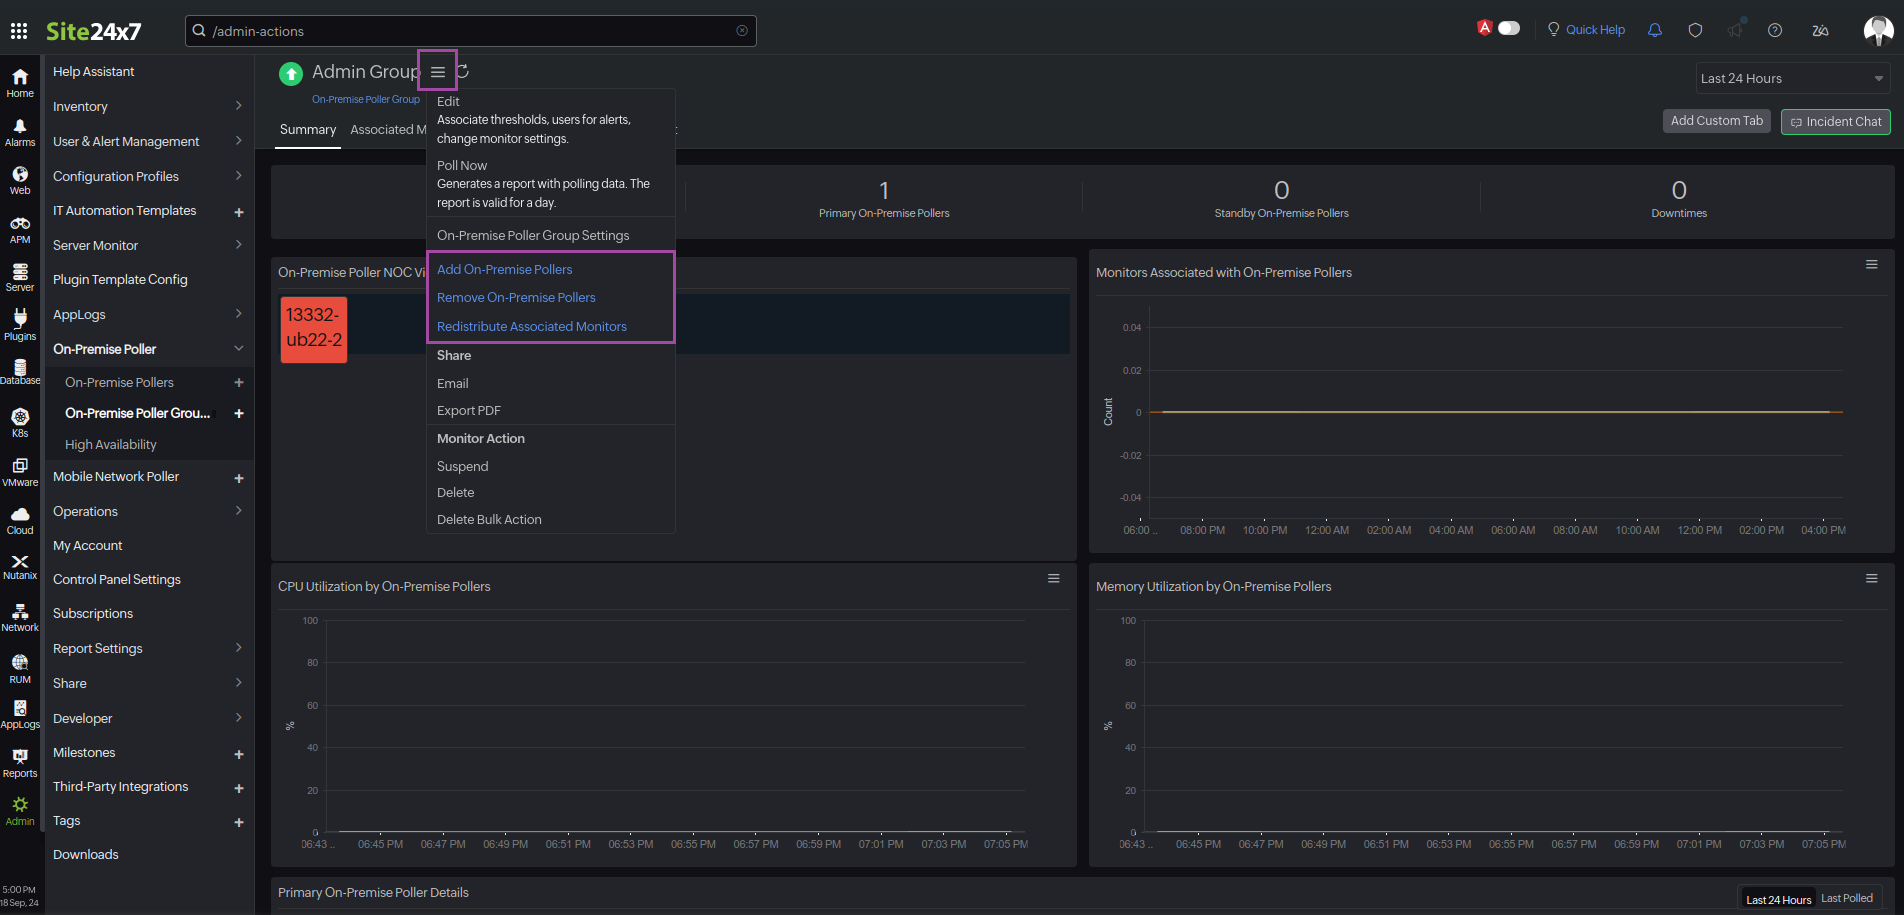
To add a new On-Premise Poller to the On-Premise Poller Group, follow the steps below:
- Go to Admin > On-Premise Poller > On-Premise Poller Group.
- From the list of On-Premise Poller Groups, choose the On-Premise Poller Group that you want to edit.
- Click the hamburger icon
 next to the desired On-Premise Poller Group and click Add On-Premise Pollers.
 - In the window that opens, choose the On-Premise Poller that you want to add and click Update.
Removing On-Premise Pollers from an On-Premise Poller Group
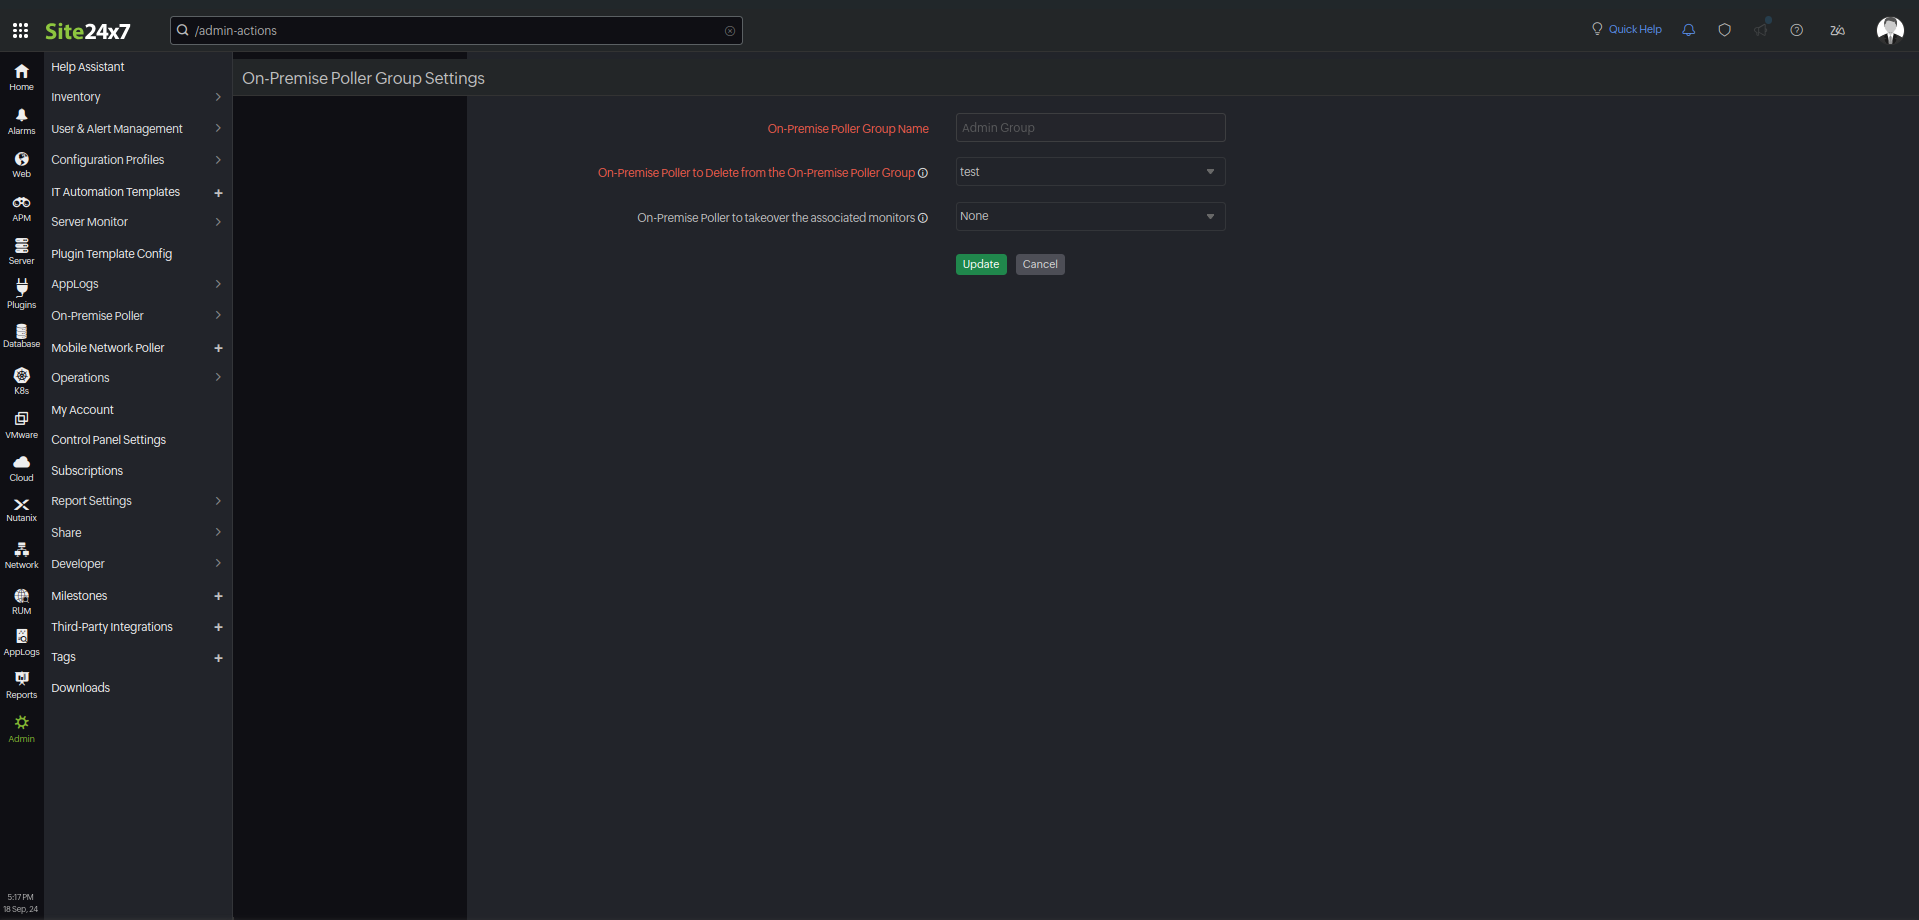
To remove an On-Premise Poller from an On-Premise Poller Group, follow the steps below:
- Go to Admin > On-Premise Poller > On-Premise Poller Group.
- From the list of On-Premise Poller Groups, choose the On-Premise Poller Group that you want to edit.
- Click the hamburger icon
 next to the desired On-Premise Poller Group and click Remove On-Premise Pollers.
 - On the On-Premise Poller Group Settings page, you can update the following settings:
- On-Premise Poller to delete from the On-Premise Poller Group: Select the On-Premise Poller that you want to delete from the On-Premise Poller Group from the drop-down menu.
- On-Premise Poller to take over the associated monitors: If the On-Premise Poller you are deleting has an attached monitor, you can either select another On-Premise Poller from the drop-down list to take over the monitors or choose Redistribute among On-Premise Pollers to distribute the load among existing primary On-Premise Pollers. If there are no attached monitors to the On-Premise Poller you are deleting, you can delete it directly.
- Click Update.
Redistributing monitors within an On-Premise Poller Group
Use the Redistribute Associated Monitors option to redistribute monitoring tasks within the On-Premise Poller Group, balancing workloads and enhancing efficiency.
To do this:
- Go to Admin > On-Premise Poller > On-Premise Poller Group.
- From the list of On-Premise Poller Groups, choose the On-Premise Poller Group that you want to edit.
- Click the hamburger icon
 next to the desired On-Premise Poller Group and click Redistribute Associated Monitors.
You can use this option in the following scenarios:
- When adding a new On-Premise Poller, use this option to balance the monitoring load among the On-Premise Pollers in the group.
- When a primary On-Premise Poller is down and no standby is configured, use this option to redistribute the workload of the monitors previously handled by the downed On-Premise Poller.
- When deleting an On-Premise Poller, use this option as described in this step to redistribute the workload of the monitors previously handled by the On-Premise Poller being removed.
You can use the Redistribute Associated Monitors option only once every five minutes.
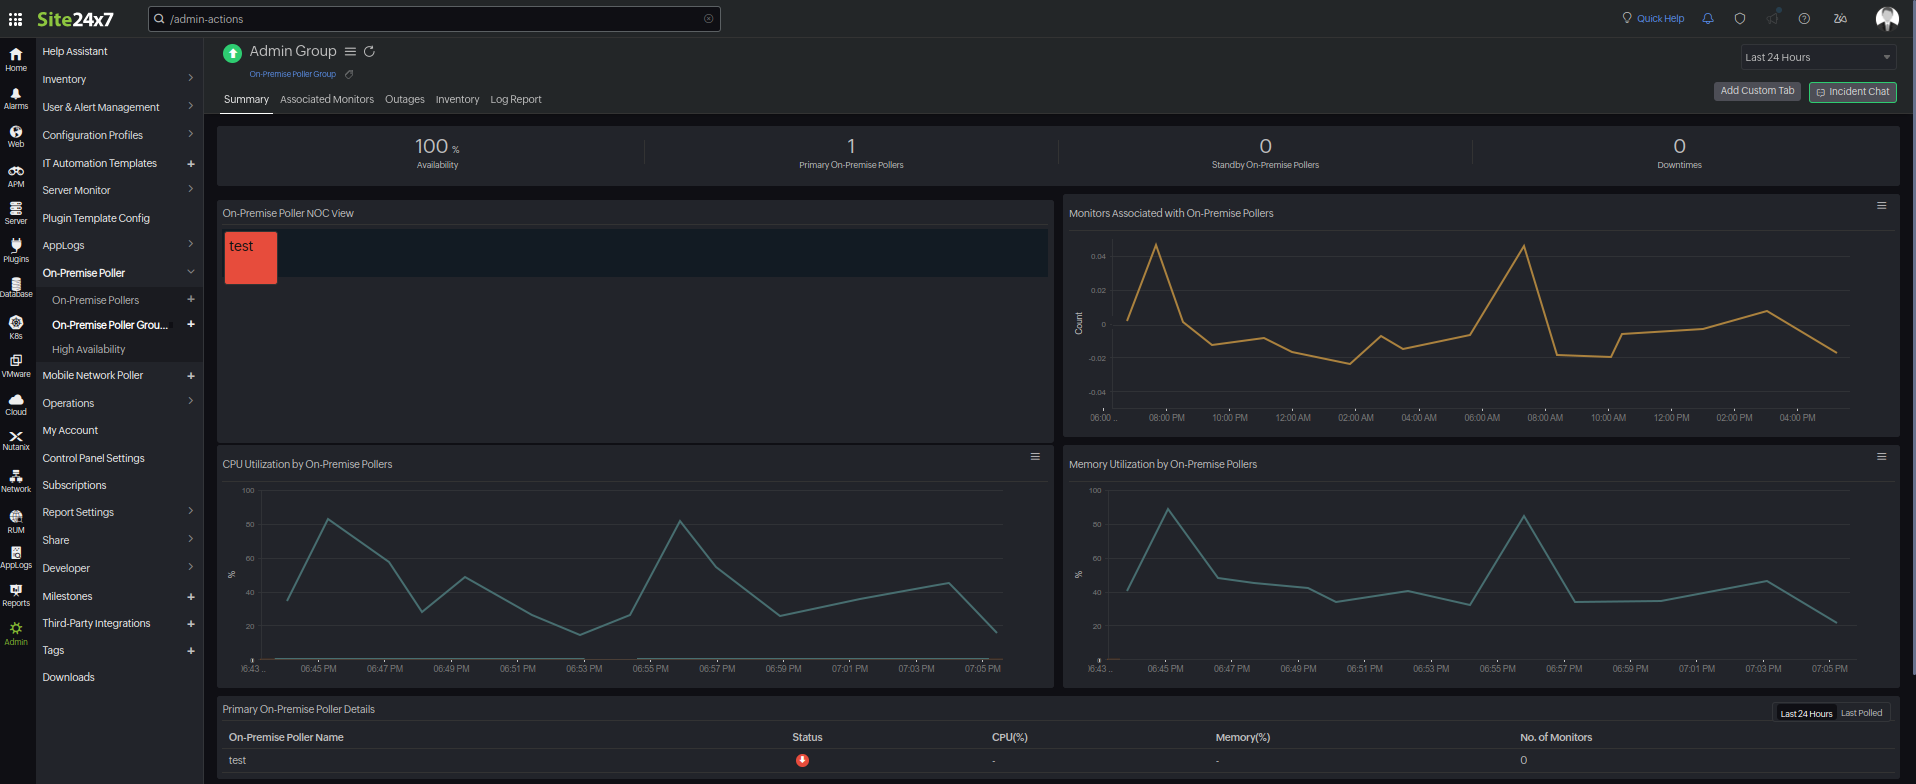
Summary and Associated Monitors metrics
Summary:
| Metrics | Description |
| Monitors Associated with On-Premise Pollers | The count of monitors associated with each On-Premise Poller |
| CPU Utilization by On-Premise Pollers | The percentage of total CPU capacity currently used by On-Premise Pollers |
| Memory Utilization by On-Premise Pollers | The percentage of total memory capacity currently used by On-Premise Pollers |
| Primary On-Premise Poller Details | The list of primary On-Premise Pollers with their Status, CPU (%), Memory (%), and number of monitors |
| Standby On-Premise Poller Details | The list of standby On-Premise Pollers with their Status, CPU (%), Memory (%), and number of monitors |
| Latest Events | The list of events includes actions such as adding or removing On-Premise Pollers, handling removals by redistribution or takeover, monitoring redistribution, and High Availability actions. |
This event data provides a comprehensive log of events related to the management and operation of On-Premise Pollers in the On-Premise Poller Group.
The events include:
- On-Premise Poller addition: Records when a new On-Premise Poller is added to the On-Premise Poller Group.
- On-Premise Poller removal: Records instances when an On-Premise Poller is removed. This can occur through:
- Removal by redistribution: When an On-Premise Poller is removed and its monitoring tasks are redistributed among the remaining primary On-Premise Pollers.
- Removal with takeover: When an On-Premise Poller is removed and its responsibilities are taken over by another On-Premise Poller.
- Monitor redistribution: Records actions related to the redistribution of monitoring tasks among On-Premise Pollers.
- High Availability actions: Records actions related to High Availability On-Premise Poller operations.
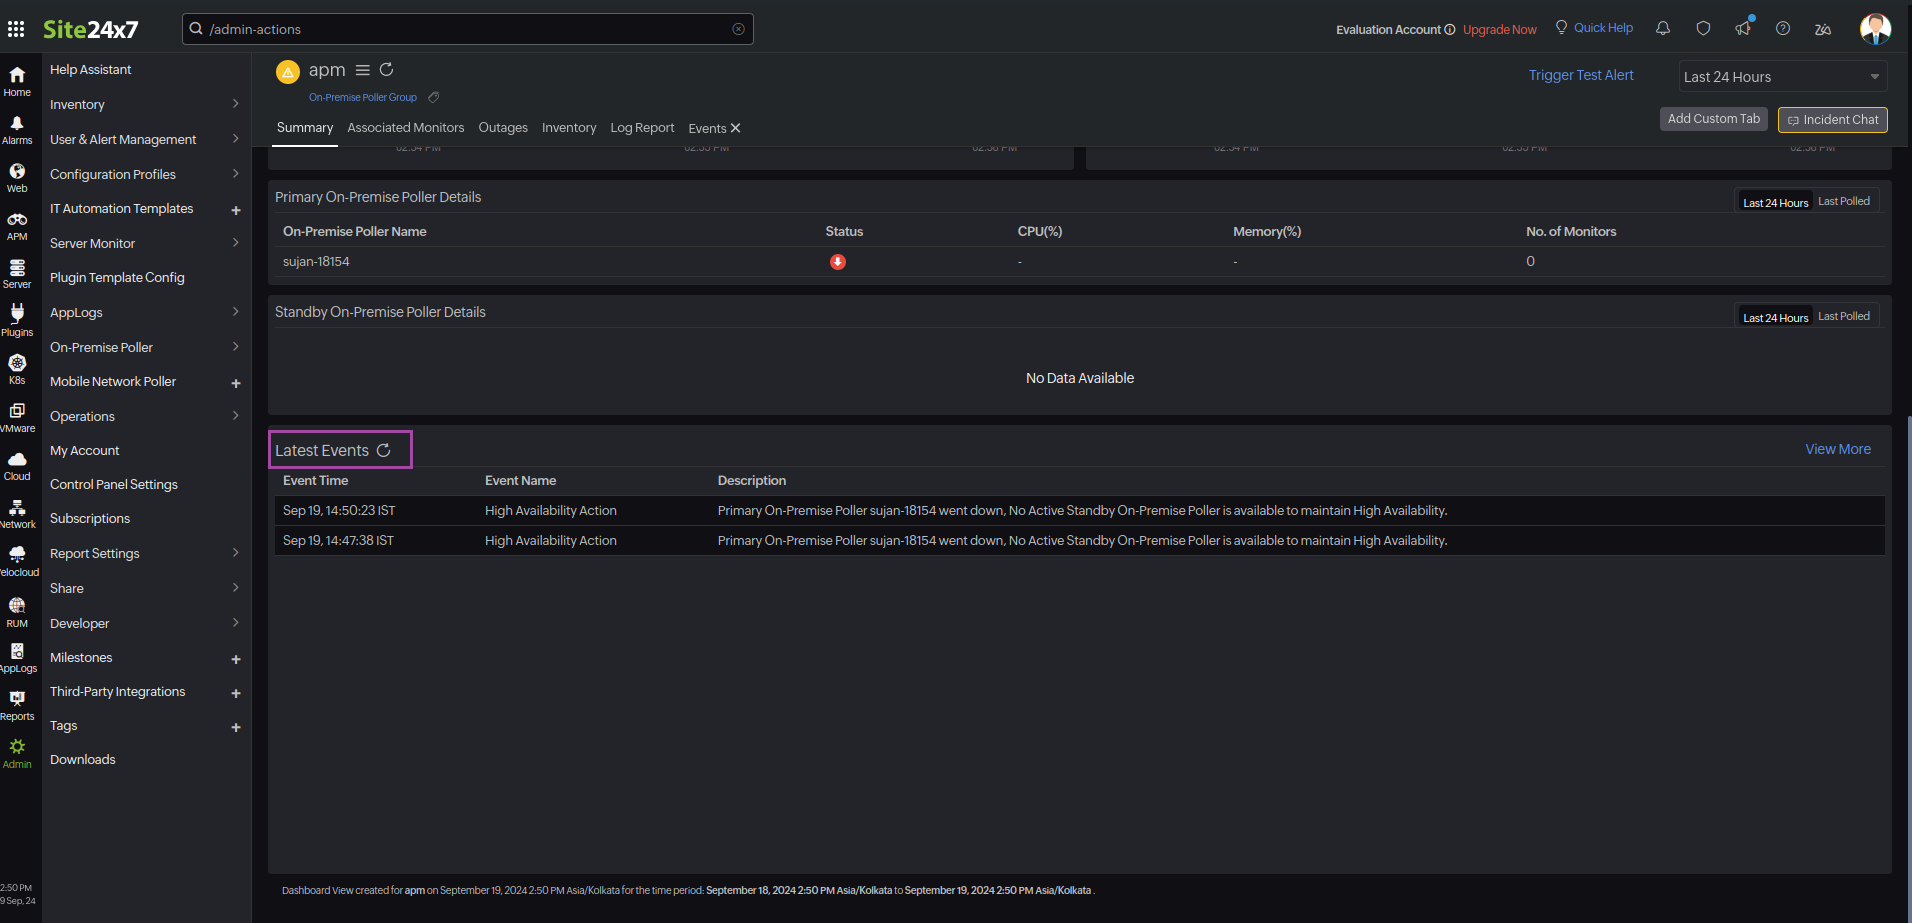
You can view and query this data, which creates an On-Premise Poller Group Events log type in AppLogs.
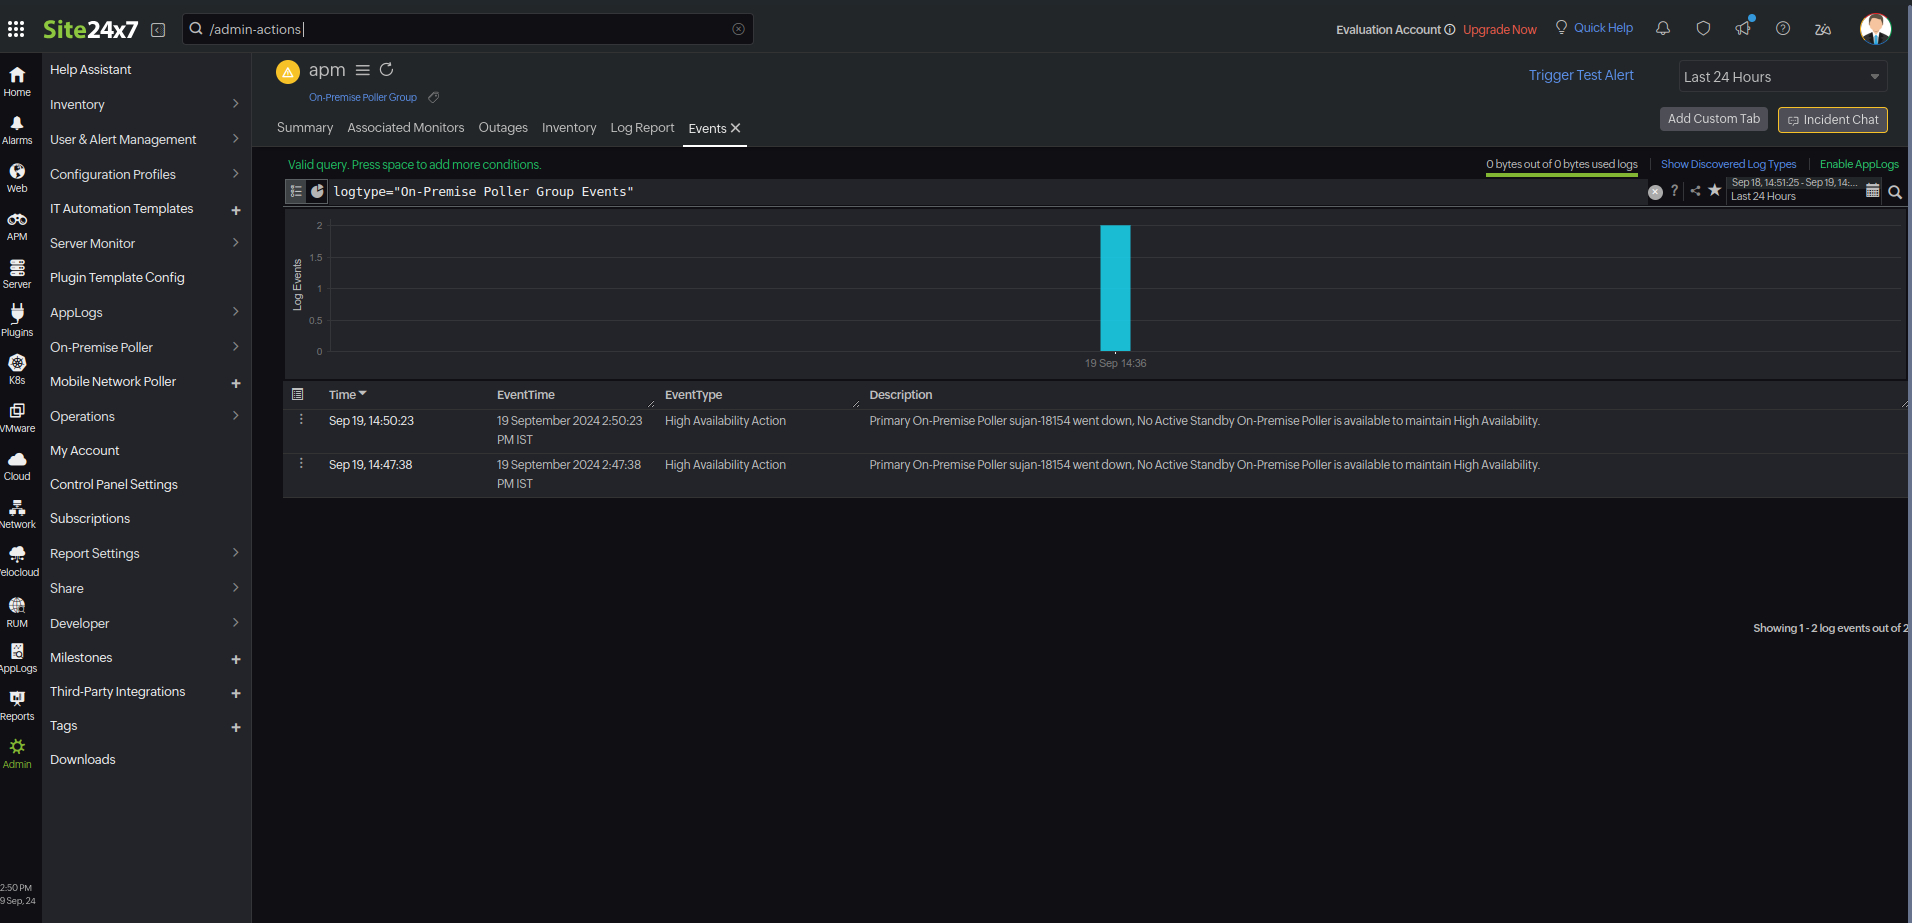
AppLogs is Site24x7's log management service that enables you to upload and manage logs from your entire infrastructure on a single dashboard. Using a user-friendly query language, you can filter out invalid values and quickly gain actionable insights.
Associated Monitors:
This tab lists the associated monitors with their Monitor Display Name, Status, and Last Polled details.
If either a primary or standby On-Premise Poller goes down, the On-Premise Poller Group will enter a trouble state.
Migrate to the On-Premise Poller Group
Learn more about migrating existing On-Premise Pollers to an On-Premise Poller Group.
Related articles
-
On this page
- Prerequisites for adding an On-Premise Poller to an On-Premise Poller Group
- Supported monitors
- Adding an On-Premise Poller Group
- Location Profile
- Editing an On-Premise Poller Group
- Adding a new On-Premise Poller to an On-Premise Poller Group
- Removing On-Premise Pollers from an On-Premise Poller Group
- Redistributing monitors within an On-Premise Poller Group
- Summary and Associated Monitors metrics
- Migrate to the On-Premise Poller Group
