
Add a BGP Route monitor
A BGP Route monitor helps you continuously track BGP routing information for your IP Prefix across the internet. It validates the Origin Autonomous System (AS) and detects unexpected routing changes such as route hijacks, route leaks, AS path changes, and route flapping before they impact your users.
BGP Route monitoring enables network administrators, ISPs, cloud providers, and enterprises to maintain routing integrity, improve network reliability, and quickly respond to routing anomalies that could affect application availability and connectivity.
How does this work?
When you configure a BGP Route Monitor, Site24x7 periodically collects BGP routing information for the configured IP prefix from multiple internet vantage points.
During each monitoring cycle, Site24x7:
- Collects BGP routing information for the configured IP prefix from multiple Internet vantage points.
- Verifies whether the prefix is announced by the configured Origin AS.
- Detects routing anomalies such as:
- Route hijacking
- Route leaks
- AS path changes
- Route flapping
- RPKI validation issues
- Triggers alerts when routing changes violate the configured thresholds or when the observed Origin AS differs from the configured Origin AS.
This allows you to identify internet routing issues before they affect application availability or user connectivity.
Use case
Use case 1: Detect an unexpected route announcement
An enterprise's customer portal uses an IP prefix that is expected to originate from AS64500. Due to an ISP misconfiguration, the same prefix is advertised from a different AS, causing slow or intermittent connectivity for some users.
Without BGP monitoring, the issue may go unnoticed because the web server itself remains healthy.
Site24x7 detects that the observed Origin AS differs from the configured Origin AS and alerts administrators, enabling them to investigate the routing issue before it impacts more users.
Use case 2: Monitor prefixes announced through different ASNs
An enterprise may have IP prefixes announced through different ASNs, including provider-owned or leased ASNs. By creating BGP Route monitors with the appropriate IP Prefix and Origin AS combinations, administrators can validate the prefix against its expected Origin AS.
If Site24x7 observes a different Origin AS, it can identify the mismatch and alert administrators to investigate whether the route announcement is expected or unauthorized.
Add a BGP Route monitor
To add a BGP Route monitor follow the below steps:
- Log in to your Site24x7 account.
- Navigate to Admin > Inventory > Add Monitor.
- Select BGP Route, monitor.
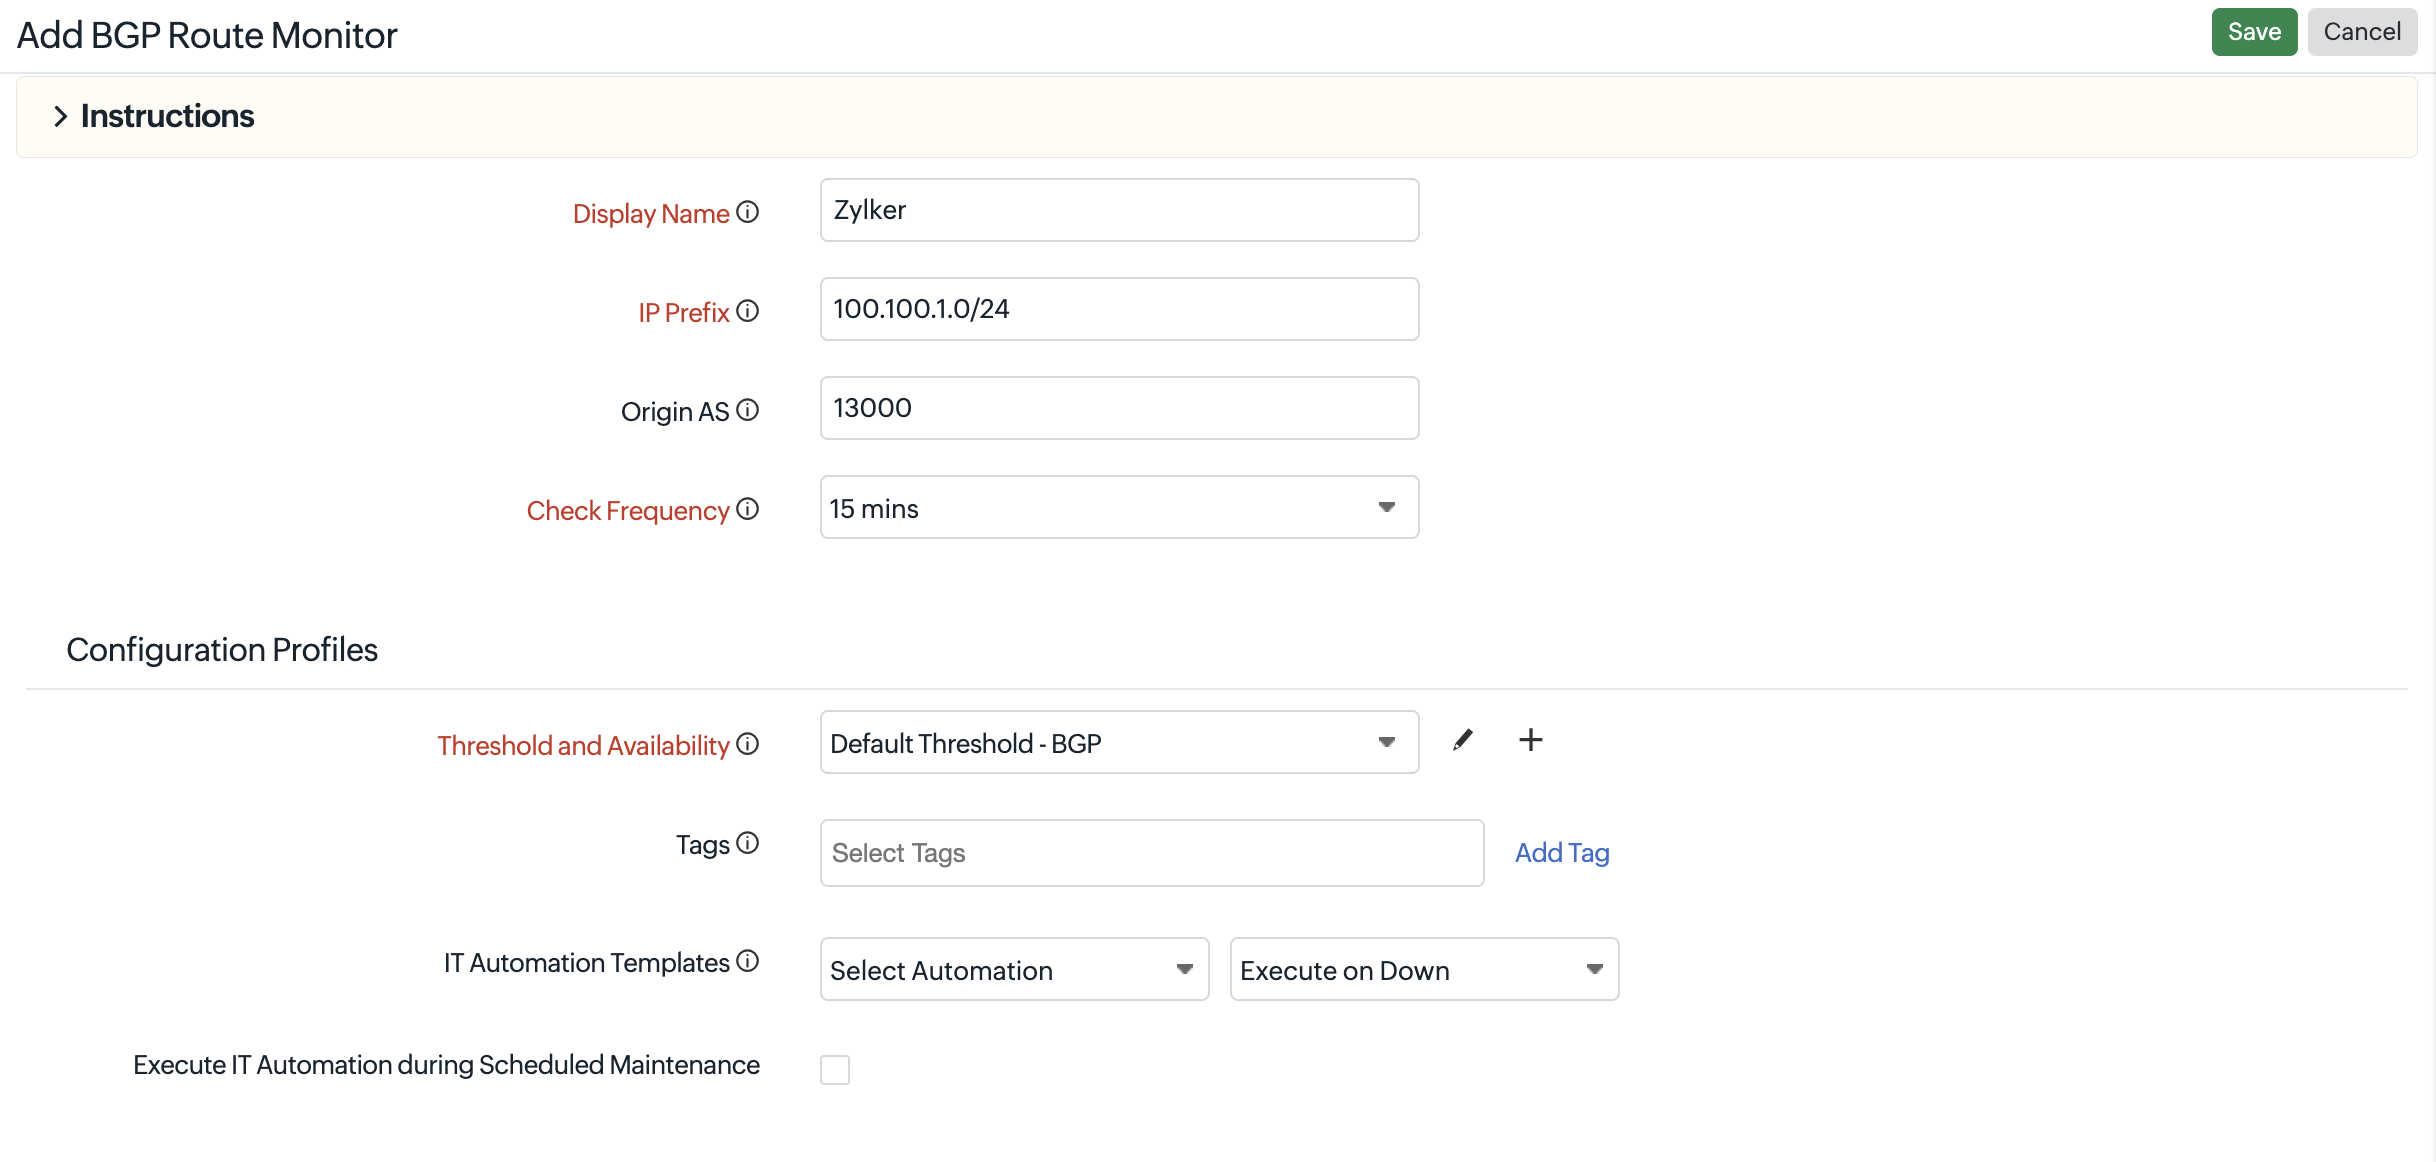
- Configure the following fields:
-
- Display Name: Enter a unique name to identify the BGP Route Monitor.
- IP Prefix: Enter the IP prefix in CIDR notation (for example, 192.0.2.0/24) that you want to monitor.
- Origin AS: Enter the expected Autonomous System Number (ASN) that originates the configured IP prefix. Site24x7 detects when the prefix is advertised from a different Origin AS.
NoteConfigure the correct Origin AS for the monitored IP Prefix. Site24x7 validates the observed Origin AS against the configured Origin AS and identifies unexpected changes that could indicate a routing anomaly.
- Check Frequency: Select how often Site24x7 checks the BGP routing information for the configured domain, the minimum frequency being 5 minutes.
NoteEnsure that the Origin AS corresponds to the AS expected to advertise the configured IP Prefix. This mapping enables Site24x7 to identify unexpected Origin AS changes that may indicate routing misconfigurations or unauthorized route announcements.
- Provide the details under the Configuration Profiles:
- Threshold and Availability: Select a threshold profile from the drop-down list, or choose the threshold and availability, and get notified when the resources cross the configured threshold. Learn more about adding threshold and availability.
- Tags: Associate your monitor with predefined Tag(s) to help organize and manage your monitors more creatively. Learn how to add Tags.
- IT Automation Template: Select an IT Automation template to automatically execute predefined actions when the monitor status changes. Learn more about IT Automation.
- Execute IT Automation During Scheduled Maintenance: Configuring a scheduled maintenance window lets you suppress alerts for specific IT resources during routine maintenance. Enable this option to execute the selected IT Automation template even when the monitor is under scheduled maintenance.
- Provide the details under Alert Settings:
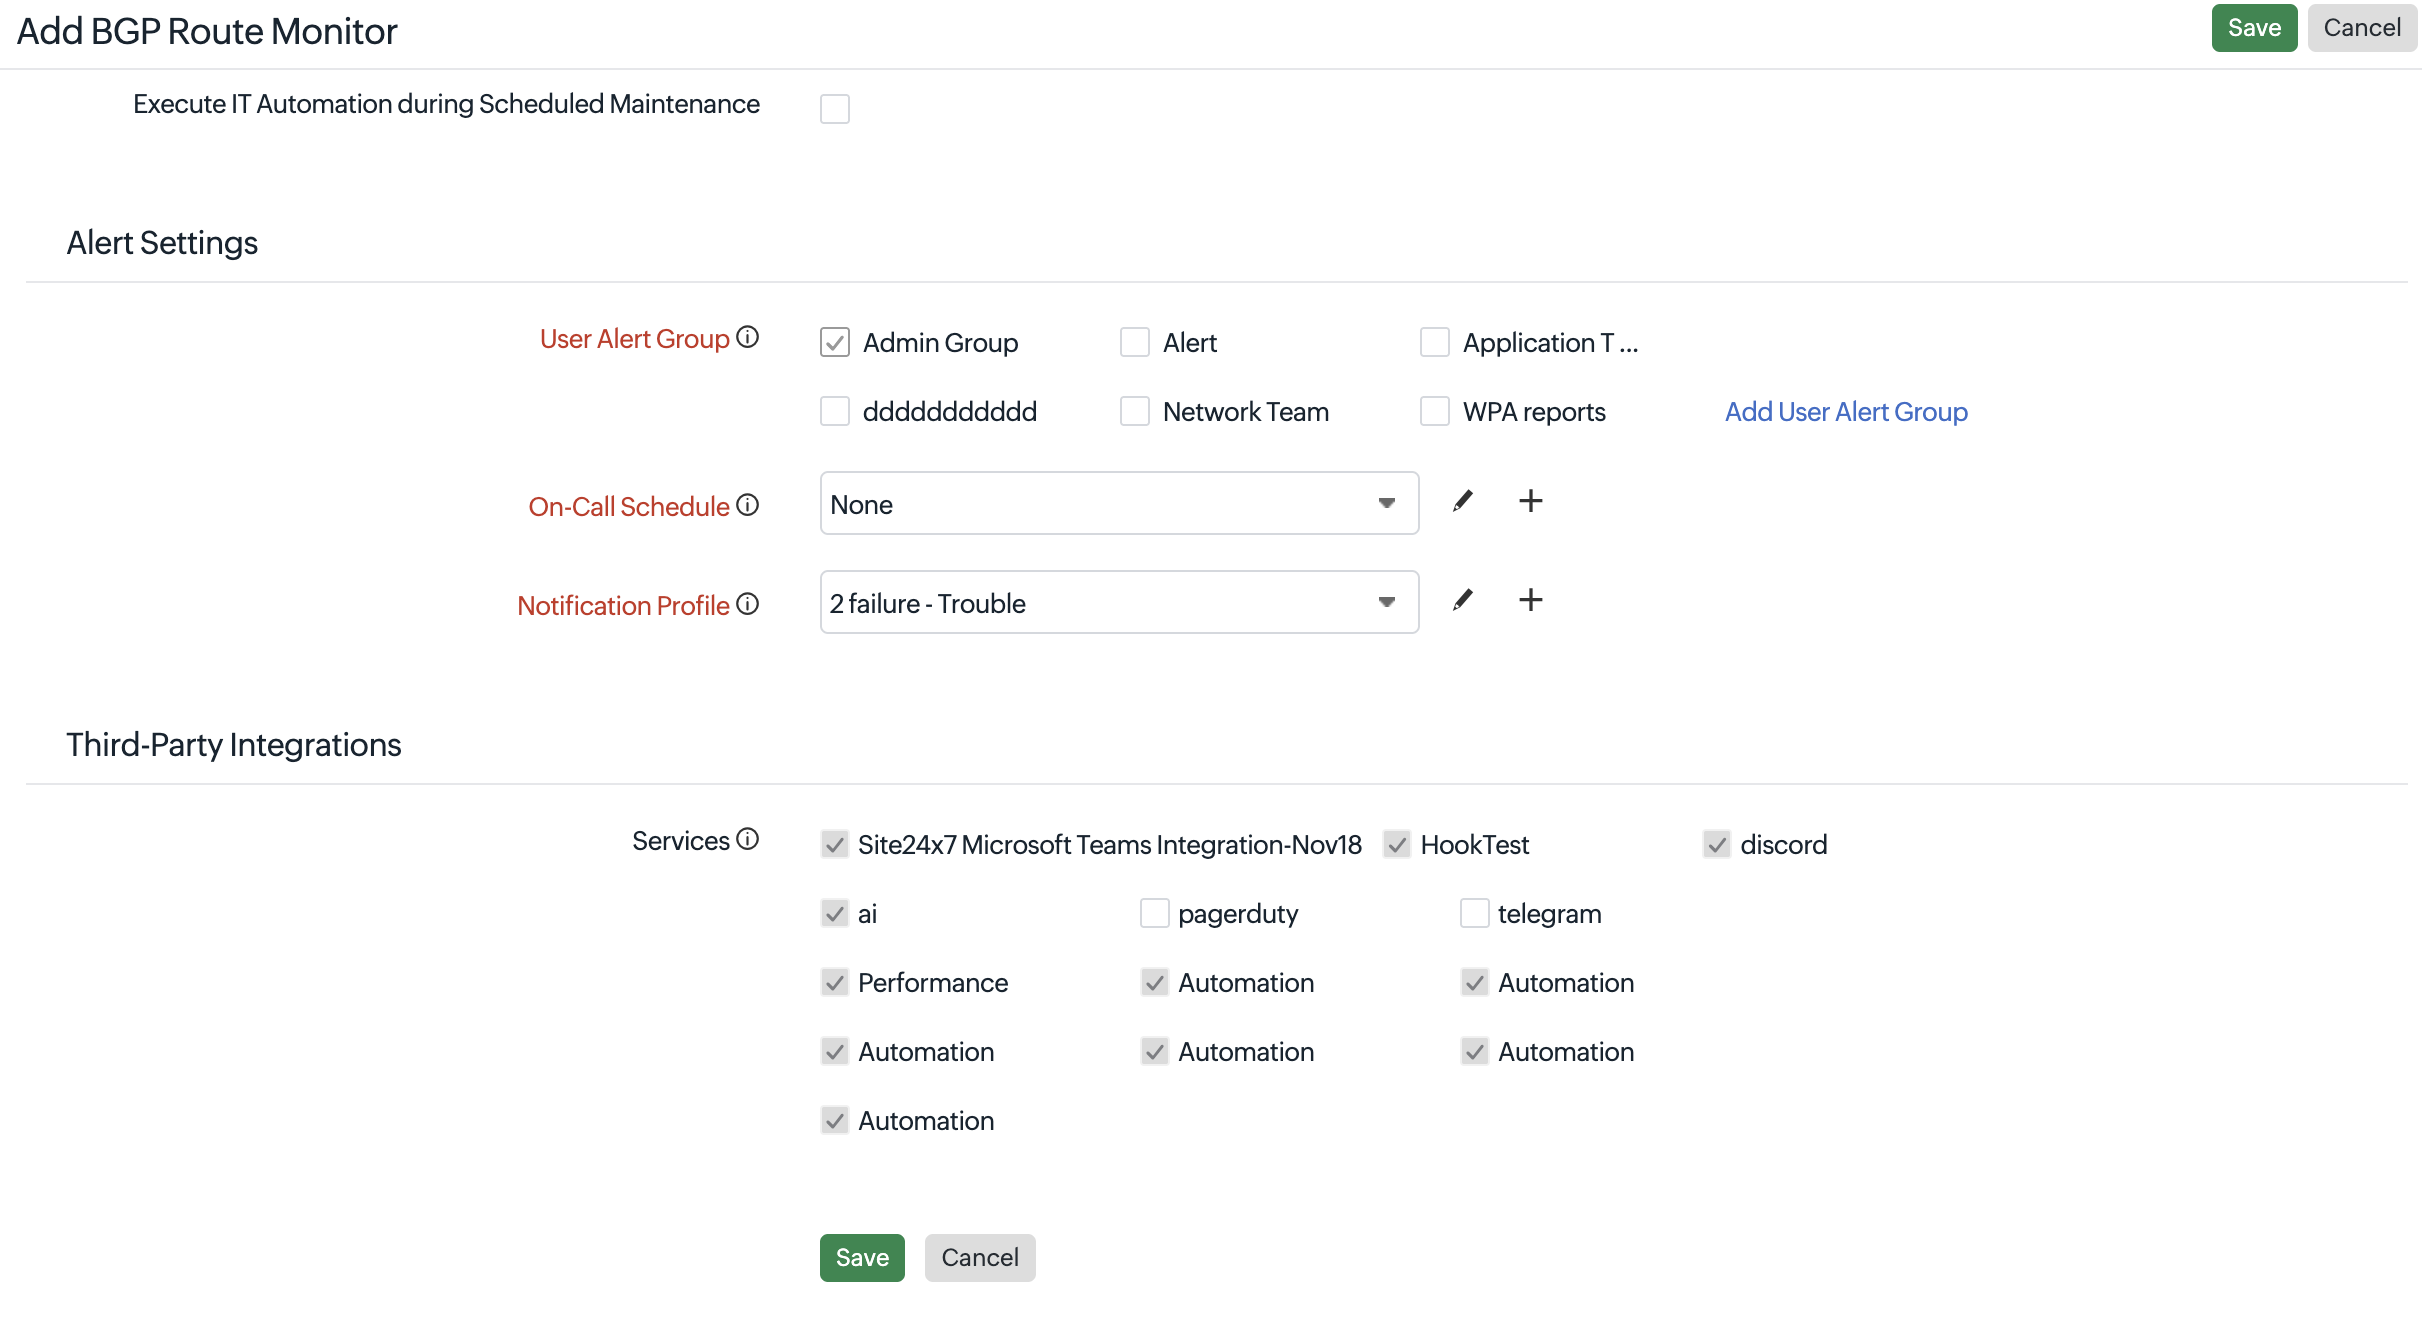
- User Alert Group: Select the user group that needs to be alerted during an outage. To include multiple users in a group, refer to User Groups.
- Click Add User Alert Group link to create a new alert group and associate it with the monitor.
- On-Call Schedule: The On-Call Schedule option ensures notifications are sent to assignees during specific shift hours, helping them respond quickly to alerts or incidents. Choose an On-Call of your preference from the drop-down list.
- Notification Profile: Choose a notification profile from the drop-down list or select the default profile available. A notification profile helps configure who and when to notify in case of downtime.
- User Alert Group: Select the user group that needs to be alerted during an outage. To include multiple users in a group, refer to User Groups.
- Third-Party Integrations: Associate your monitor with a pre-configured third-party service. It lets you push your monitor alarms to selected services, improving incident management.
If you haven't set up any integrations yet, navigate to Admin > Third-party Integrations to create one. - Click Save to save the monitor.
Learn more about the various performance metrics of a BGP Route monitor.