Azure Logic Apps integration
Azure Logic Apps is a cloud-based workflow automation service from Microsoft Azure that enables you to connect applications, services, and systems.
Integrate the Site24x7 platform with Azure Logic Apps to automatically forward monitoring alerts to your Logic Apps workflows. Use this integration to trigger AI agent workflows for intelligent incident analysis, automated incident response, notifications, and business process orchestration across Azure services, Microsoft 365, ITSM tools, and custom applications when a monitor status changes.
Key capabilities of the integration
- Forward monitor status alerts to an Azure Logic Apps workflow through an HTTP Request trigger.
- Select specific monitor status changes—Down , Trouble , Critical , or Problem —to trigger alert notifications.
- Send custom parameters to provide additional context to your Logic Apps workflow and AI agents.
- Configure an alternate notification channel to ensure that alerts are not missed if the primary integration encounters an issue.
Prerequisites
Ensure that you have:
- An active Microsoft Azure subscription.
- An Azure Logic Apps workflow configured with an HTTP Request trigger.
- The HTTP endpoint generated by the Logic Apps workflow.
- If you use custom parameters, define the corresponding keys in the JSON schema configured for the HTTP Request trigger.
Configuring the Azure Logic Apps side of the integration
- Sign in to the Azure portal and create a new Logic App, or open an existing one you want to use for Site24x7 alerts.
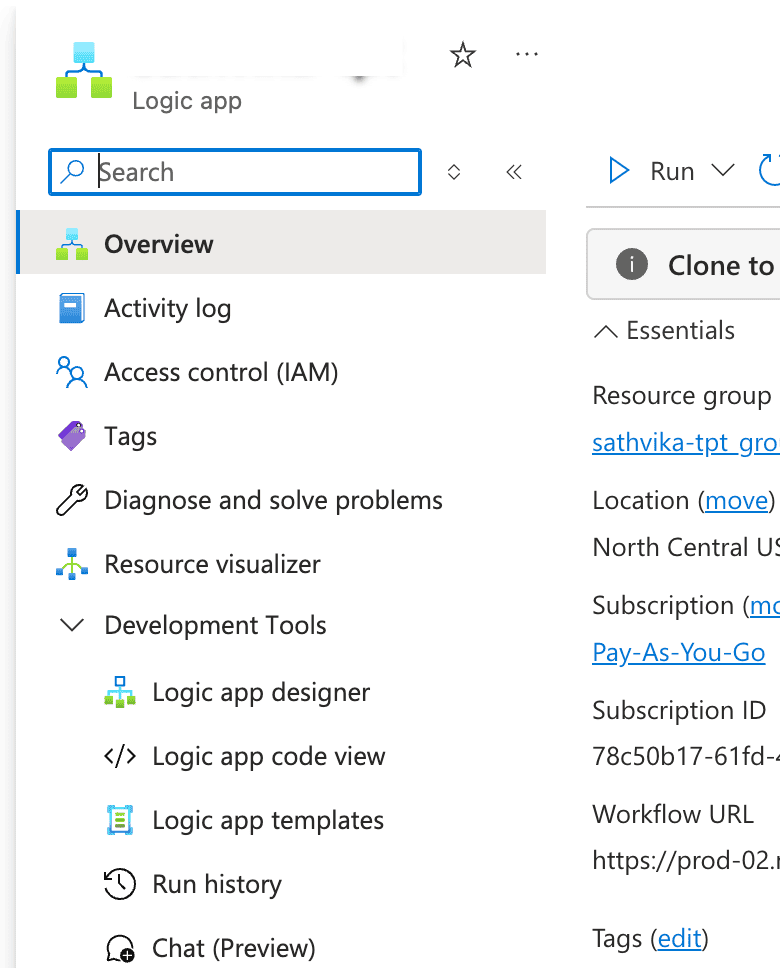
- Navigate to your Logic App and, under Development Tools , click Logic App Designer.
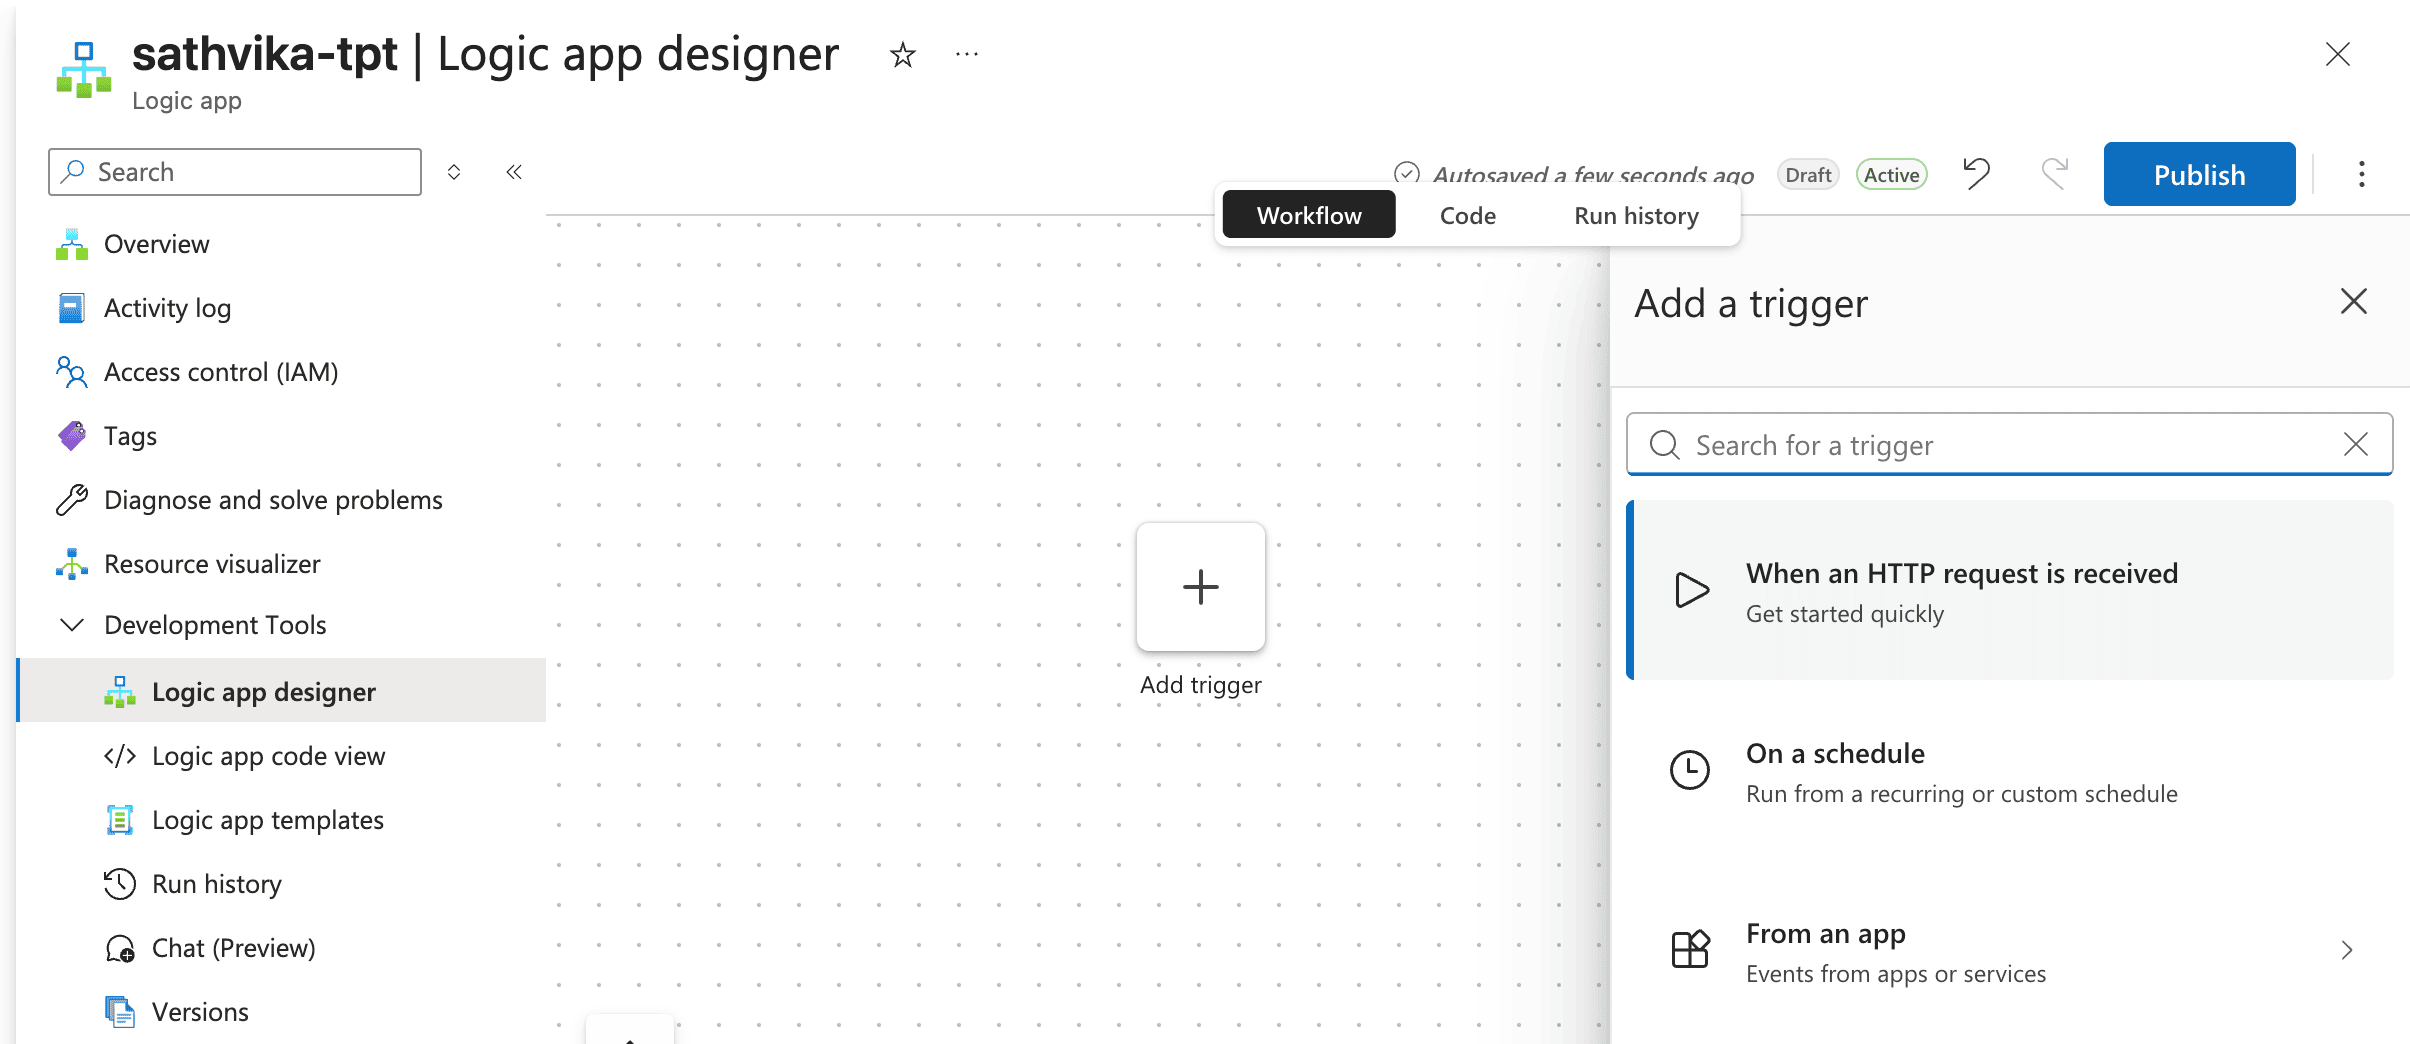
- Under Workflow, click Add a trigger. Search for HTTP request and select When a HTTP request is received.
- In the trigger configuration, paste the following sample JSON into the Request Body JSON Schema field. Azure Logic Apps uses this schema to parse the alert payload sent from Site24x7 and make the fields available to downstream actions.
{
"MONITORNAME": "$MONITORNAME",
"MONITOR_GROUPNAME": "$MONITOR_GROUPNAME",
"FAILED_LOCATIONS": "$FAILED_LOCATIONS",
"ALERT_TIME_ISO": "$ALERT_TIME_ISO",
"ALERT_TIME_IN_TEXT": "$ALERT_TIME_IN_TEXT",
"INCIDENT_DETAILS": "$INCIDENT_DETAILS",
"MONITOR_ID": "$MONITOR_ID",
"ALERT_TIME": "$ALERT_TIME",
"INCIDENT_TIME_ISO": "$INCIDENT_TIME_ISO",
"MONITOR_DASHBOARD_LINK": "$MONITOR_DASHBOARD_LINK",
"STATUS": "$STATUS",
"OUTAGE_TIME_UNIX_FORMAT": "$OUTAGE_TIME_UNIX_FORMAT",
"INCIDENT_REASON": "$INCIDENT_REASON",
"STATUS_ID": "$STATUS_ID",
"MONITORURL": "$MONITORURL",
"MONITORTYPE": "$MONITORTYPE",
"INCIDENT_TIME": "$INCIDENT_TIME",
"TAGS": "$TAGS",
"POLLFREQUENCY": "$POLLFREQUENCY",
"OUTAGE_DURATION": "$OUTAGE_DURATION",
"IPv4": "$IPv4",
"IPv6": "$IPv6",
"TIMEZONE": "$TIMEZONE",
"FAILED_ATTRIBUTES": "$FAILED_ATTRIBUTES",
"FAILED_CHILD_RESOURCE": "$FAILED_CHILD_RESOURCE",
"RCA_LINK": "$RCA_LINK",
"STATUS_CHANGE_ATTRIBUTES": "$STATUS_CHANGE_ATTRIBUTES",
"ALARM_CATEGORY": "$ALARM_CATEGORY",
"ATTRIBUTE_NAMES": "$ATTRIBUTE_NAMES",
"TOP_PROCESS_BY_MEMORY": "$TOP_PROCESS_BY_MEMORY",
"TOP_PROCESS_BY_CPU": "$TOP_PROCESS_BY_CPU"
}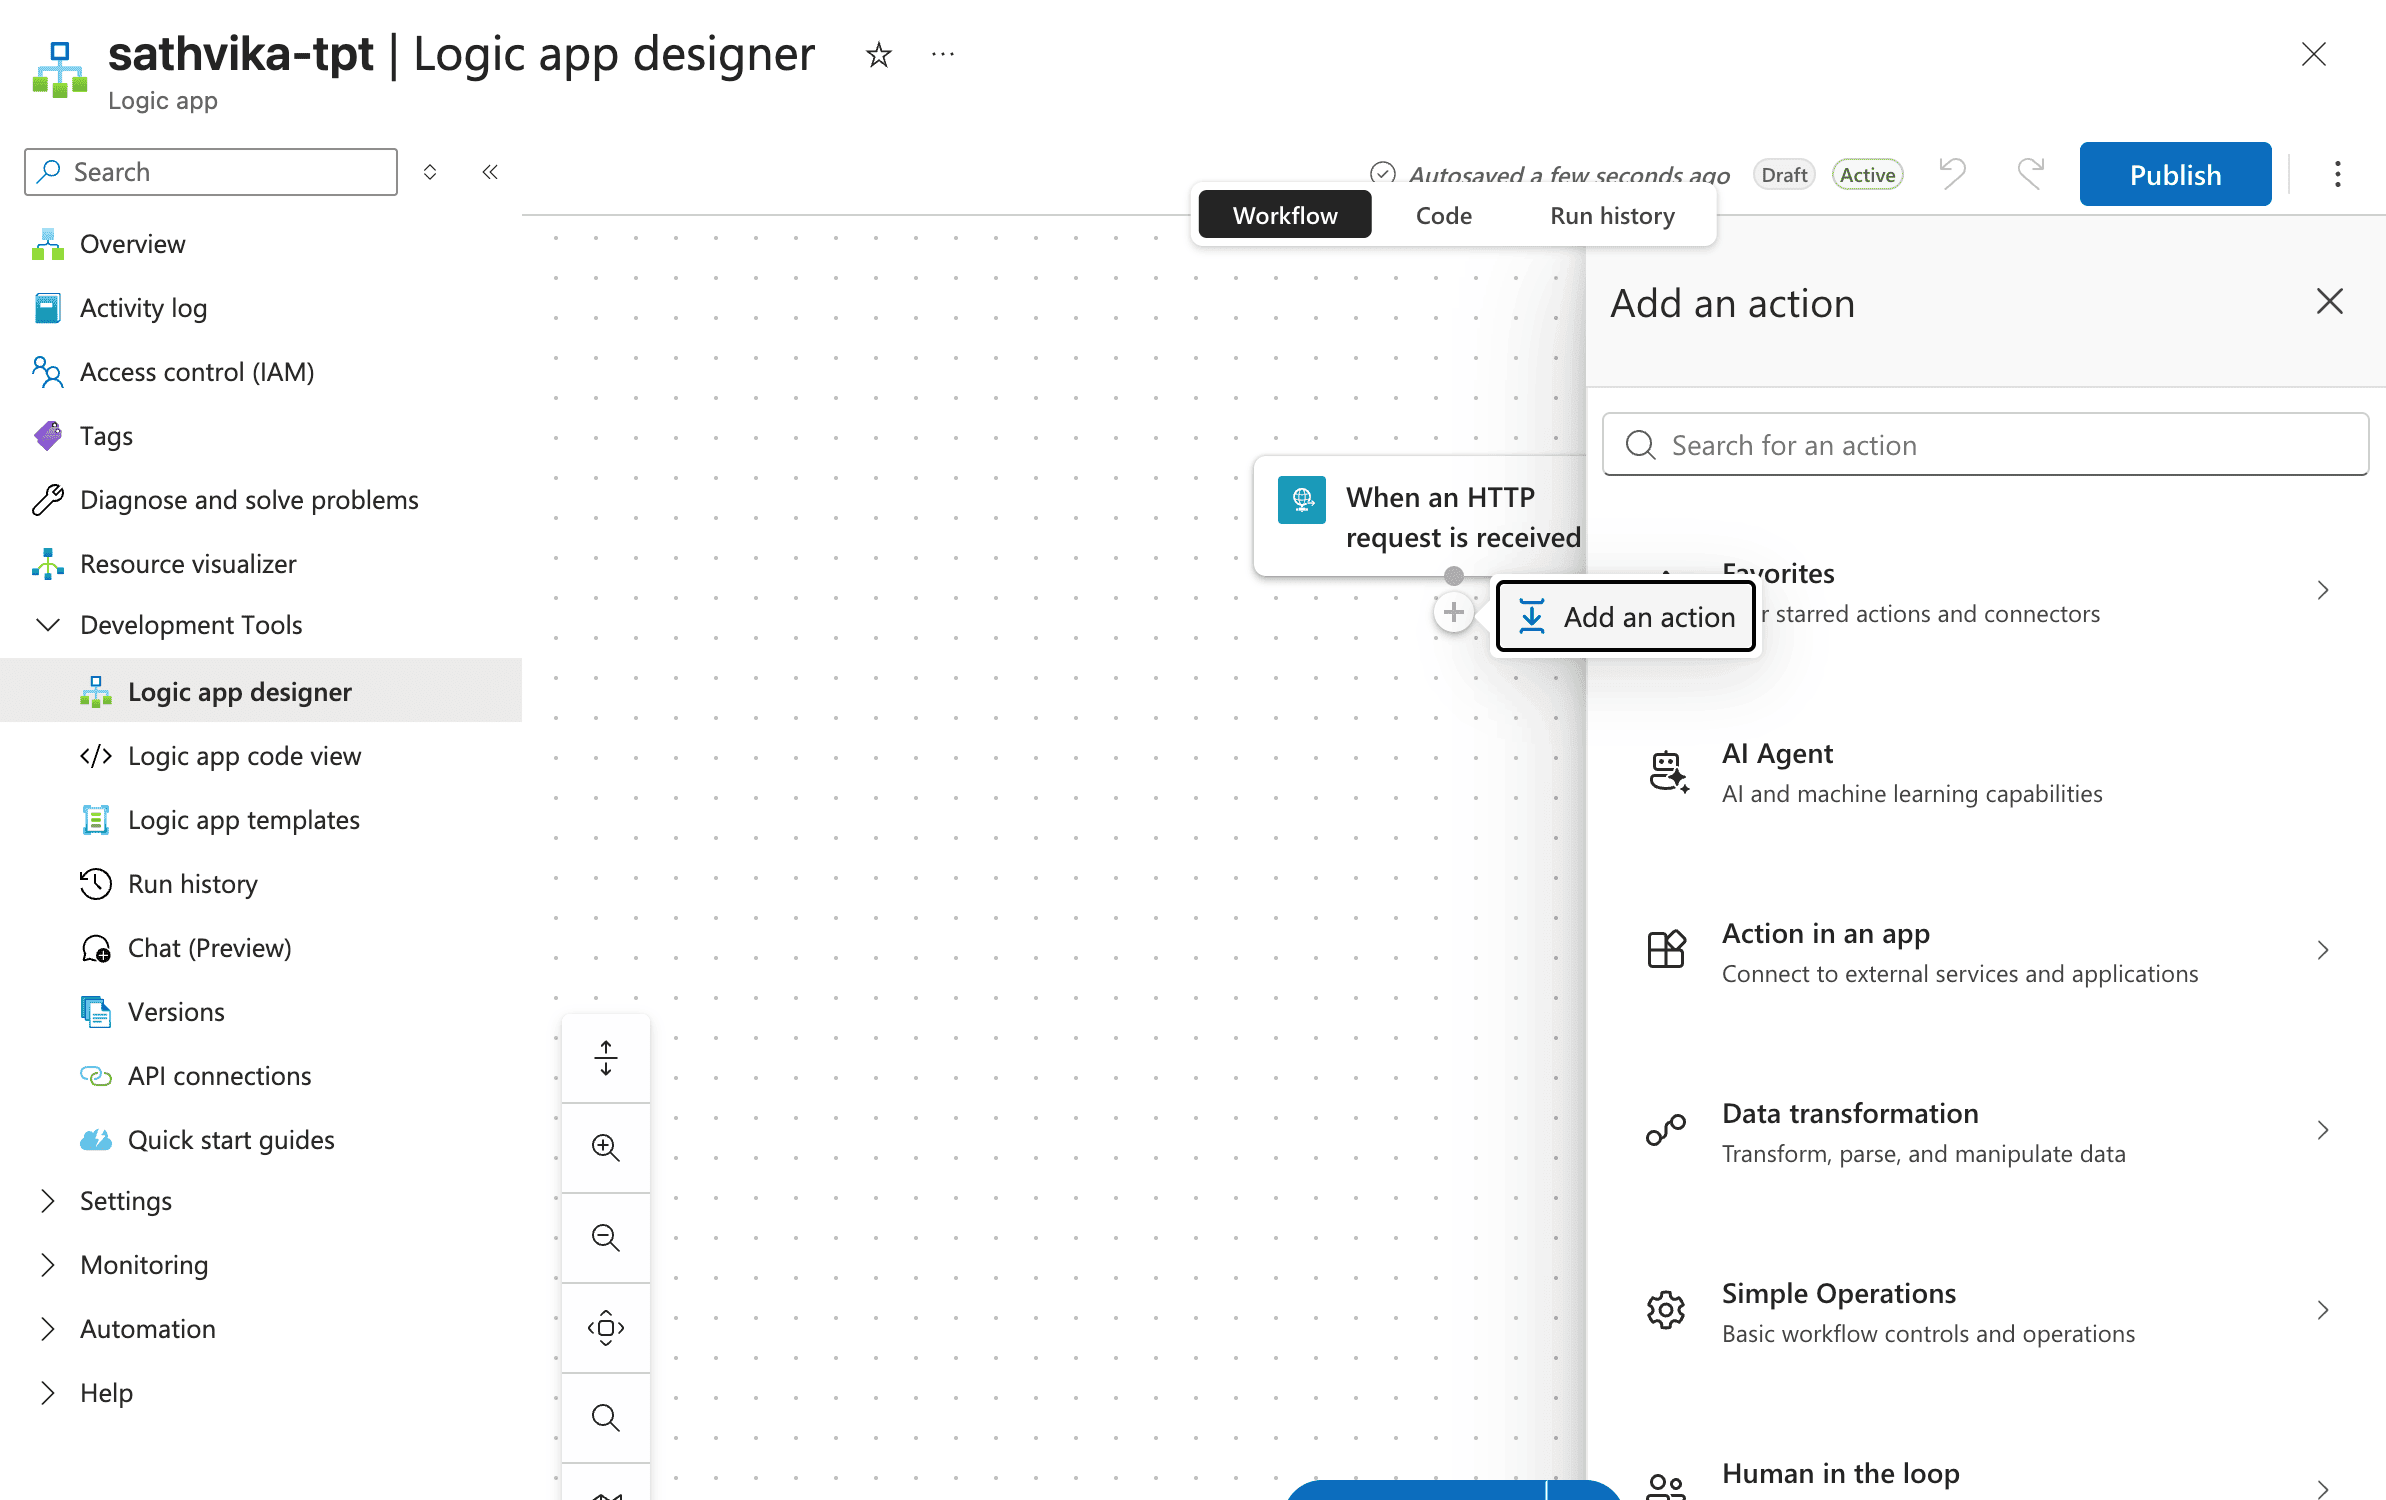
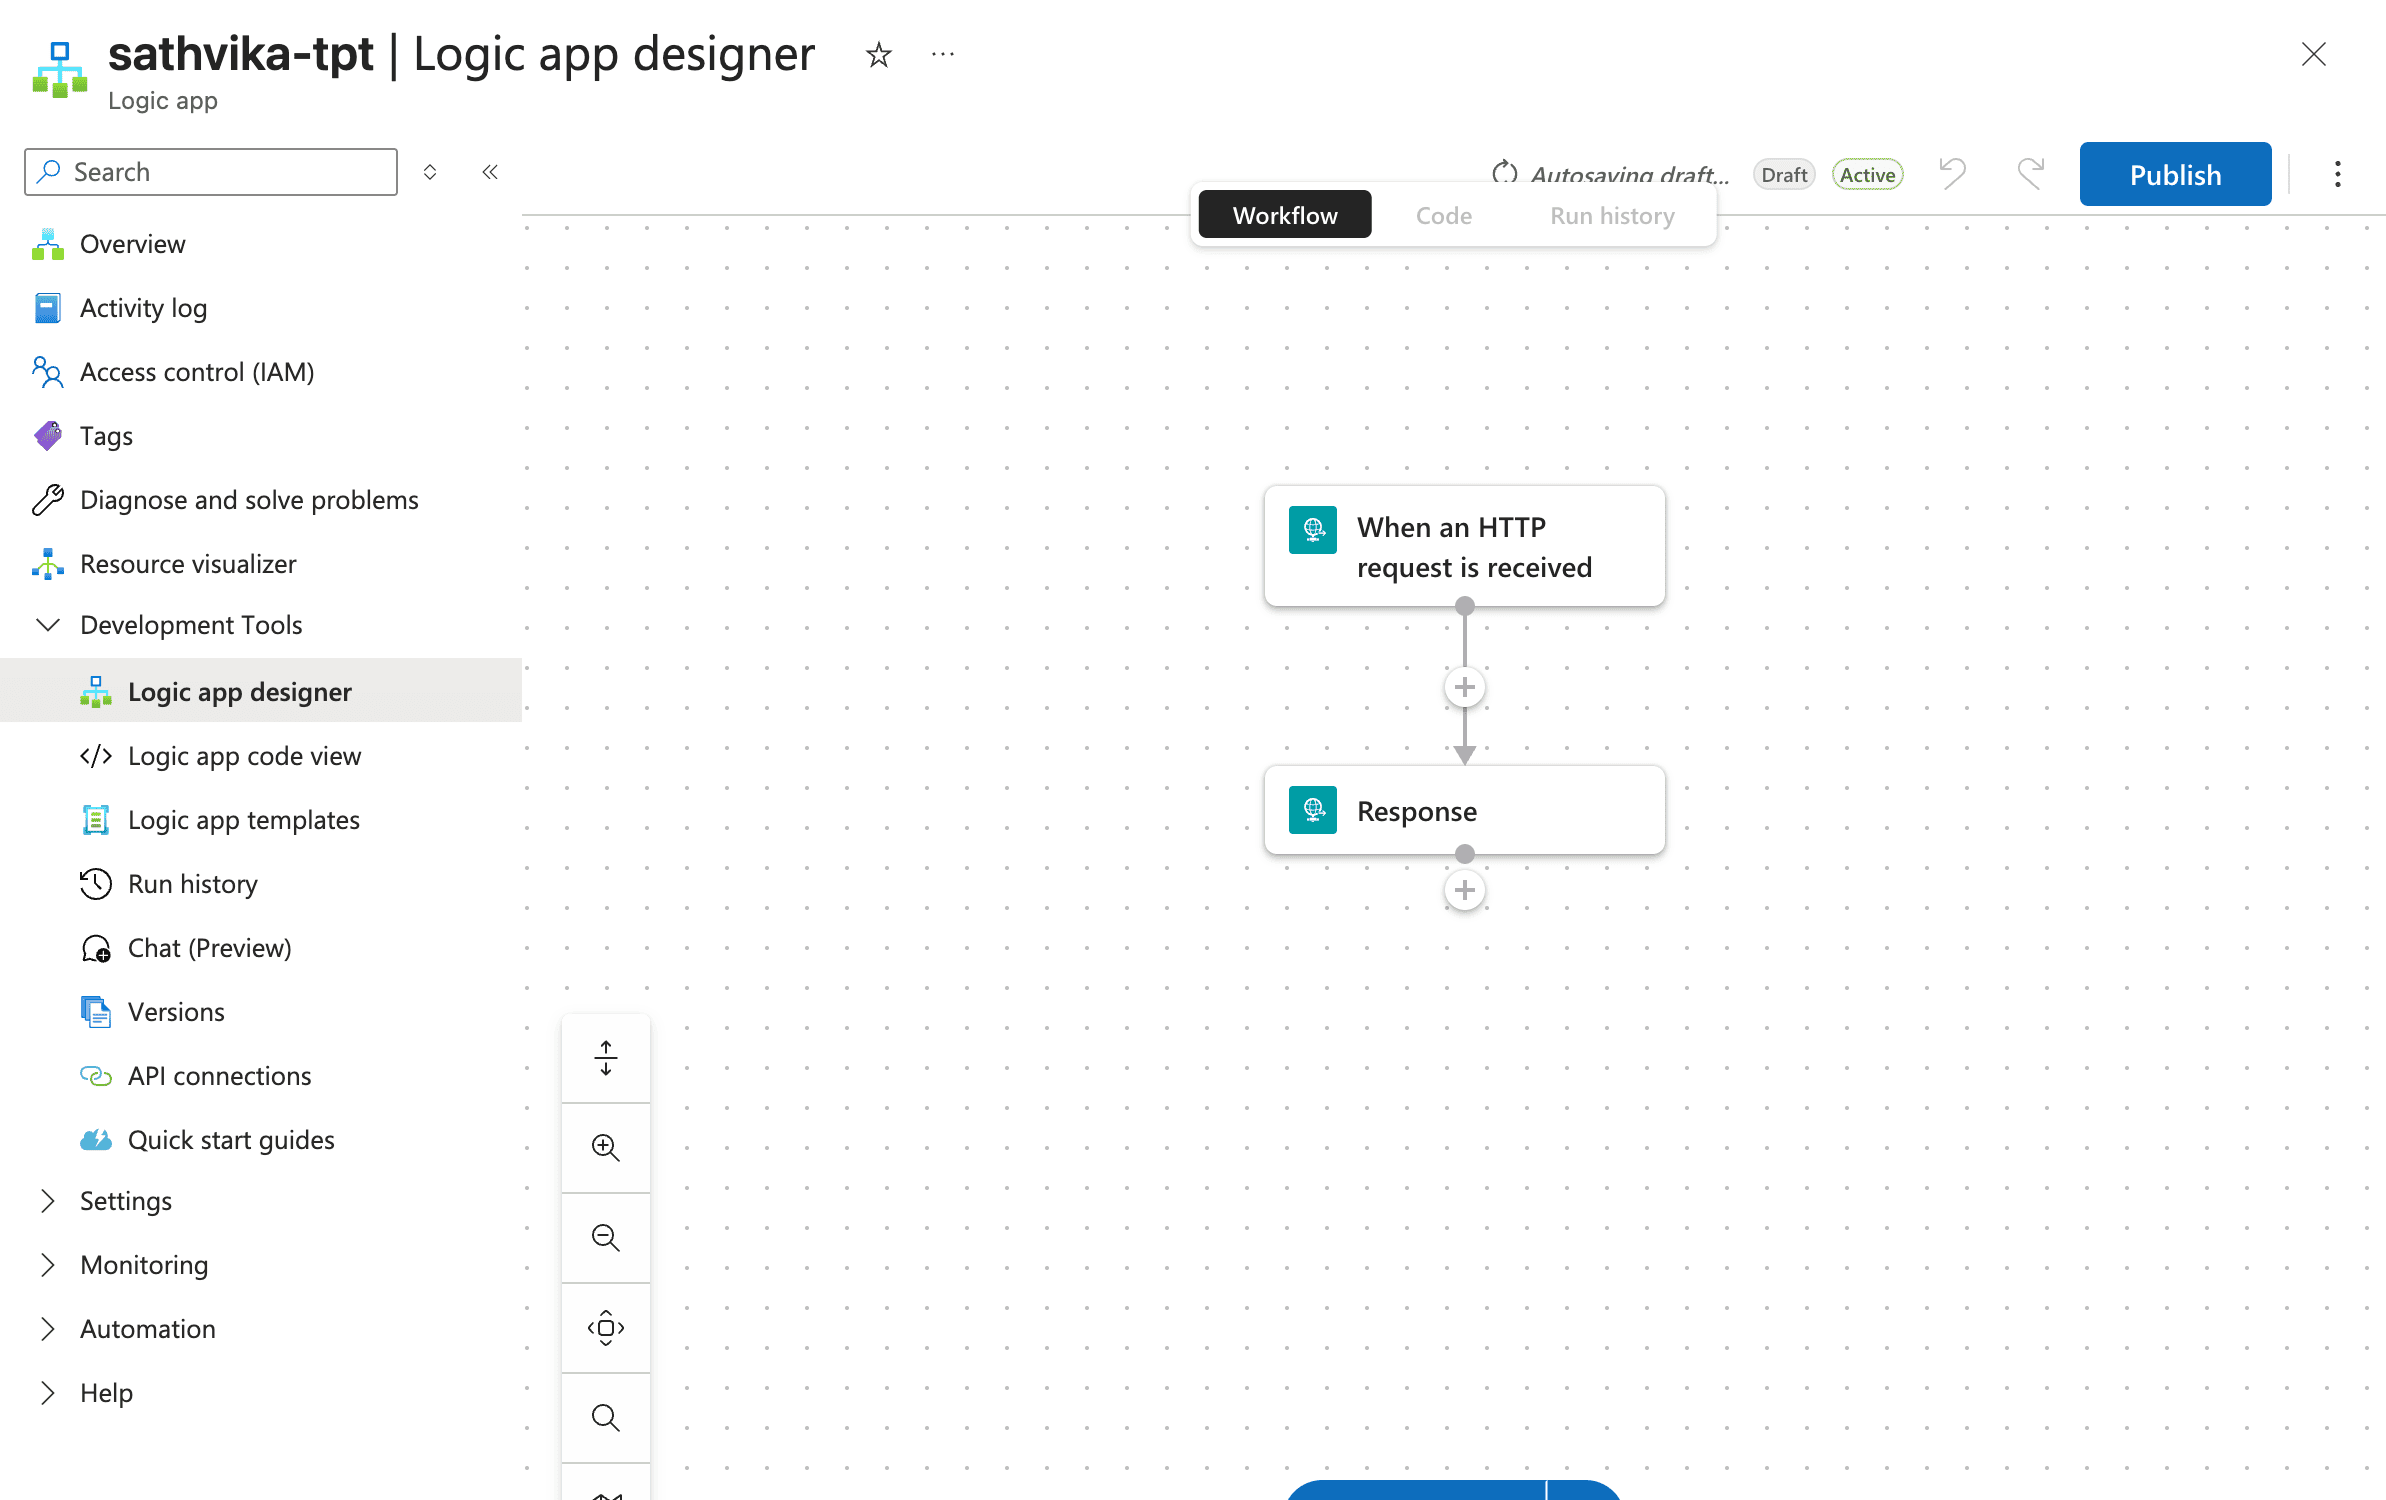
- Click the Add an action button that appears below the trigger. In the action search panel on the right, search for Response and select it. This action returns an HTTP response to Site24x7 after the workflow receives an alert.
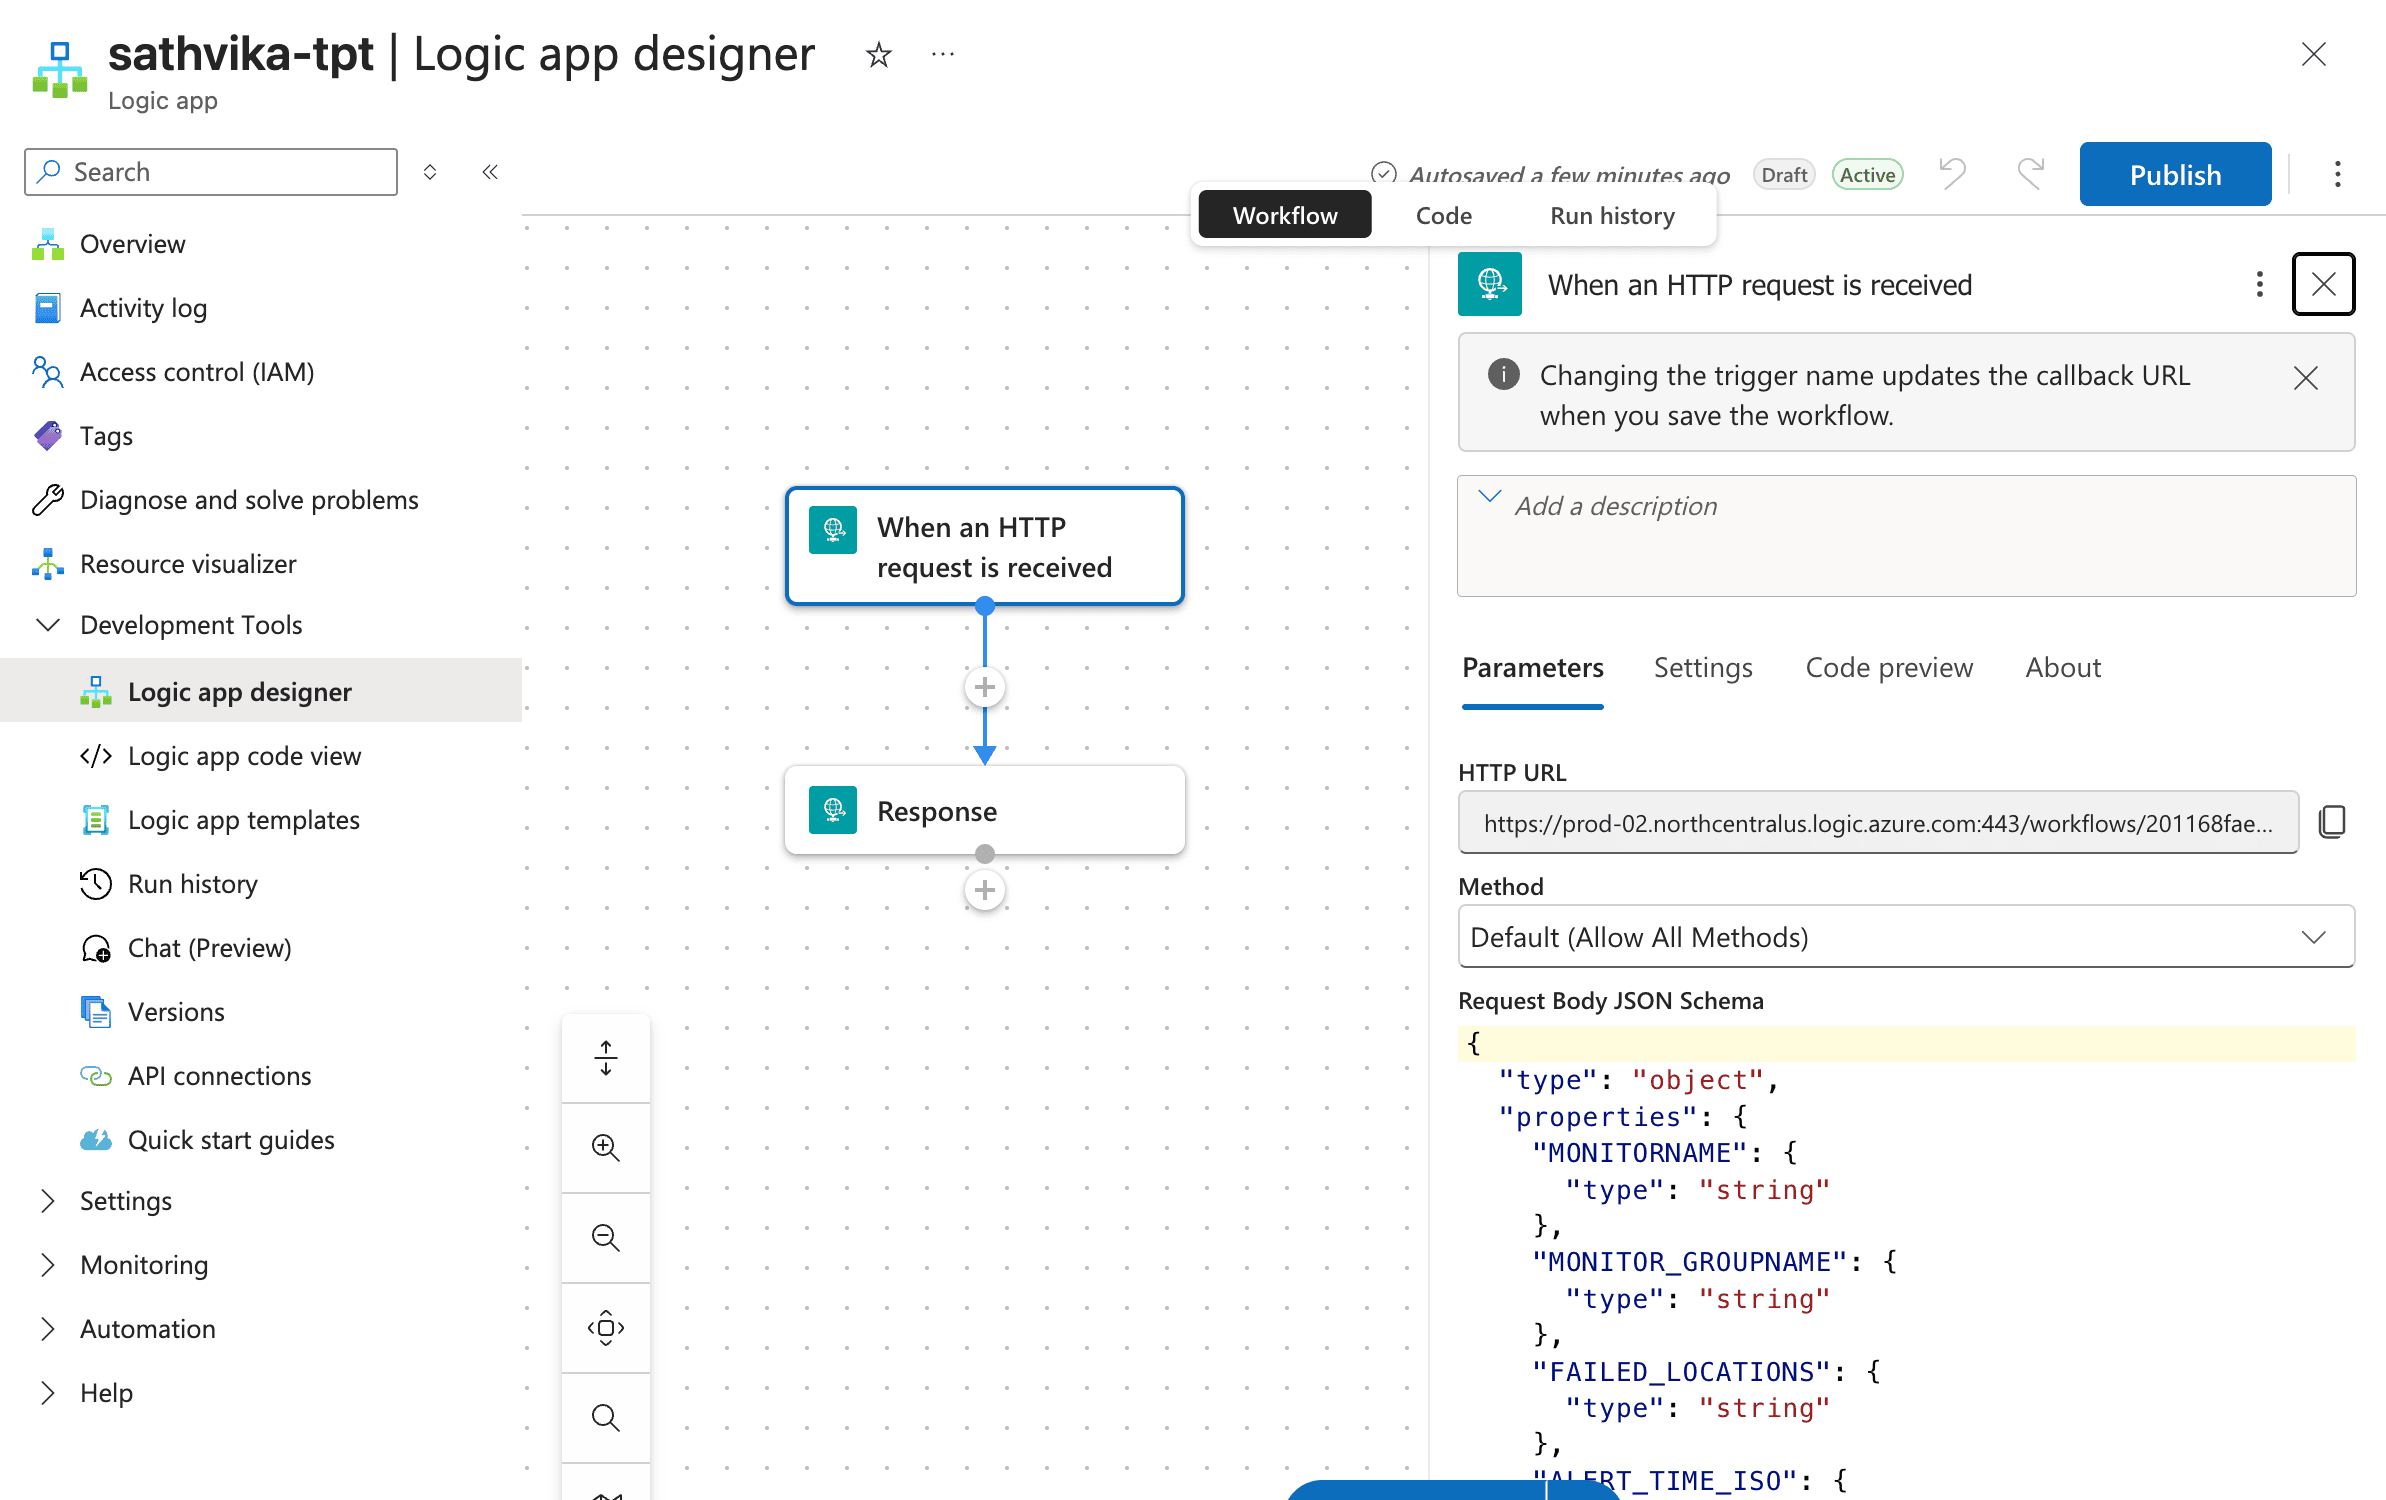
- Save the Logic App. Once saved, click the HTTP trigger to expand it. Copy the generated HTTP URL—you'll paste this into the Site24x7 integration form.
- Keep the HTTP URL safe. Anyone with access to this URL can send requests to your Logic App workflow.
- To verify that an alert was received successfully, open your Logic App in the Azure portal and go to Run History > Outputs.
Configuring the Site24x7 side of the integration
Once you've obtained the HTTP URL from Azure Logic Apps, complete the following steps in Site24x7.
- Log in to Site24x7 and go to Admin > Third-Party Integrations > Azure Logic Apps .
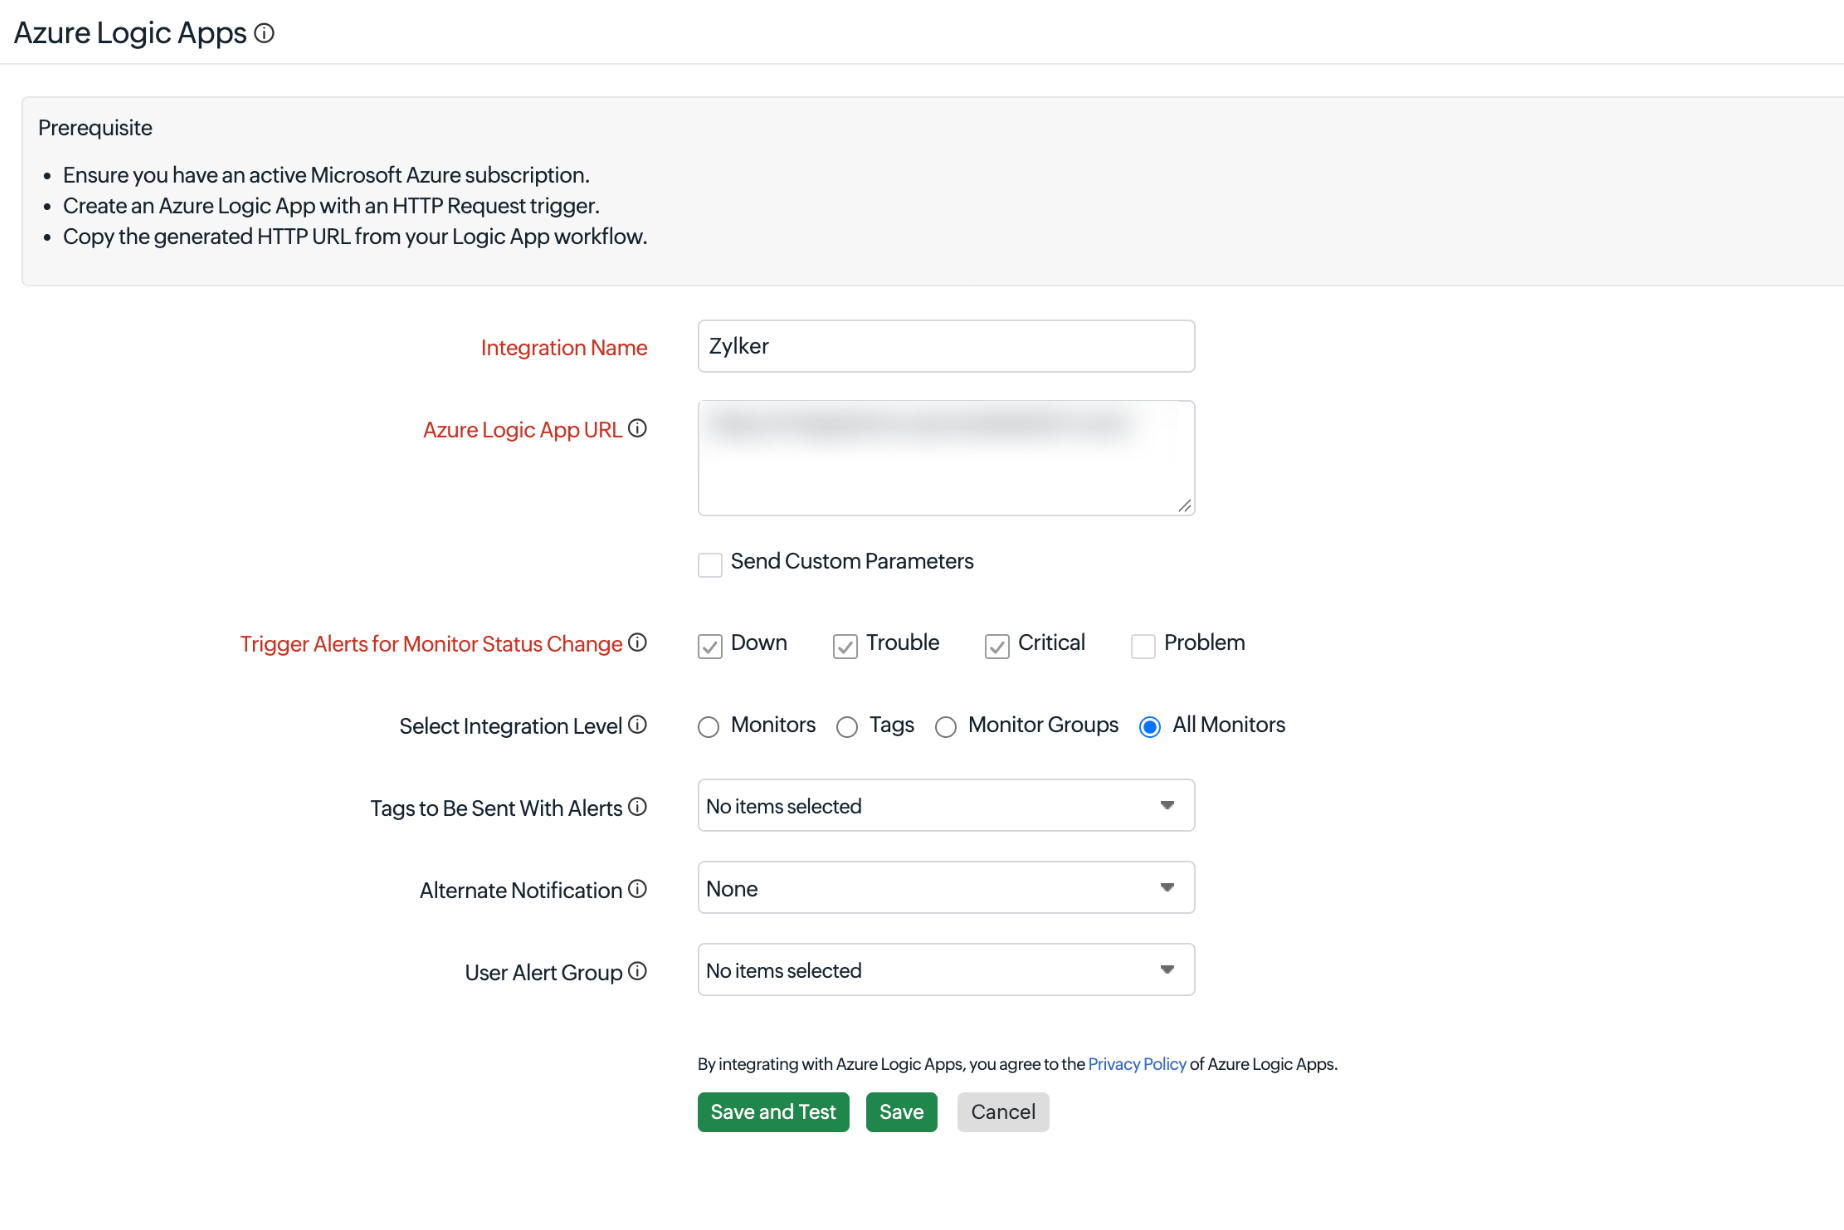
- Provide the below details in the integrations page:
- Integration Name: Provide a descriptive name that helps identify this integration in your account.
- Azure Logic App URL: Paste the HTTPS endpoint generated by your Azure Logic Apps workflow. Site24x7 sends monitoring alerts to this URL when the selected alert conditions are met. Site24x7 validates the connection when you save the integration.
- Send Custom Parameters: Choose this option to send a custom JSON payload to your Azure Logic App instead of the default alert payload. When enabled, an input area appears where you can define key-value pairs in valid JSON format.
Note
- The custom parameter JSON fully replaces the default payload. Only the keys in your custom JSON are sent to Azure Logic Apps.
- Ensure every key in your custom JSON is also defined in your Logic App schema. Azure Logic Apps processes only keys that are declared in the schema.
- Use the $ symbol followed by an incident parameter name for dynamic values (for example, $MONITORNAME, $STATUS).
- Enclose the full input within braces {}. Enclose all keys and values in double quotes "". Separate multiple key-value pairs with commas (e.g., "X" : "$X", "Y" : "$Y", "Z" : "$Z").
- Trigger Alerts for Monitor Status Change: Select the monitor status changes for which you want to receive alerts. The available options are Down , Trouble , Critical , and Problem. Select at least one status.
- Select Integration Level: Select one of the following options to control which monitors send alerts to your Logic App:
- Monitors: Sends alerts from one or more specific monitors that you select.
- Tags: Sends alerts from monitors associated with one or more specific tags.
- Monitor Groups: Sends alerts from all monitors within one or more monitor groups.
- All Monitors: Sends alerts from all monitors in your Site24x7 account. This option is selected by default.
- Tags to Be Sent With Alerts: Select the tag keys associated with the monitor that need to be sent with the alert. When an alert triggers, matching tags are included in the notification payload.
NoteIf no tags are selected, all tags associated with the monitor are included in the alert notification. This field is active when Select Integration Level is set to Monitors, Tags, or Monitor Groups.
- Alternate Notification: Select an alternate notification medium. If the Azure Logic Apps integration encounters an issue, the alternate medium activates to ensure alerts aren't missed. Select None if you don't want to configure an alternate channel.
- User Alert Group: Select one or more User Alert Groups from the drop-down menu to associate them with this integration. If the integration call fails, Site24x7 notifies all contacts and users in the selected User Alert Groups.
User Alert Groups help you organize contacts and users into groups, making it easier to notify the appropriate team if the integration call fails. Learn more about User Alert Group .
- Click Save and Test to validate the connection and save the configuration, or click Save to save without sending a test alert.
Suspend, activate, or delete the Azure Logic Apps integration
Suspend the integration
- Go to Admin > Third-Party Integrations .
- Click the hamburger icon [icon] next to the Azure Logic Apps integration.
- Select Suspend .
Suspending the integration stops Site24x7 from sending alert notifications to your Azure Logic App workflow. The configuration is retained and can be reactivated at any time.
Activate the integration
- Go to Admin > Third-Party Integrations .
- Click the hamburger icon [icon] next to the Azure Logic Apps integration.
- Select Activate .
Activating a suspended integration resumes sending alert notifications from Site24x7 to your Azure Logic App workflow.
Delete the integration
- Go to Admin > Third-Party Integrations .
- Click the hamburger icon [icon] next to the Azure Logic Apps integration.
- Select Delete .
Deleting the integration permanently removes it from your Site24x7 account. This action can't be undone.