A virtual machine emulates a physical computer system’s functionality. Azure Virtual Machines (VMs), for example, are crucial to numerous IT infrastructures. They’re on-demand, scalable, and easy-to-set-up compute resources that aim to provide more flexibility than on-premises resources.
But if not appropriately configured, Azure VMs can experience connectivity issues. So, efficient troubleshooting is vital to run these systems smoothly and ensure uninterrupted business operations.
This hands-on article explores the most common causes of Azure VM connectivity issues. We’ll demonstrate how to fix these issues and suggest best practices to remediate them.
You can troubleshoot most Azure VM connectivity issues by checking its components and configurations.
Azure virtual network — This is the foundation for your private network in Azure. It provides an isolated network environment to run VMs, letting you control traffic flow and implement network-level security measures.
If you place a VM in the wrong virtual network, it may hinder connectivity. The VM may be unable to access necessary resources, exposing itself to unnecessary traffic.
Network security groups (NSGs) — An NSG contains security rules to filter the Azure VM’s inbound and outbound traffic. You can configure these rules to filter inbound and outbound traffic-based parameters like the source and destination IP addresses, ports, and protocols.
When troubleshooting your connection issues, verify that the NSG rules allow the necessary traffic for your VM. For example, if there’s a blocked connection on port 80, check if an NSG rule is denying the connection.
Network interface card (NIC) — An NIC contains the public and private IP of the Azure VM and bridges the VM and its virtual network. It lets the VMs securely communicate with each other, additional Azure resources, the Internet, and on-premises resources.
Associating a NIC to the correct virtual network ensures the VM obtains the correct IP address and connects to the network successfully.
Azure managed disks — These managed disks are block-level storage areas that Azure automatically manages. You only need to select the disk size and type and provision the disk, while Azure creates the disk and handles scaling and maintenance.
A managed disk’s performance can affect connectivity. For instance, slow disk read and writes can impact a VM’s ability to process network traffic. Misconfigured OS disk firewalls might restrict incoming traffic, denying a connection.
CPU and memory resources — High consumption of resources can negatively impact VM connectivity. A VM consuming plenty of processing power and memory might struggle to process network traffic. It may also become unresponsive, causing a connection loss.
Your operational efficiency and user experience may decline when misconfigured NSG rules, incorrect firewall settings, NIC issues, resource exhaustion, and other issues go unaddressed. Connectivity disruptions, downtime, and unreliable access to Azure VMs can lead to reduced productivity and revenue loss.
The upcoming sections review connectivity issues and demonstrate how to troubleshoot them. To follow along, ensure you have the following:
Misconfigured NSG rules can cause unexpected connectivity problems. They can occur when you erroneously set up inbound or outbound rules to block desired traffic or allow unintended access.
Suppose you have an Azure VM hosting a web server and want to ensure users can access your site from a browser. However, you discover that the connection is blocked, potentially driving away users who can’t connect.
To address this connectivity issue, grant users access to the site from the browser by creating an NSG rule to allow inbound HTTP traffic to your VM. The section below demonstrates how to do so.
Note that allowing HTTP traffic to your VM is just one use case for NSG rules. These rules also control access to your VM by letting you restrict traffic to and from specific sources. When you implement precise NSG rules that permit only the necessary traffic, you can secure your Azure VMs effectively.
Start the troubleshooting process by checking the current security rules associated with your VM using the steps below. Note that this process might vary depending on your use case and the rule you want to create. You may need to modify the rule’s properties to meet your security requirements.
First, open the Azure Portal and sign in to your account. Then, in the search box at the top, type “Network Security Groups.” In the Services section, select Network security groups. This action lists all the NSGs and their associated resource groups and subscriptions.
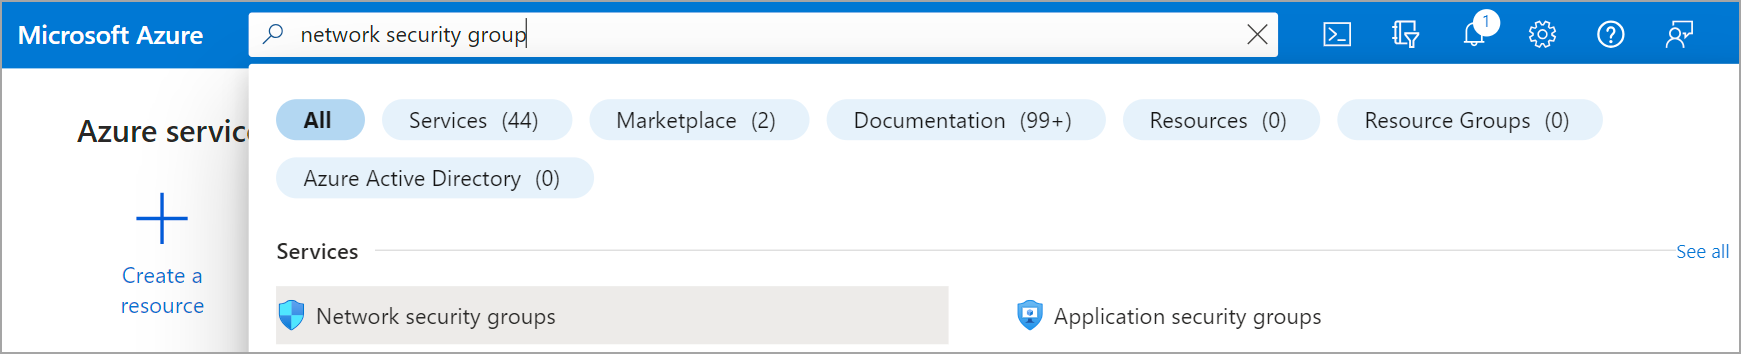 Fig. 1: Searching for network security groups
From the list, click the NSG associated with your VM.
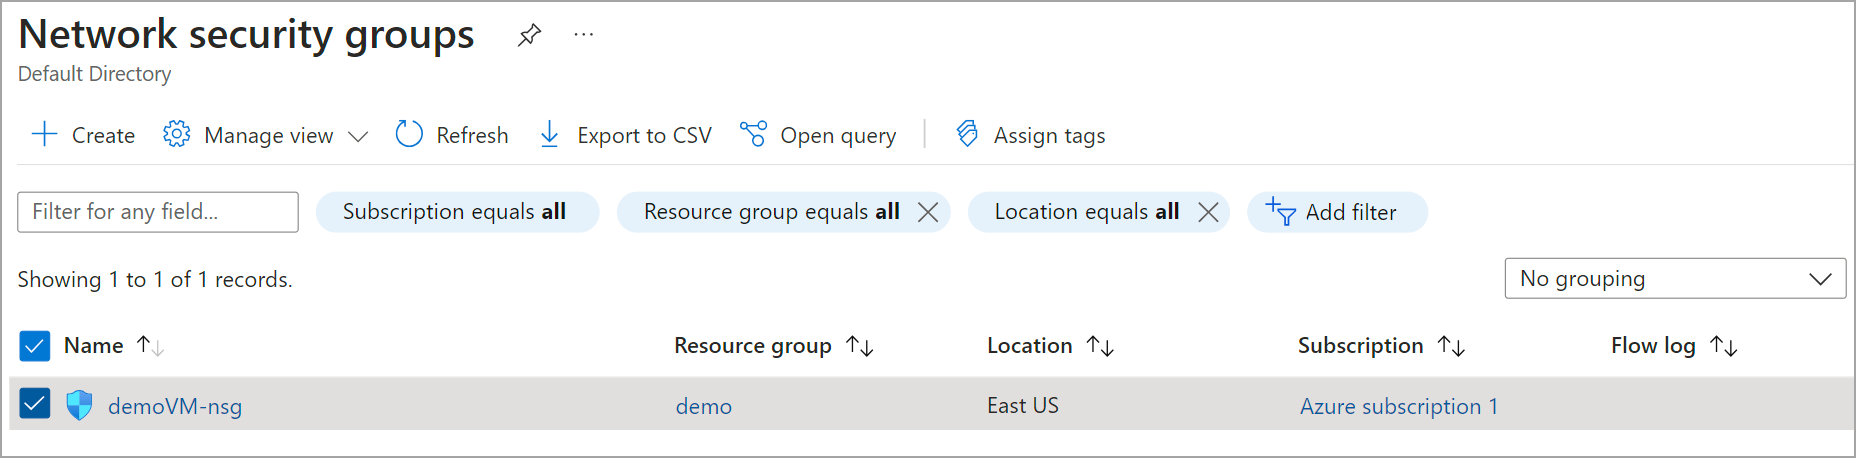 Fig. 2: List of network security groups
Then, to check your VM’s NSG, click the Networking tab on your VM’s dashboard.
In the dashboard’s sidebar, click Inbound security rules under Settings to view all the NSG rules for inbound traffic.
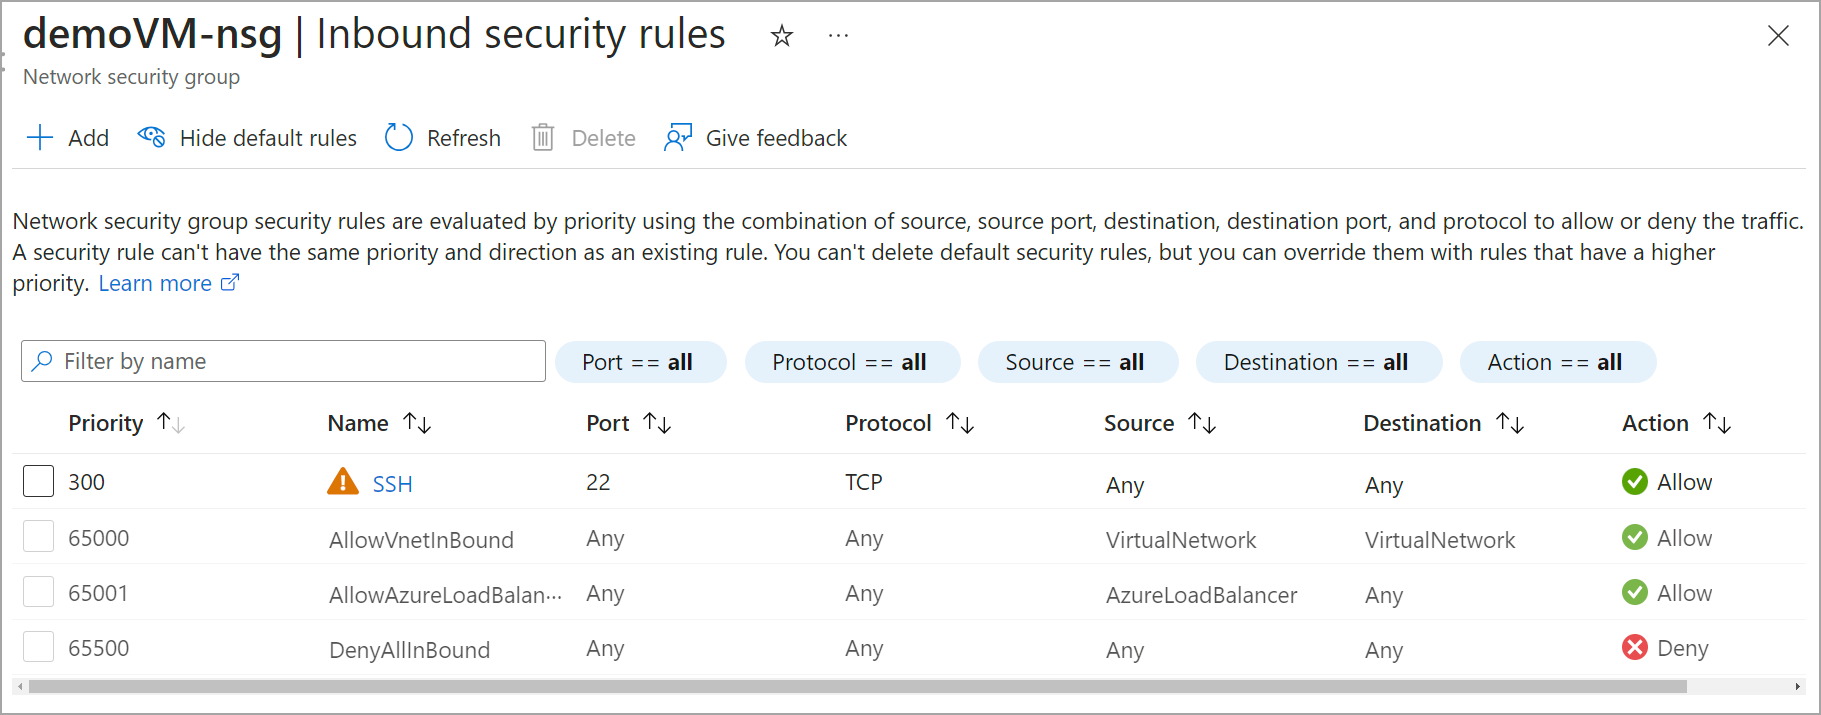 Fig. 3: Inbound security rules for a VM
This VM has a default rule named DenyAllInBound that denies all inbound traffic from outside the virtual network. This traffic may come from the Internet, other VMs, or other Azure resources. This rule isn't problematic if the VM doesn’t need to receive any data from outside networks. However, if it does, the rule becomes an obstacle by denying connectivity, affecting the VM’s performance.
Because DenyAllInbound is a default rule, you can’t delete it. However, you can override it by adding a new rule with a lower priority number. The lower the number, the higher the priority, and the earlier the VM will process that rule.
To add the new rule that allows inbound traffic from the Internet, click + Add at the top of the NSG inbound security rules dashboard. You should see a form similar to the image below.
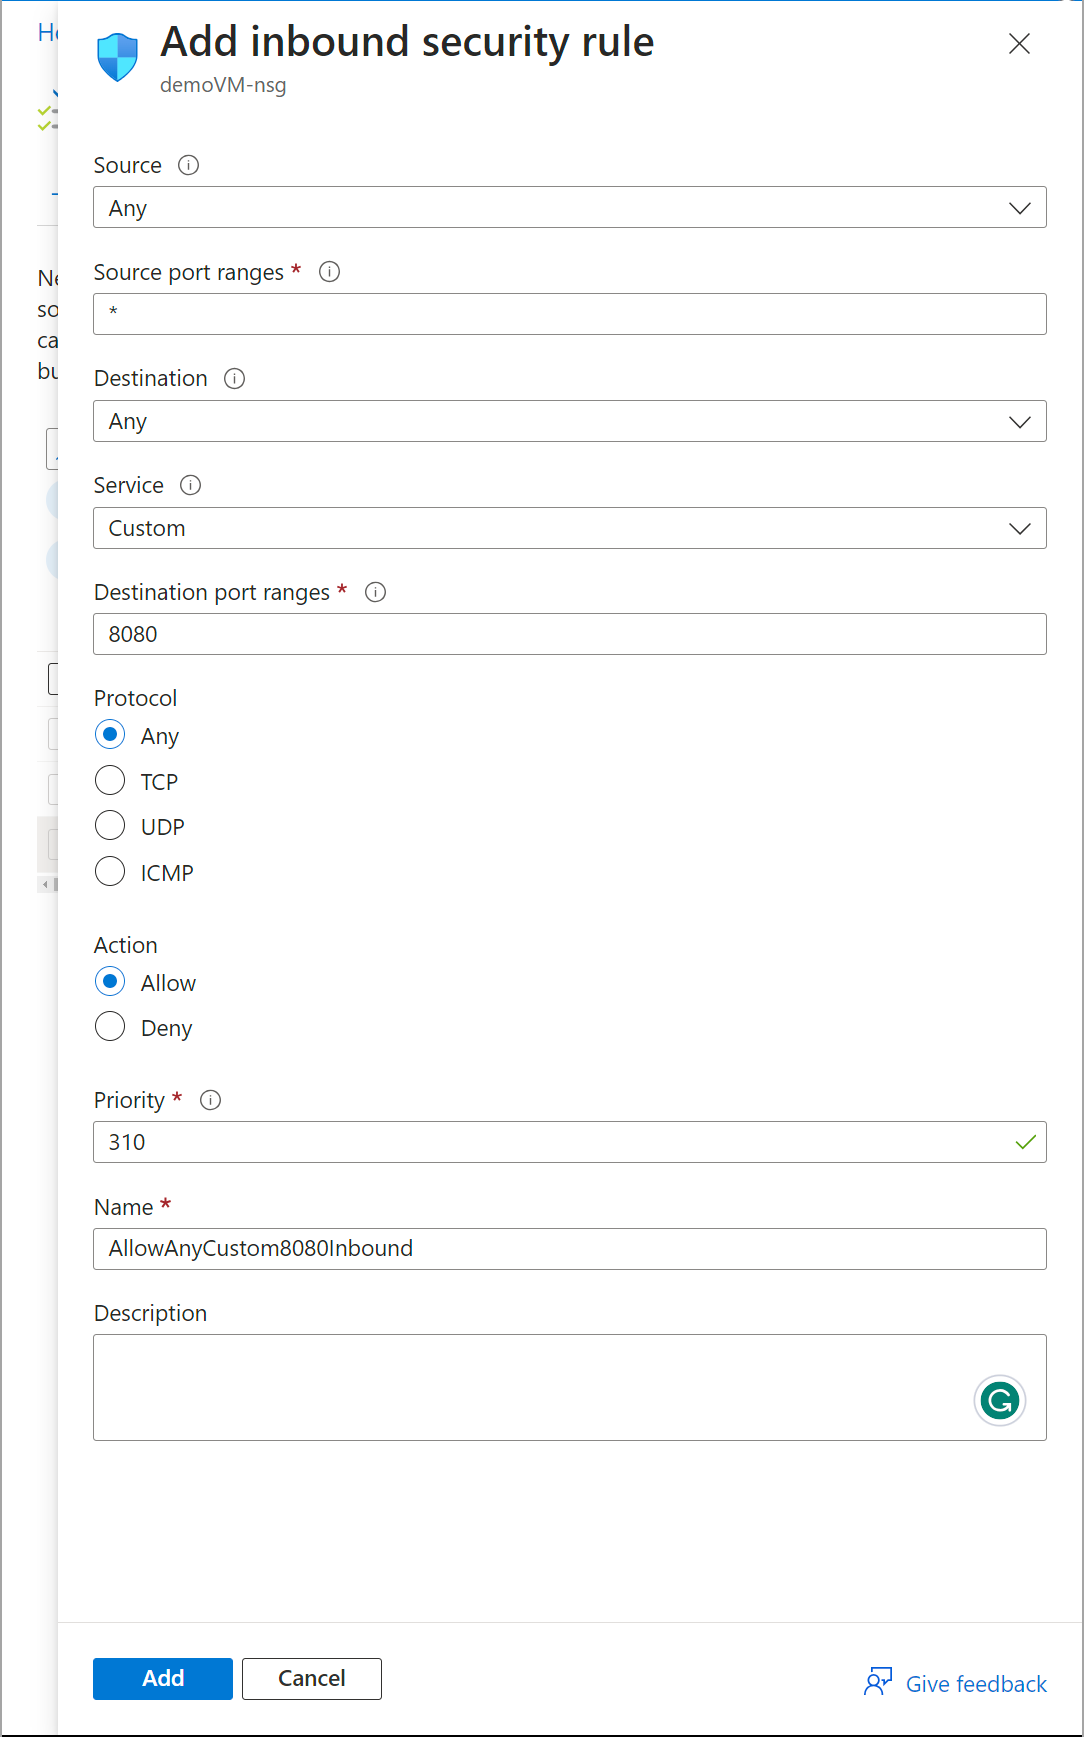 Fig. 4: Add inbound security rules
Fill in the form as follows:
DenyAllInbound rule, which is priority 65500. You can’t have two rules with the same priority number—they must be unique.Finally, click Add to create the rule.
You can now establish a connection from the Internet to the Azure VM.
The above steps outline adding, reviewing, and modifying an NSG rule to allow inbound HTTP traffic. Note that it’s just one of many troubleshooting use cases for NSG rules. For example, you may want to limit inbound Secure Shell Protocol (SSH) access to specific IP addresses to secure the VM. Additionally, if you have segmented your virtual network into subnets, you can apply NSG rules to a particular subnet to control the traffic there.
Firewall settings at the OS level can interfere with Azure VM connectivity. For instance, an overzealous inbound rule could block necessary traffic.
To resolve this issue, inspect your current firewall settings from the command line and modify the rule to allow the necessary traffic. Start by connecting to the Azure VM via Remote Desktop Protocol (RDP), SSH, or Bastion.
This demonstration uses RDP to connect to a Windows VM. First, click Connect in the Azure Portal, then download the RDP file. Next, open the file to connect to the Azure VM. This action prompts you to enter the username and password you provided when you created the VM. The username should follow the vmname/username format.
From your Windows OS start menu, run Windows PowerShell as an administrator, then run the following command to check the current firewall configuration.
Get-NetFirewallProfile -Name Public
This command displays the firewall configuration for the public network profile, including the enabled state (set to on or off), the inbound and outbound rules, and other settings for actions like logging.
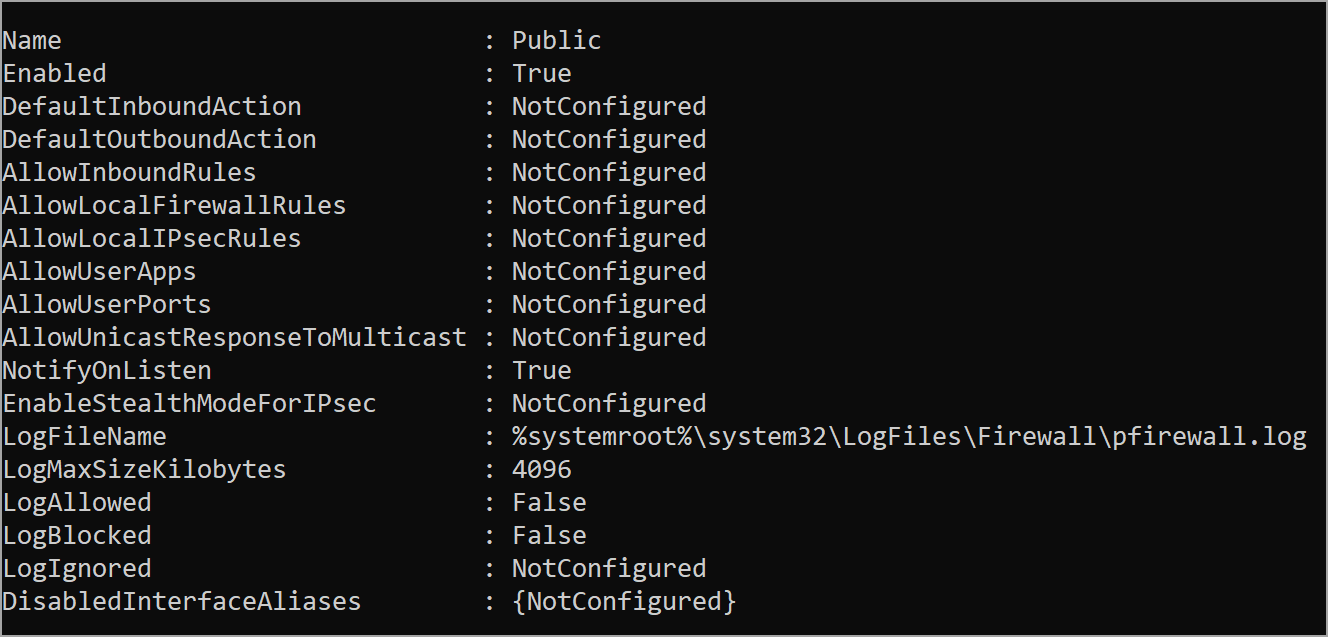 Fig. 5: Firewall configuration for a public network profile of an Azure Windows VM
To enable the firewall, use the following command.
Set-NetFirewallProfile -Profile Public -Enabled True
To turn off the firewall, run the following command.
Set-NetFirewallProfile -Profile Public -Enabled False
Although you can turn off the firewall, it's best to keep it enabled for security and instead allow or block specific ports. For example, use the following command to allow traffic on port 80 for incoming HTTP traffic.
New-NetFirewallRule -DisplayName 'Allow-HTTP-Inbound' -Profile @('Domain', 'Private') -Direction Inbound -Action Allow -Protocol TCP -LocalPort 80
You should output similar to the image with the details of the new rule.
 Fig. 6: New firewall rule added to a Windows VM
Here’s what each part of the command does:
If you want to remove a rule that’s restricting access, use the Remove-NetFirewallRule cmdlet command and specify the rule’s name, like below.
Remove-NetFirewallRule -DisplayName 'Allow-HTTP-Inbound'
Executing this command removes the restriction on port 80, letting you connect to the VM successfully.
If you’re using a Linux Azure VM, start by checking the firewall status using Uncomplicated Firewall (ufw), a tool that simplifies working with firewall rules in Linux.
The example below uses an Ubuntu 20.04 Linux VM. Ubuntu has UFW installed by default.
To troubleshoot the firewall rules, run the command given below on the terminal to check if the firewall is enabled.
sudo ufw status
The output of this command is either active if the firewall is enabled or inactive if disabled. If it’s inactive, enable the firewall using the command below.
sudo ufw enable
For security purposes, it’s better to allow all outgoing traffic and deny all incoming traffic. Do so using the following commands.
sudo ufw default allow outgoing
sudo ufw default deny incoming
Run the following command to allow incoming traffic on a specific port, such as HTTP traffic on port 80.
sudo ufw allow port 80
Then, check whether you successfully added the rule using the following command.
sudo ufw status verbose
You should see an output similar to the image below, with To “80”, Action “ALLOW IN”, and From “Anywhere.”
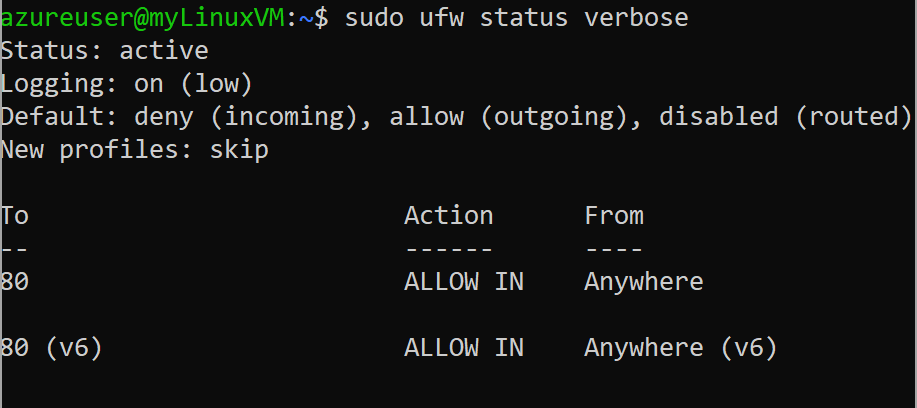 Fig. 7: Verbose status of an Ubuntu firewall
To deny a connection on port 80, run the following command.
sudo ufw deny 80
To delete this rule, run the following command.
sudo ufw delete deny 80
For a secure system, configure the OS firewall rules to allow only the incoming connections your VM needs and deny any unnecessary ones.
A NIC allows your VM to communicate with other networks, so if it has issues, your connection breaks down.
Azure Network Watcher can diagnose these issues via several tools to monitor, analyze, and debug connectivity problems. To troubleshoot issues with the NIC, use a tool like IP flow verify to detect traffic filtering issues at the VM level. The tool checks whether a packet is allowed to or from an IP address and tells you which rule allowed or denied it.
To use Azure Network Watcher, go to the Azure Portal and select Network Watcher on the overview page. Under Network diagnostic tools, select IP flow verify from the sidebar. Azure Network Watcher’s IP flow verify feature will confirm if a rule in your NSG blocks traffic to or from your VM.
On the IP flow verify page, fill in the required details:
Now, click Verify IP flow to check if an NSG rule is blocking the traffic.
The results (in the following image) indicate that traffic isn’t allowed from 102.217.126.3 because of the DenyAllInBound security rule.
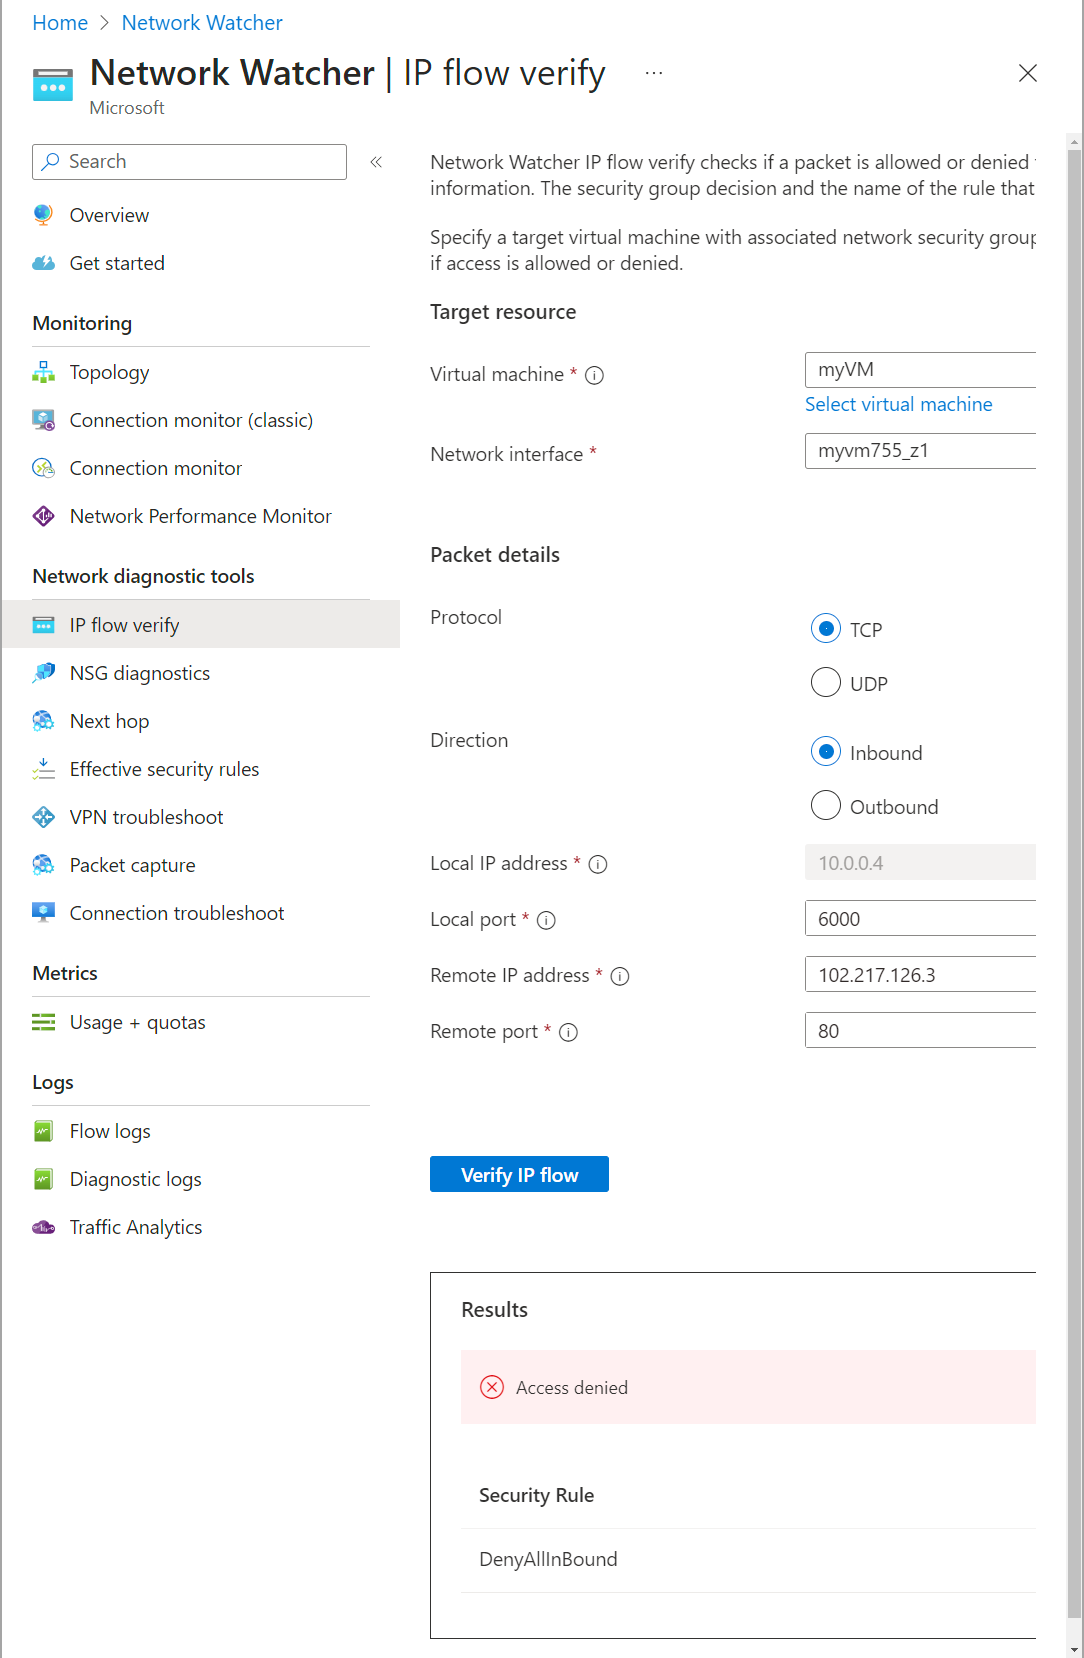 Fig. 8: IP flow verify results
To fix this issue, add a new NSG rule with a lower priority number that allows inbound traffic from this IP address on port 80.
Start by installing the Azure PowerShell module using the following command.
Install-Module -Name Az
If it’s your first time installing a module from PowerShell Gallery, it prompts you to allow the installation. Select yes or yes to all to continue.
Then, sign in to your Azure account using the command below.
Connect-AzAccount -UseDeviceAuthentication
The tool you need is Test-AzNetworkWatcherIPFlow, which tells you if a packet is allowed or denied to or from a particular destination.
First, retrieve the Network Watcher resource using the command below.
$nw = Get-AzResource | Where-Object {$_.ResourceType -eq "Microsoft.Network/networkWatchers" -and $_.Location -eq "eastUS" }
$networkWatcher = Get-AzNetworkWatcher -Name $nw.Name -ResourceGroupName $nw.ResourceGroupName
Then, retrieve the VM from Azure using the following command.
$VM = Get-AzVM -ResourceGroupName demo -Name myVM
Next, retrieve the network interfaces associated with the VM using the command below.
$Nics = Get-AzNetworkInterface | Where-Object { $VM.NetworkProfile.NetworkInterfaces.Id -contains $_.Id }
Now, use the following command to verify the IP flow for HTTP traffic using the first IP from the first network interface for inbound traffic on port 80.
Test-AzNetworkWatcherIPFlow -NetworkWatcher $networkWatcher -TargetVirtualMachineId $VM.Id -Direction Inbound -Protocol TCP -LocalIPAddress $Nics[0].IpConfigurations[0].PrivateIpAddress -LocalPort 6000 -RemoteIPAddress 13.107.21.200 -RemotePort 80
The result (below) indicates whether the traffic is allowed or blocked and identifies the rule that allows or blocks it.
Access RuleName
------         --------
Deny   defaultSecurityRules/DenyAllInBound
In this case, the result shows that access is denied for all inbound traffic. You can add a new NSG rule with a lower priority number to allow traffic.
Resource exhaustion, a result of depleting CPU, memory, or disk space, can lead to Azure VM connectivity issues. Azure’s built-in diagnostic tools help identify if your VM is suffering from resource exhaustion, allowing you to take remedial action, such as resizing the VM or reducing the workload.
To perform the diagnosis, go to the Azure portal and select Virtual Machines. Then, select the VM you’d like to check.
In the Help section, select Performance diagnostics, then click Install performance diagnostics. After it finishes installing, click Run diagnostics. This action presents four options: quick performance analysis, performance analysis, advanced performance analysis, and Azure files analysis.
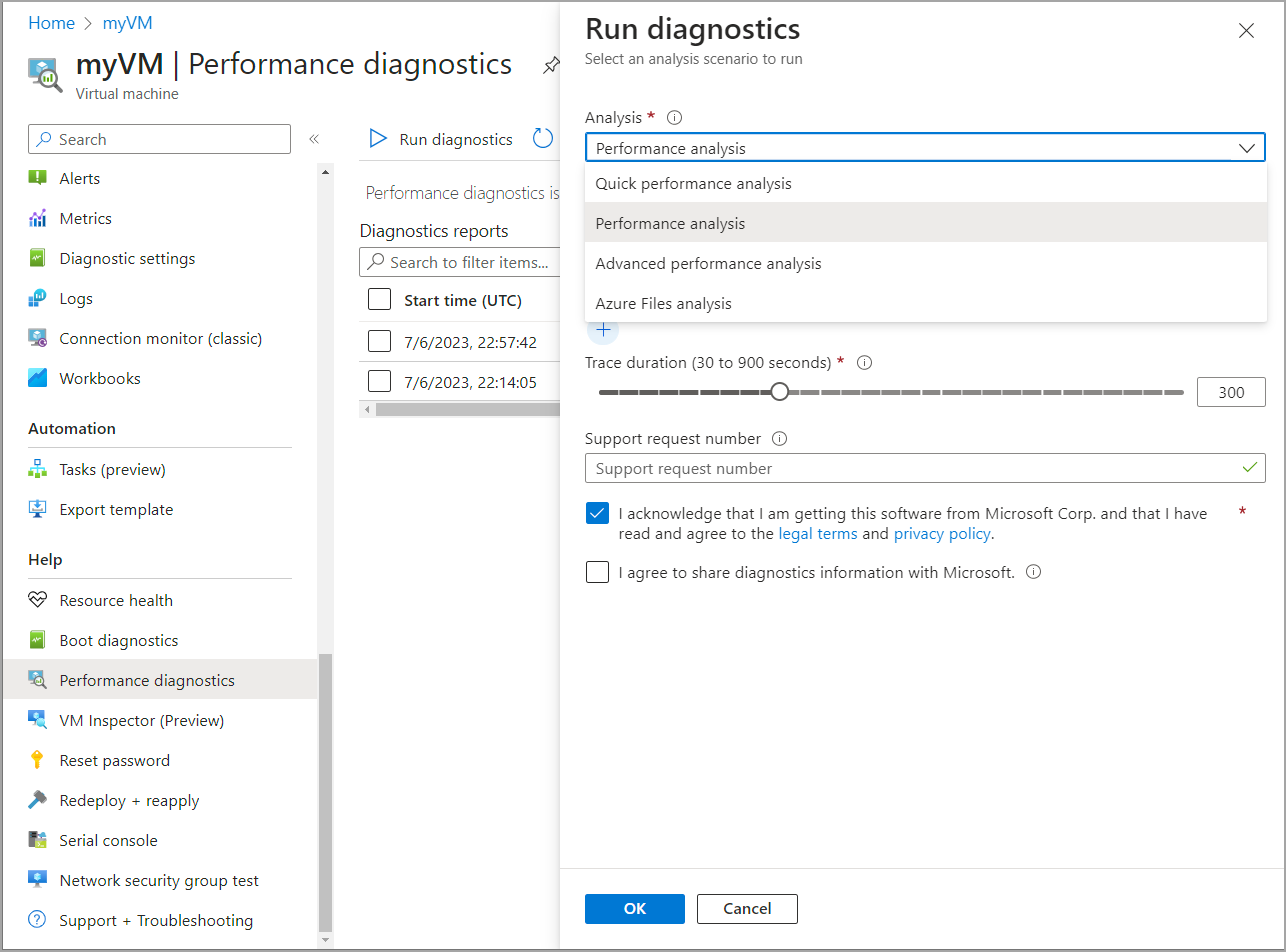 Fig. 9: Running diagnostics on an Azure VM
Each option analyzes the VM at a different level. For this demonstration, select the performance analysis, which monitors high resource consumption—including high CPU and memory usage. Select the analysis’ duration. The longer you specify, the larger the output file’s size.
Click OK to start the analysis. Then, open the generated report, which should look similar to the image below.
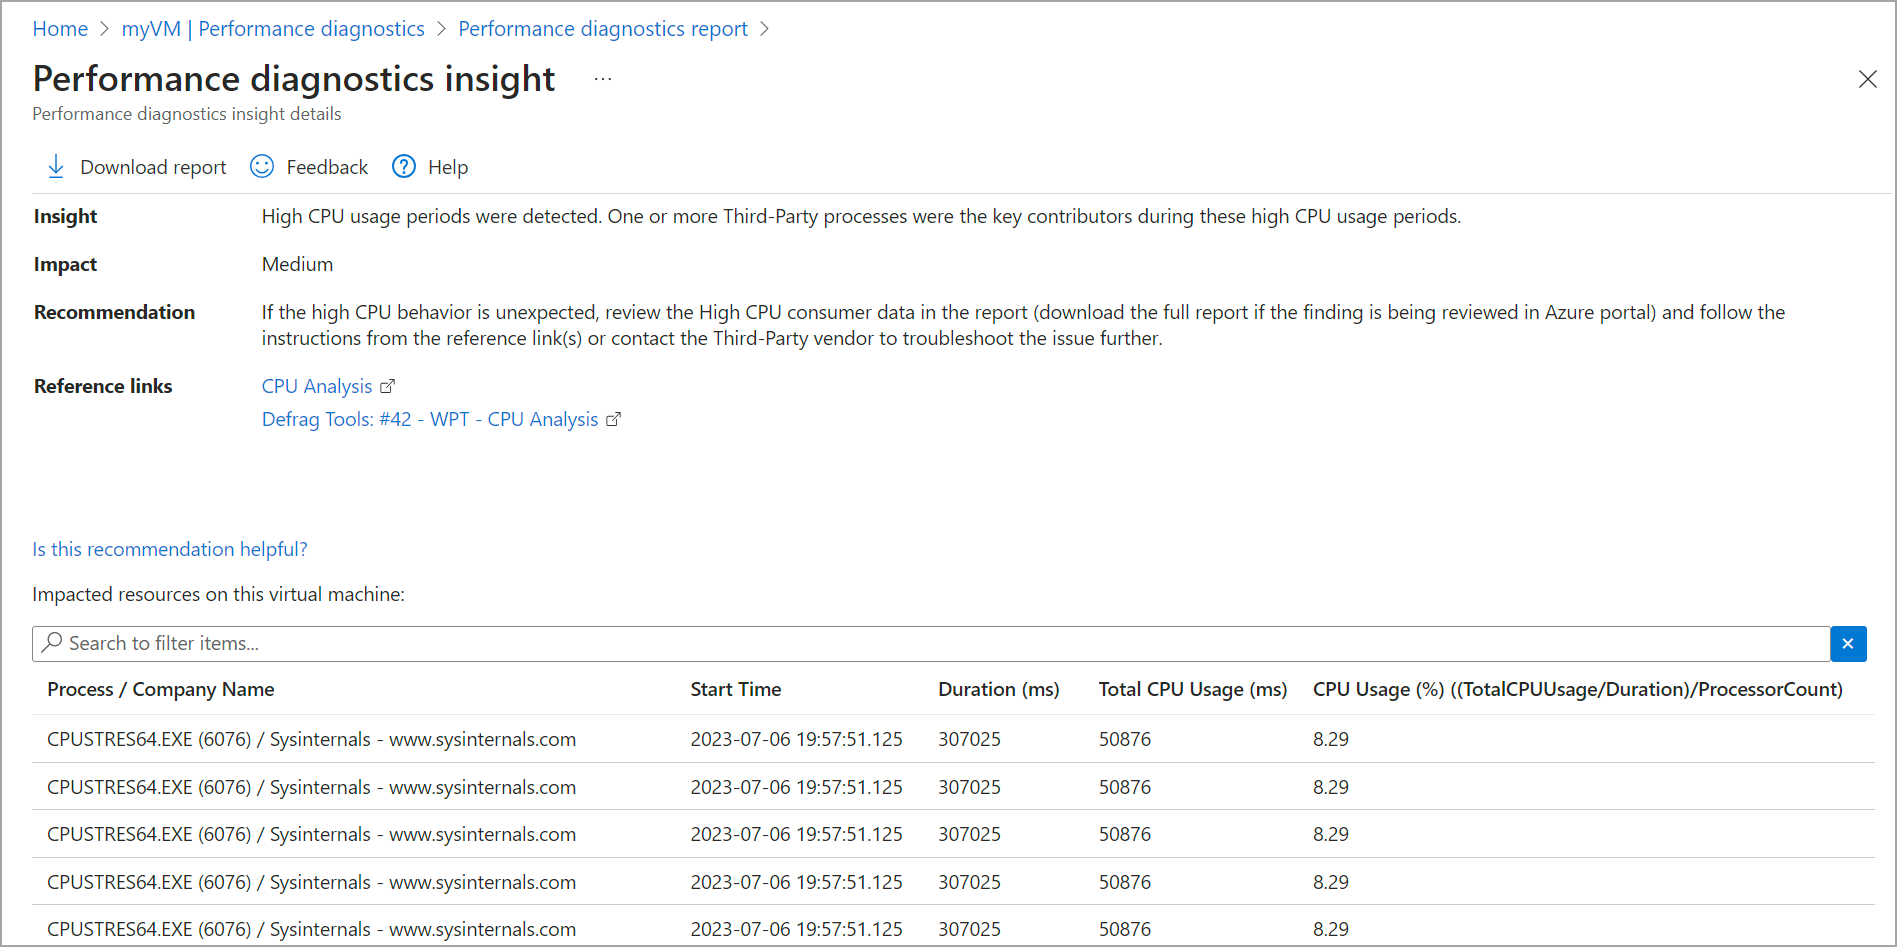 Fig. 10: Azure VM’s performance diagnostics insights
The report identifies high CPU usage periods, leading to latency and a slow system. It also lists the programs that contributed to the increased usage levels.
You can address the resource-intensive programs individually and decide how to scale the system, like if you need to allocate more processing power to the Azure VM.
Troubleshooting Azure VM connectivity issues requires a systematic approach to isolate the problem and identify the correct solution. Following best practices, such as starting with the most obvious potential issues, using Azure’s diagnostic tools effectively, and understanding your VM’s configuration, including NIC settings, NSG rules, and firewall settings, can streamline this process.
Consider using a comprehensive monitoring tool for a more in-depth look into your VM’s performance. Site24x7’s Azure Monitoring tool integrates with Azure to monitor over 100 resources, including Azure VMs.
This tool’s infrastructure dashboard represents a view of all your account’s Azure resources. You can view the resources according to their states: up, down, or discovery in progress. You can also view the daily usage of critical resources on the inventory dashboard for services like VMs.
Also, Site24x7’s Azure Server Monitoring extension helps you monitor VM metrics like CPU percentage, disk usage metrics, and network inflows and outflows. You can create VM thresholds to get alerts when these thresholds are surpassed.
With Site24x7, you can also view your VM’s past performance data to identify—and remediate—connectivity issues before they create service disruptions.
Get ahead of VM connectivity issues before they cause problems and give Site24x7 a try today.
Yes, Site24x7 tracks key Azure VM network metrics like Network In and Network Out, helping you analyze traffic patterns and detect connectivity issues in real time.
Site24x7 monitors CPU, memory, and disk usage in real-time. You can set thresholds to receive alerts before resource exhaustion impacts connectivity.
Yes, Site24x7 can monitor the status and throughput of your Azure VPN Gateways and ExpressRoute circuits, ensuring your hybrid connectivity remains stable.