The recent advancements in containers have transformed the way applications are built. Containerization tools help developers test, package, and deploy apps faster, with orchestration systems like Kubernetes help scale and manage those containers.
Azure Kubernetes Service (AKS) is a hosted Kubernetes service that provides straightforward development and deployment tooling for cloud-native apps in Azure. However, migrating traditional ASP.NET applications to AKS can be tedious and prone to errors. That’s why Azure Migrate was introduced: to facilitate the containerization of ASP.NET applications for easy deployment.
Most ASP.NET applications fall into one of two categories: ASP.NET Core and ASP.NET MVC 4. The former is an open-source framework compatible with multiple operating systems, while the latter is a mature framework for building server-based web apps exclusively on Windows.
This hands-on article guides you through migrating any existing ASP.NET application to AKS using the Azure Migrate tool. By the end of this article, you’ll know how to migrate your own existing projects onto AKS, even if they weren’t originally designed to run on containers or be deployed in Kubernetes.
To follow this demonstration, you’ll need the following:
You'll also need to configure your ASP.NET permissions properly. To do so, right-click the C:\IISPublish folder, open the Security tab, click the Edit button and add the full control permissions to the IUSR user.
Note that this article includes tutorials for migrating both types of ASP.NET applications. To skip to the guide most relevant to your project, click on one of the following:
You have some options for modernizing ASP.NET web applications into a containerized environment. One option is to upgrade the application to a newer version. However, you can also do it without changing the application’s code.
First, you must package your application to ensure it behaves similarly, regardless of the environment. This assembled format is called a container image.
Next, the container image is put into Azure Container Registry to make the image accessible to the application hosts.
Finally, you deploy the application into AKS.
 Fig. 1: Containerization of an existing ASP.NET app
This section demonstrates how to correctly fill in the fields and settings the Azure Migration App Containerization tool requires.
Once the tool is installed, open the tool URL at https://localhost:44369/. You can also click on the shortcut icon on your desktop.
Log in using the computer’s local administrator account when the sign in form appears.
 Fig. 2: The Azure Migrate App Containerization tool
Now, you can get the app migration tool. Open the Microsoft Azure home page, sign in, and search for “Azure Migrate.”
 Fig. 3: Searching for the Azure Migrate service
Click Explore more, then select App Containerization under Web apps to container.
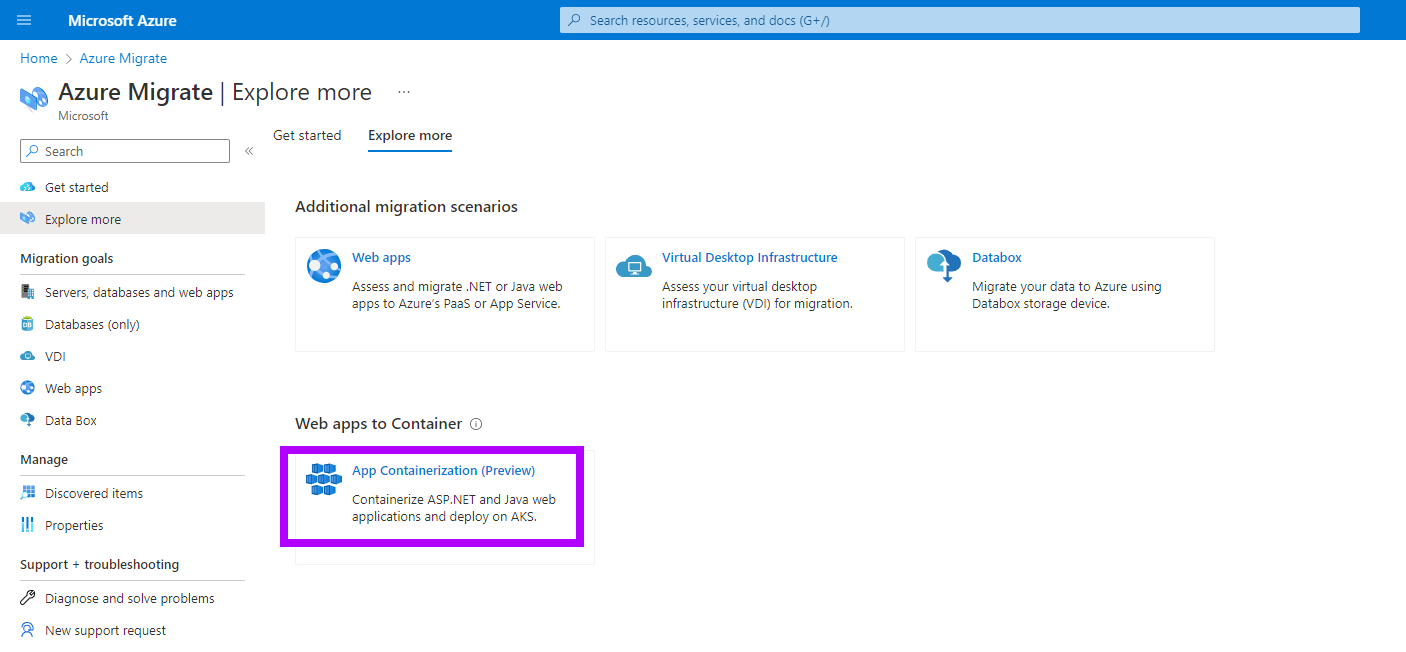 Fig. 4: The Azure Migrate blade in Azure Portal
The next page provides links to learn more about migrating ASP.NET applications to containers on AKS and prompts you to download the App Containerization tool. Click the Download button.
 Fig. 5: Download the App Containerization tool
You’ll see that The App Containerization tool has been downloaded:
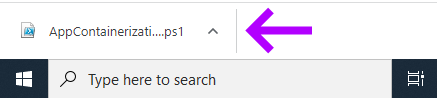 Fig. 6: The App Containerization tool was downloaded
To install the tool, open PowerShell in Administrator mode.
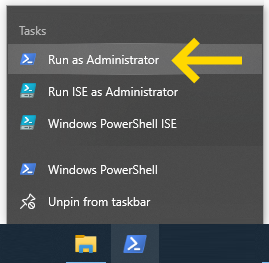 Fig. 7: Select Run as Administrator
In PowerShell, change the directory to the Downloads folder, then run the App Containerization installer using the code below:
> cd ~/Downloads
> .\AppContainerizationInstaller.ps1
 Fig. 8: Running the App Containerization Installer
The App Containerization tool will be installed and added as a website on your local machine’s IIS.
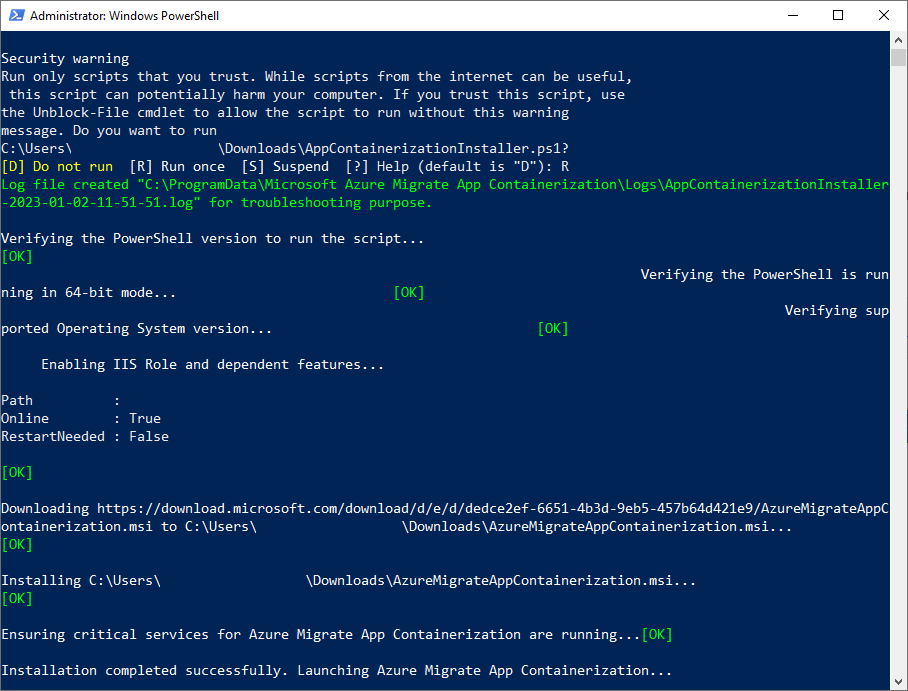 Fig. 9: The App Containerization installation
The installer will launch the Azure Migrate App Containerization website. When the following page appears on the browser, ignore the alert by clicking the ADVANCED button.
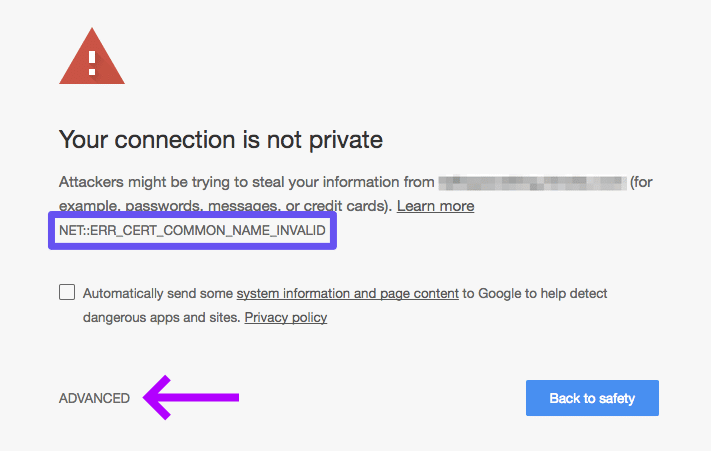 Fig. 10: Solving the “Your connection is not private” alert
This will open a link allowing you to proceed to the local website.
 Fig. 11: Proceeding to the local App Containerization website
The App Containerization tool will open on your browser, as shown below. You can access it anytime by opening the https://localhost:44369/ URL.
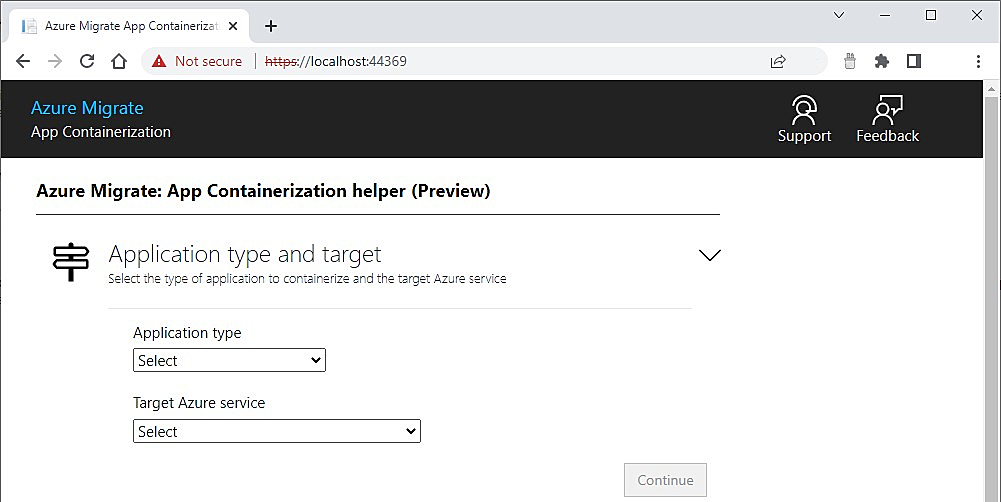 Fig. 12: The App Containerization tool
Begin by creating and configuring a simple ASP.NET Core project to use as an example. If you prefer, you can also repurpose any open-source code instead of creating it manually.
First, download and install the IIS runtime support (ASP.NET Core Module v2).
Open IIS and click on Modules.
Then, click Configure Native Modules:
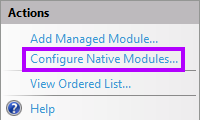 Fig. 14: The Configure Native Modules action
Ensure the AspNetCoreModuleV2 module is included. This IIS module is required to enable IIS to support ASP.NET Core 2.0 and later applications.
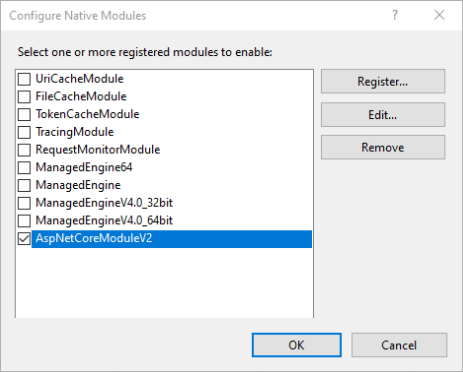 Fig. 15: Selecting the AspNetCoreModuleV2 module
After right-clicking on the Visual Studio icon, select Run as Administrator.
Create a new ASP.NET Core project named ZohoAPICore. Ensure that “Enable Docker support” isn’t checked.
Right-click on the new project, then click the Publish menu. Select C:\IISPublish\ZohoAPICore as the folder location, then click Publish.
Next, open IIS. Right-click the Sites node, then click Add Website.
Provide the following parameters:
zohoapicoreC:\IISPublish\ZohoAPICorelocalhost80Finally, head back to Visual Studio and click New publish profile. Select the Web Server (IIS) option, then choose Web Deploy and add the following options:
localhostzohoapicorelocalhostAs they appear, click Validate Connection, Finish, and Publish.
The web application will start, and the homepage should look like this:
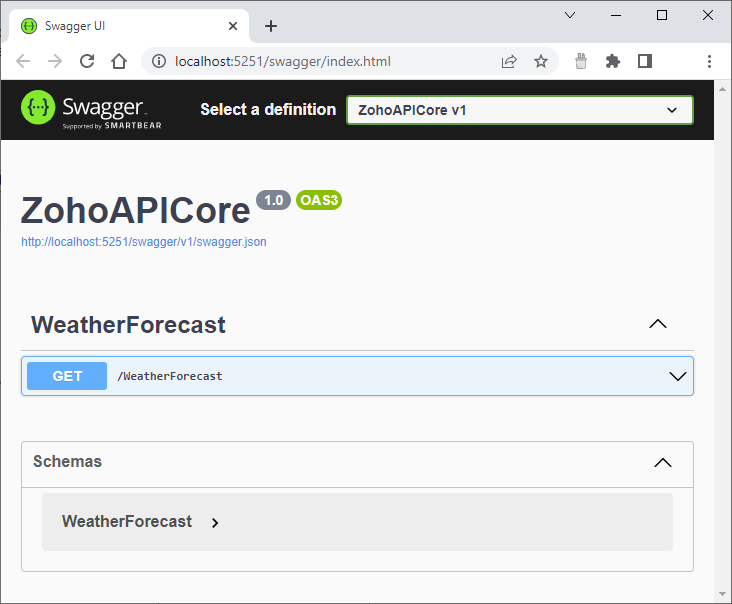 Fig. 16: Running the local ASP.NET Core app on IIS Express
Now that you have your example project, you’ll migrate it to AKS using the Azure Migrate tool.
First, open your local IIS Manager to check if it’s hosting the ASP.NET Core application.
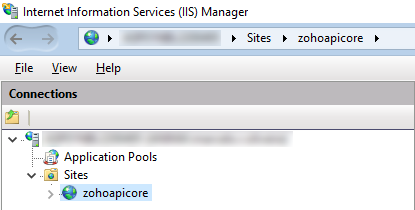 Fig. 17: The ASP.NET Core website hosted on IIS
Once the ZohoAPICore web application is hosted, it will expose the /WeatherForecast endpoint, implemented by the \Controllers\WeatherForecastController.cs file.
Open the http://localhost/WeatherForecast URL to check if the application is running correctly on IIS.
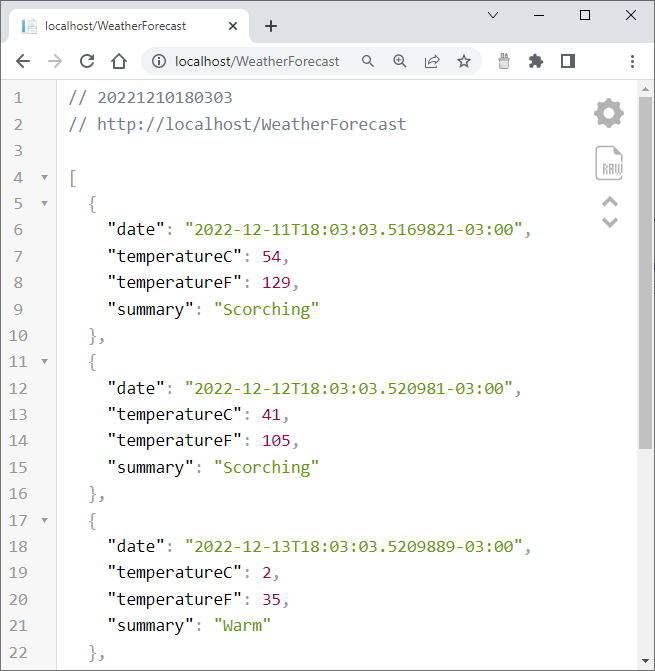 Fig. 18: The ASP.NET Core app running on the local IIS
Select the type of application to containerize: ASP.NET web apps. In the dropdown menu for Target Azure service, select Containers on Azure Kubernetes Service.
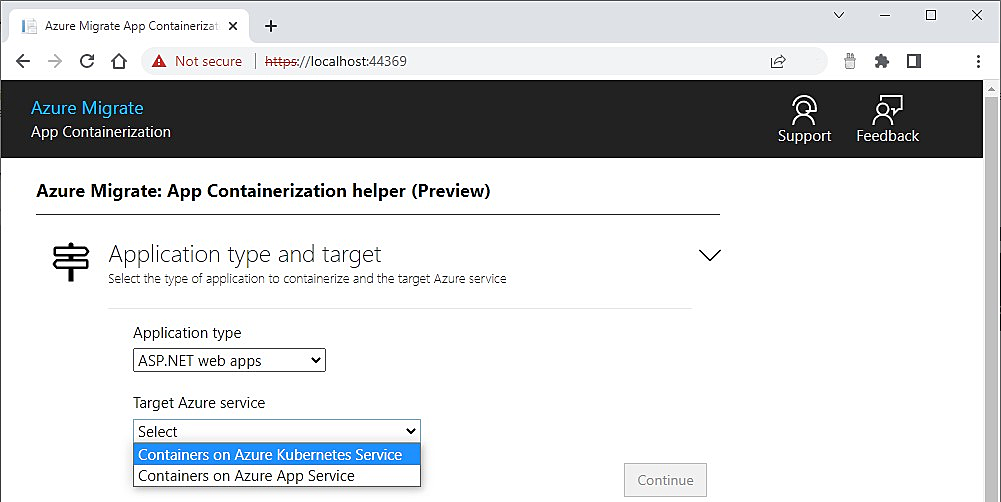 Fig. 19: Opening the Azure Migrate App Containerization tool
Then you'll be asked to check some prerequisites, including installing Microsoft Web Deploy, which is used to export the ASP.NET website hosted in your local IIS.
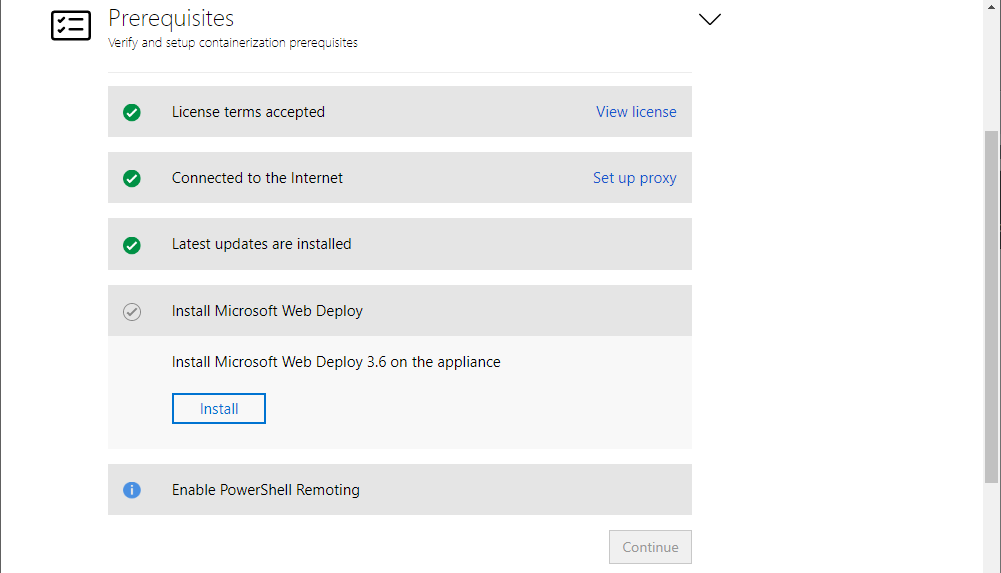 Fig. 20: Checking the migration tool prerequisites
Next, you'll have to authenticate with your Azure credentials.
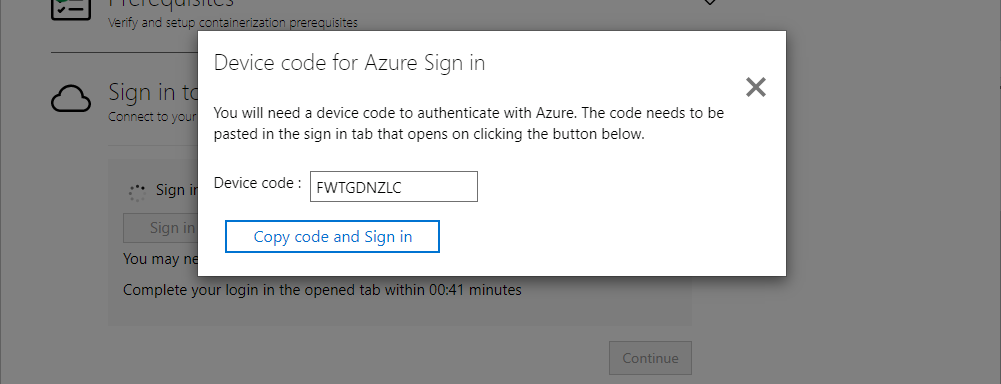 Fig. 21: Providing Azure credentials
After authenticating with the device code, provide the tenant and your Azure subscription.
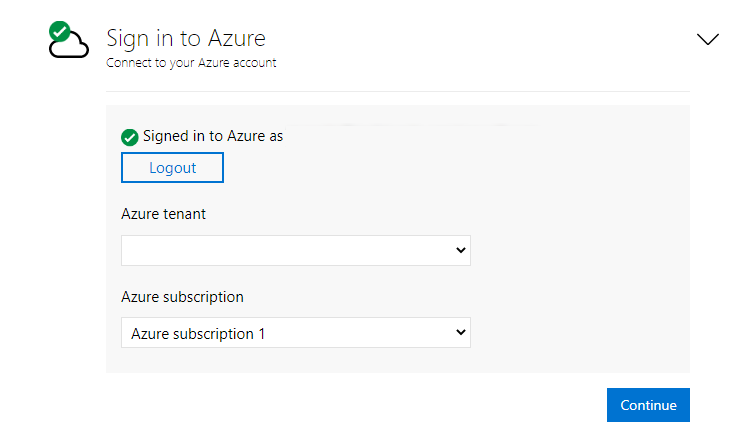 Fig. 22: Providing Azure tenant and subscription
Then you have to provide information about the source of your applications. Since the web app is hosted locally, provide 127.0.0.1, which represents the Server IP address of your local computer. Also, enter the username in the COMPUTER NAME\username format and password with privileges to access your local IIS.
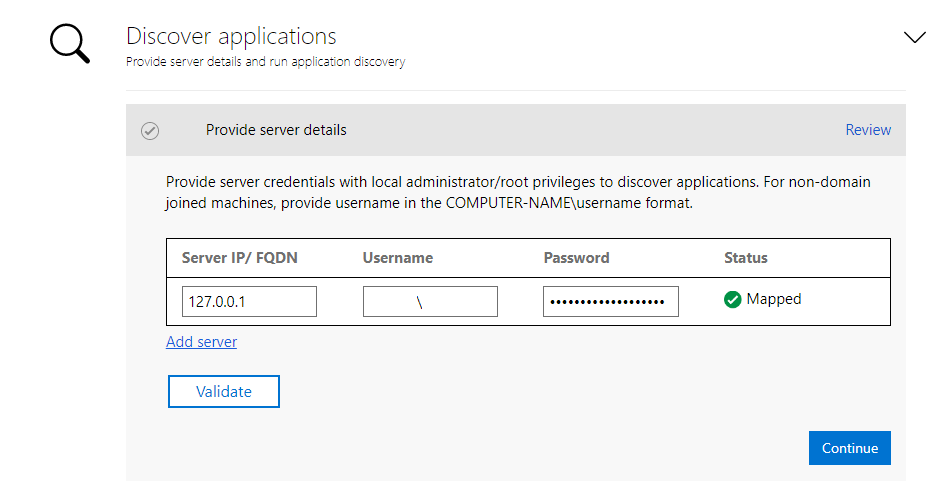 Fig. 23: Providing IIS admin user credentials
Next, specify the Target container. The tag used for the container image will be displayed in the name:tag format—for example, “zohoapicore:v1.”
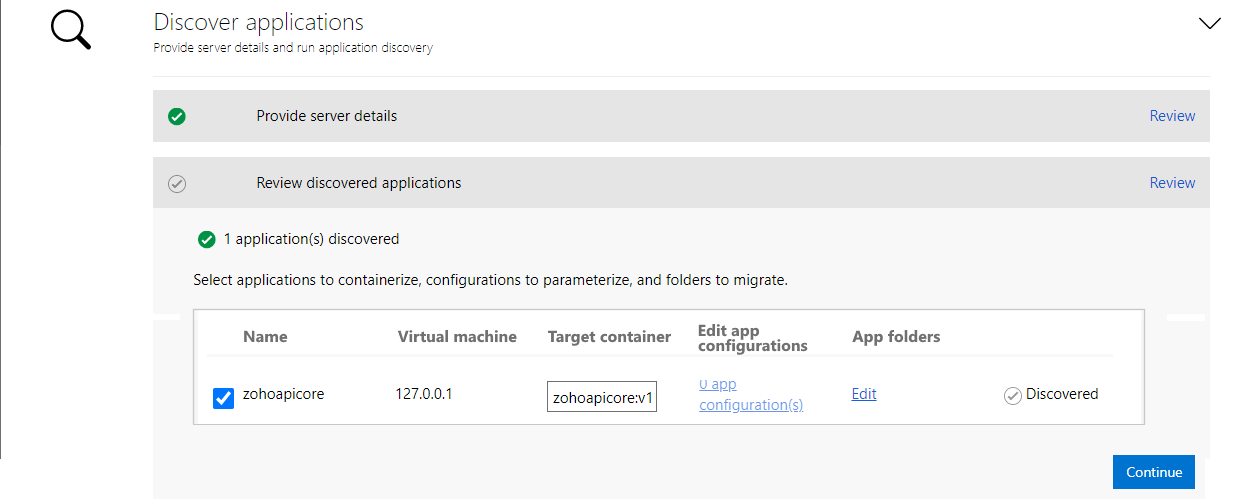 Fig. 24: Discovering local IIS apps
To build a container image, follow the steps below.
Select Azure Container Registry. The Azure Container Registry (ACR) is a repository for storing and accessing container images. Select the Azure Container Registry you want to use from the dropdown menu.
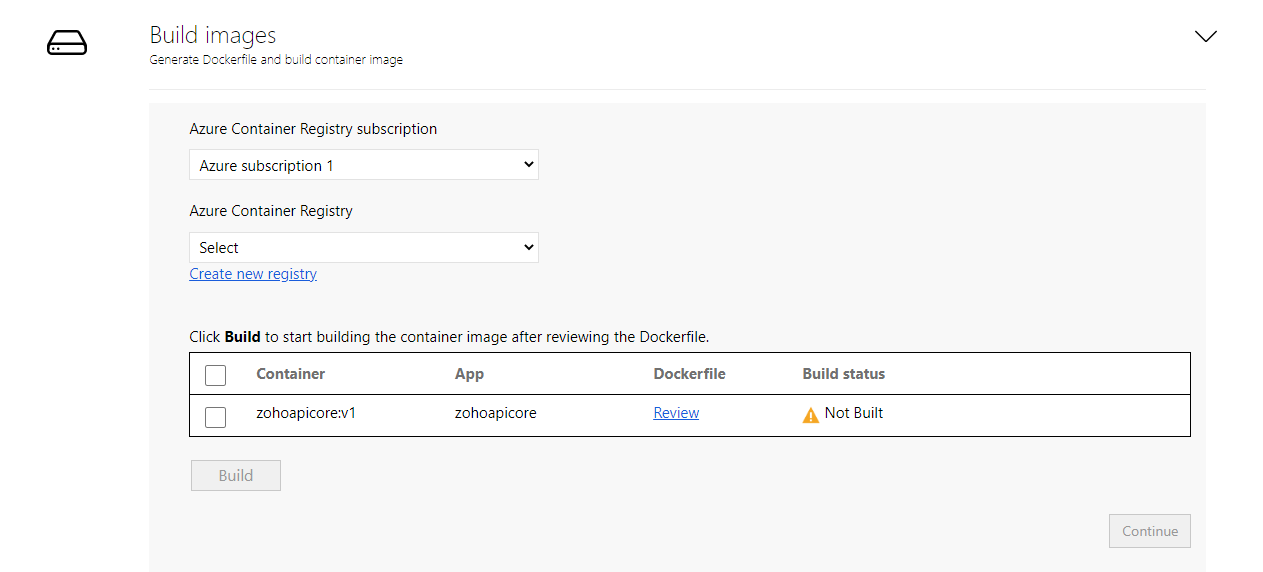 Fig. 25: Providing the Azure Container Registry
You have the option of using a new or existing Azure Container Registry. To create a new one, click on Create new registry. In this case, you’ll provide your Azure subscription, a resource group, a container registry name, and a location.
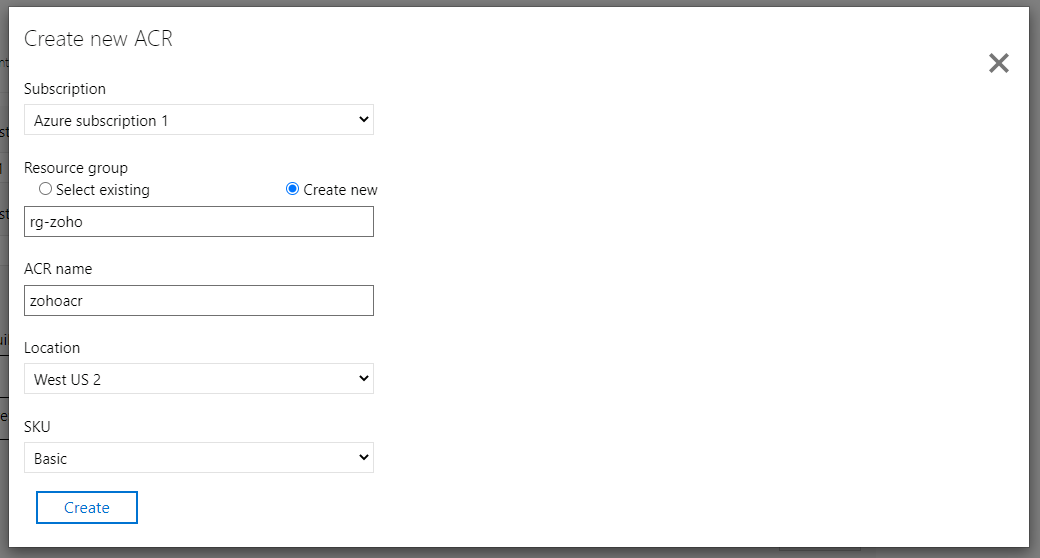 Fig. 26: Configuring Azure Container Registry
You need to edit the Dockerfile that was created at the start of the build step. Dockerfile is a text document containing several command-line, step-by-step instructions that tell Docker how to build a container image, saving users from performing all the steps manually. Click Review to review the Dockerfile.
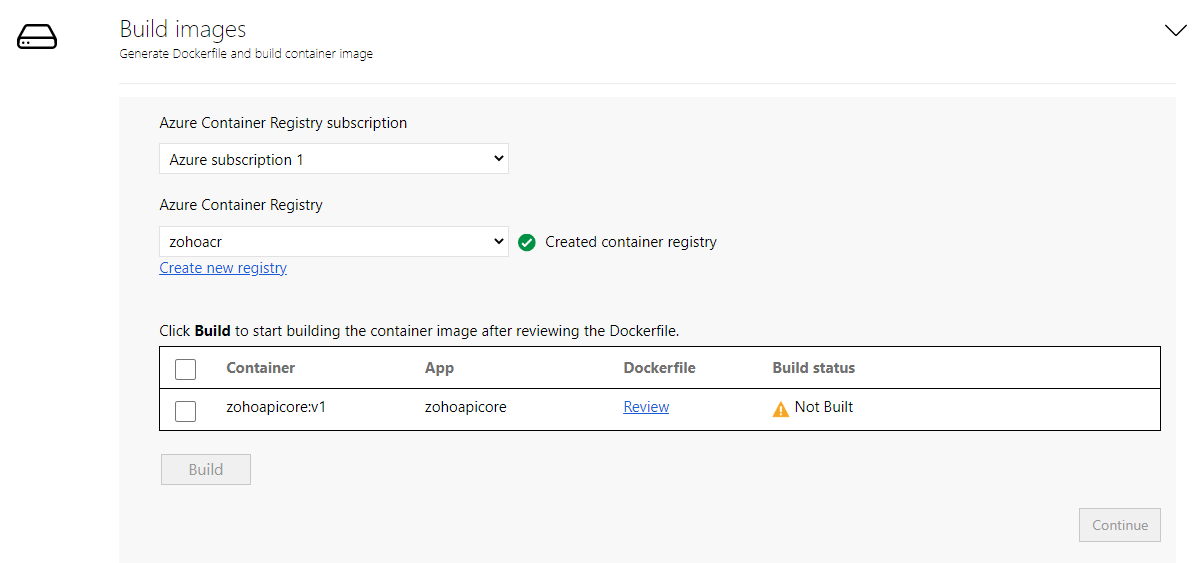 Fig. 27: Reviewing the Dockerfile
Edit the Dockerfile before building the docker image to avoid AKS version compatibility issues and ensure a seamless migration.
Change the script below from shell form below:
# Run entrypoint script.
COPY ./Entryscript.ps1 c:/Entryscript.ps1
ENTRYPOINT powershell c:/Entryscript.ps1
To the following exec form:
COPY ["./Entryscript.ps1", "c:/Entryscript.ps1"]
ENTRYPOINT ["powershell", "c:/Entryscript.ps1"]
By default, the Dockerfile COPY and ENTRYPOINT commands above come in the shell form. However, since AKS 1.23+, Microsoft recommends the exec form since it ensures that no compatibility errors will occur.
During the reviewing stage, customize the Dockerfile as necessary, then save before the build process begins.
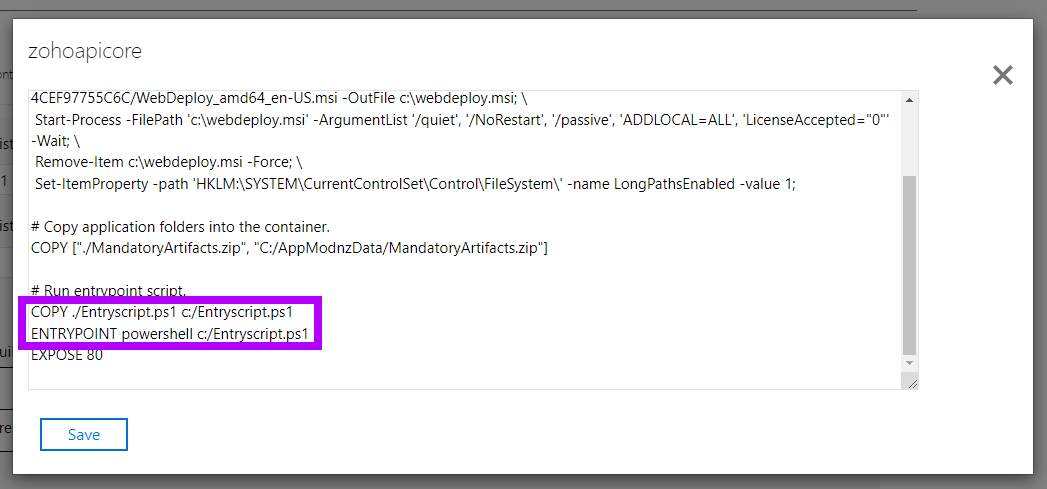 Fig. 28: The Dockerfile details
Select the ASP.NET Core application to build images for and click the Build button. This will start the container image build for each selected application. The tool will continuously track the build status for you. Once it’s complete, you can move on to the next step.
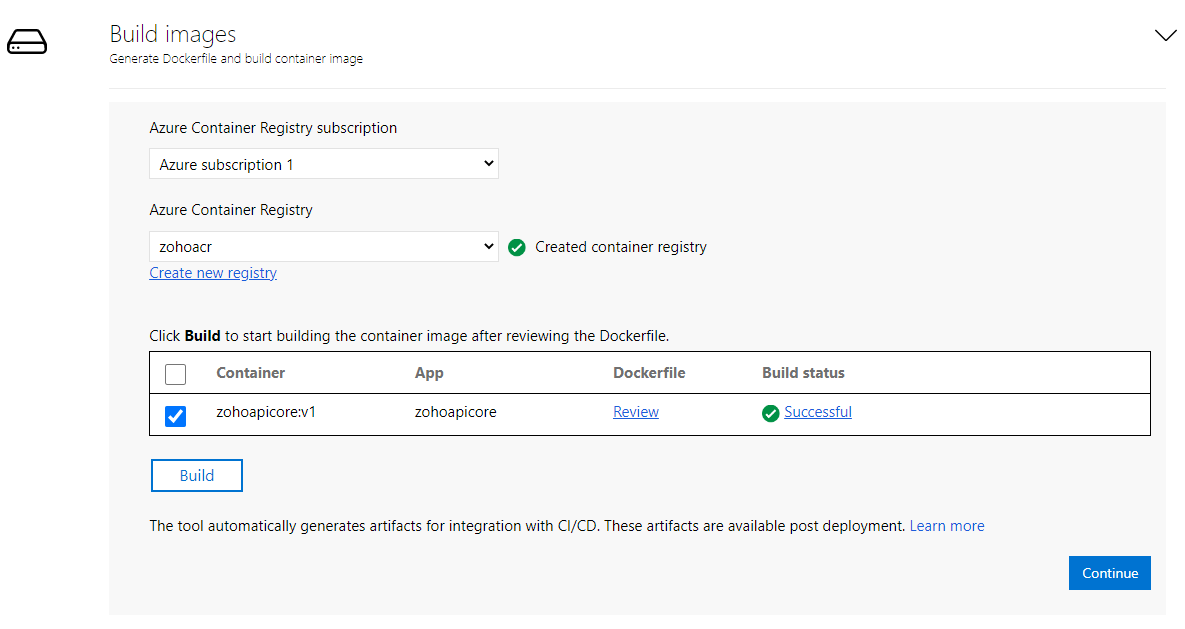 Fig. 29: Building the image
If you prefer manual monitoring, click on Build in Progress underneath the status column. Once you've begun the build process, the link takes a couple of minutes to become active.
When the build is successfully completed, click Continue.
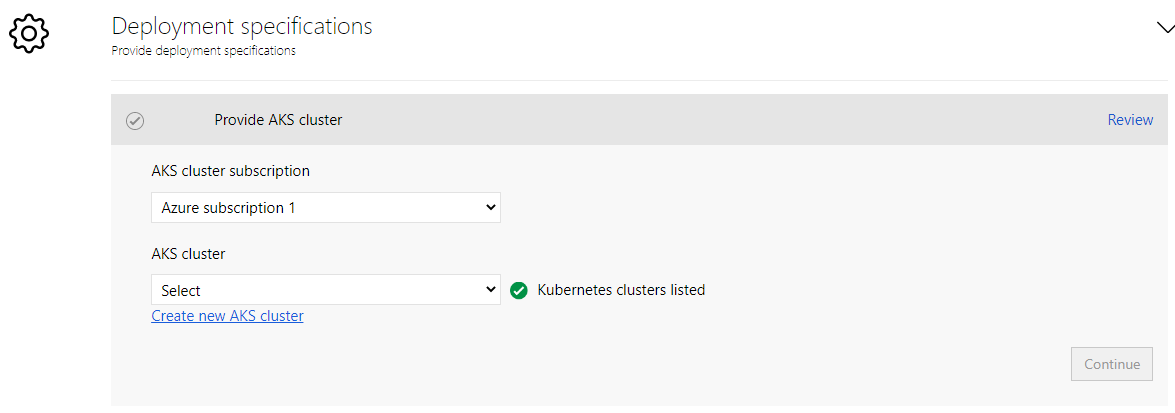 Fig. 30: The deployment specifications
You need to specify which AKS cluster you want the application to deploy to.
The selected cluster needs a Windows node pool and the ability to pull images from the selected registry. To create an AKS cluster, click on Create new AKS cluster.
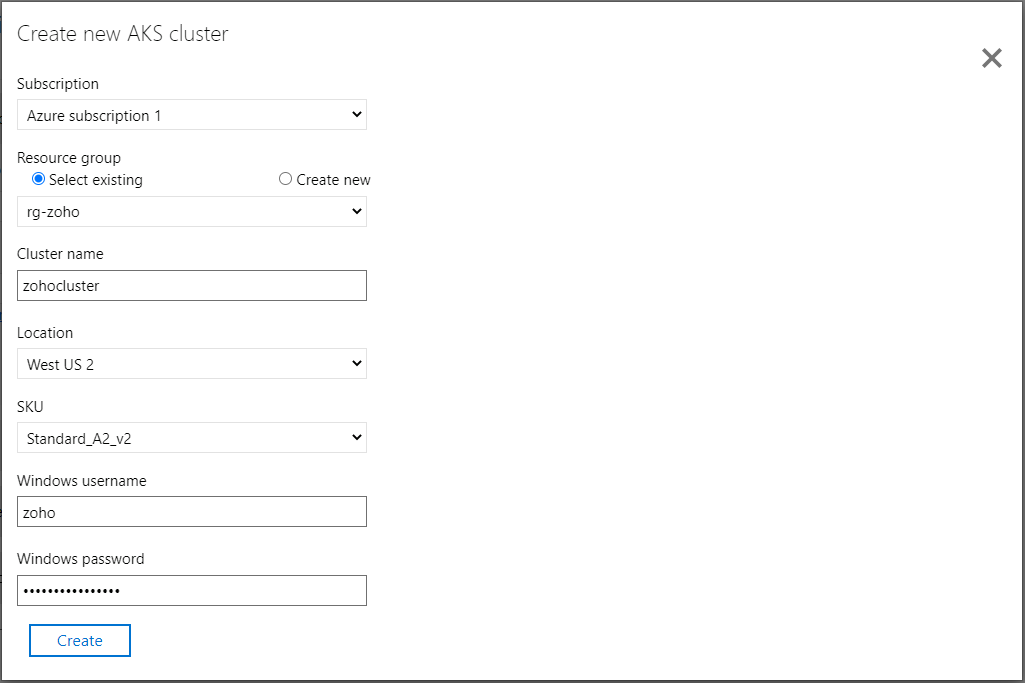 Fig. 31: Creating the AKS cluster
Click Create and then Continue.
Then skip the Specify secret store and Specify Azure file share steps because your ASP.NET application doesn’t need them.
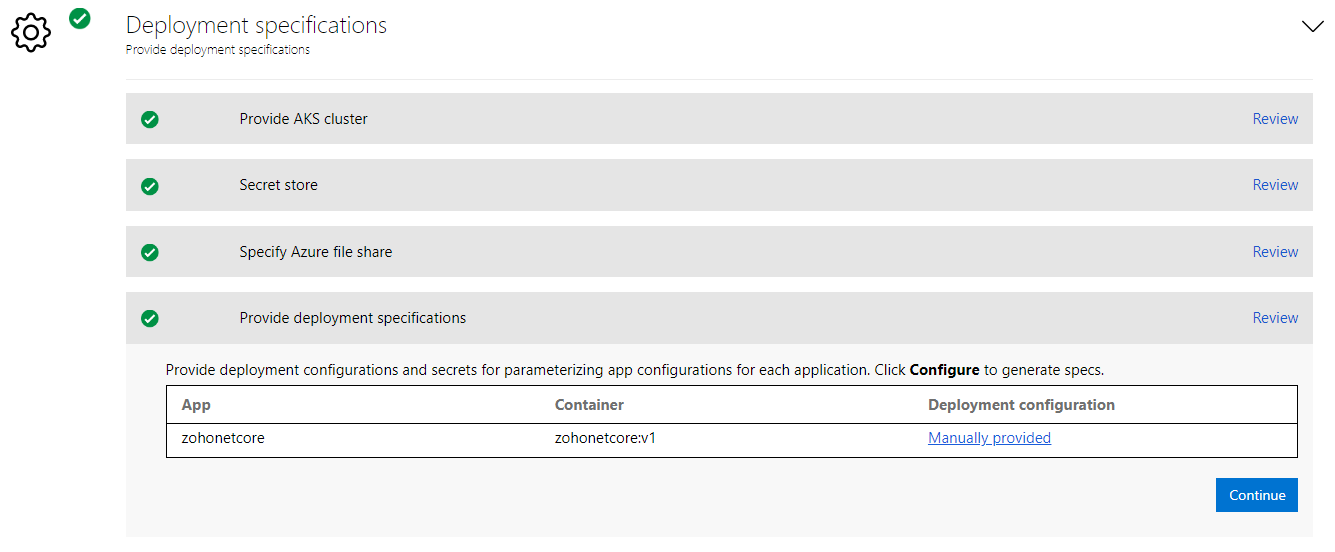 Fig. 32: The deployment specifications
Under Provide deployment specifications, click the Configure link. Here, you’ll provide the prefix string for resources created in the AKS cluster, the mapped network ports, the number of replicas, and the load balancer type. Ensure the values are the same as the ones below:
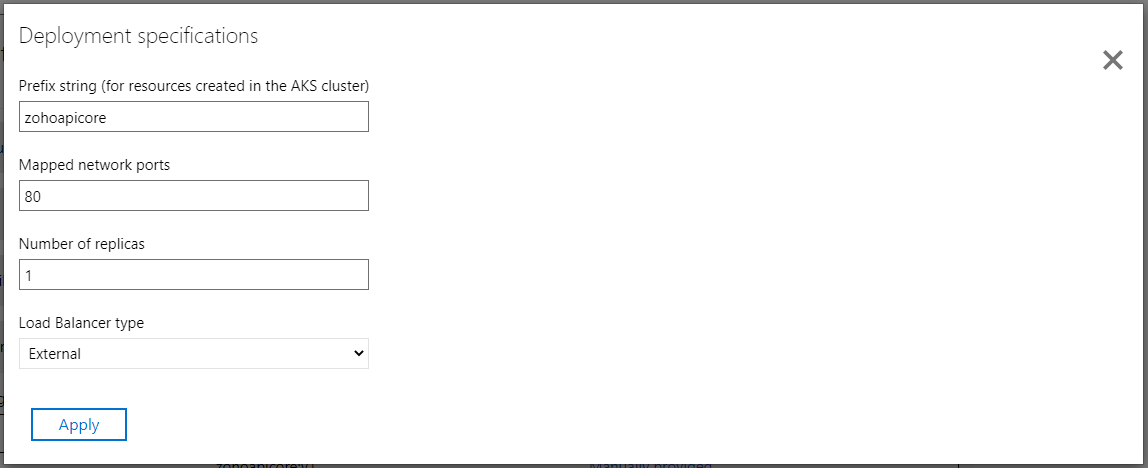 Fig. 33: Reviewing the deployment specifications
Then click the Continue button.
 Fig. 34: Reviewing the containers to deploy
Now, under the Deploy containers section, click the Edit link.
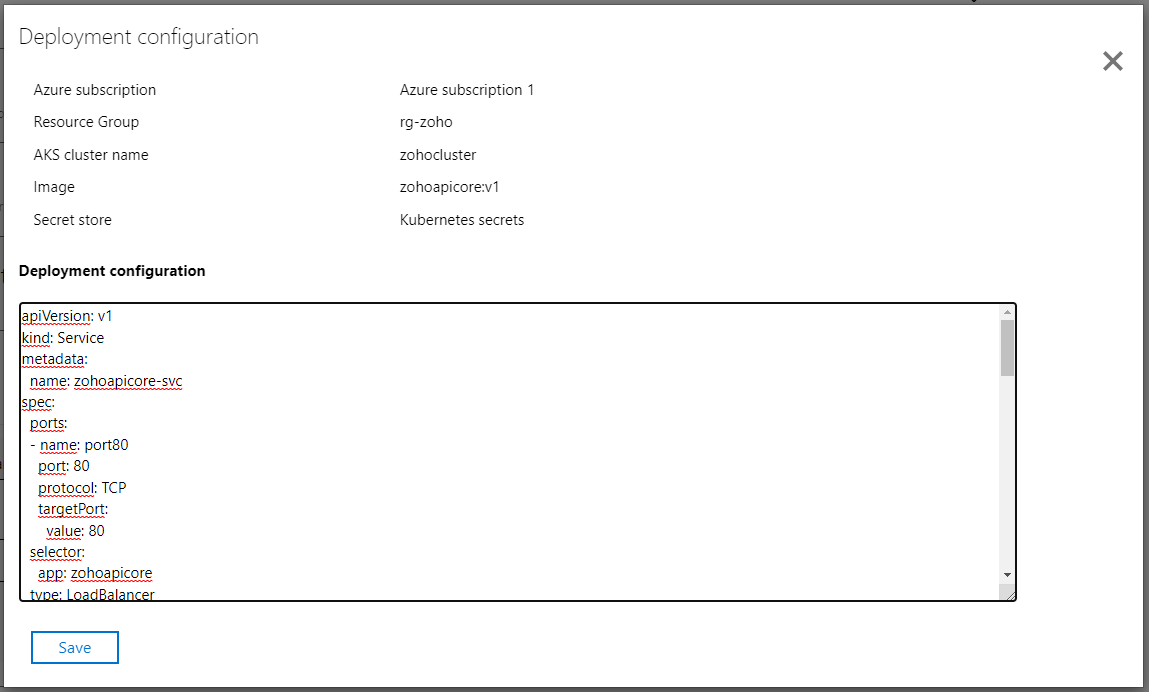 Fig. 35: The deployment configuration details
Here’s a breakdown of the deployment configuration details:
Service Configuration
StatefulSet Configuration
(A StatefulSet guarantees that the Pod restarts when you mount a volume with its original state preserved.)
apiVersion: apps/v1
kind: StatefulSet
metadata:
  labels:
    app: zohoapicore
  name: zohoapicore-sts
spec:
  replicas: 1
  selector:
    matchLabels:
      app: zohoapicore
  serviceName: zohoapicore-svc
  template:
    metadata:
      labels:
        app: zohoapicore
      name: zohoapicore-sts
    spec:
      containers:
      - env:
        - name: POD_NAME
          valueFrom:
            fieldRef:
              fieldPath: metadata.name
        image: zohoacr.azurecr.io/zohoapicore:v1
        imagePullPolicy: Always
        name: zohoapicore
        ports:
        - containerPort: 80
        resources:
          limits:
            cpu: 2
            memory: 800M
          requests:
            cpu: 1
            memory: 300M
        terminationMessagePolicy: FallbackToLogsOnError
        volumeMounts: []
      nodeSelector:
        beta.kubernetes.io/os: windows
      volumes: []
  volumeClaimTemplates: []
Don’t change these configurations—just leave them as-is and close the dialog.
Next, click the Deploy button and wait until the containerized application is deployed to AKS. This may take several minutes.
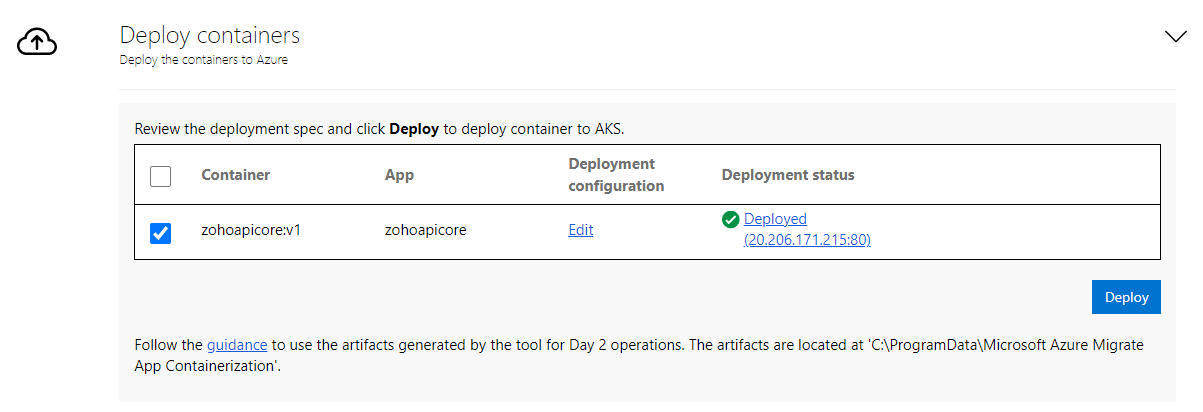 Fig. 36: Deploying the app container to AKS
When you click the Deployed link above, it gives you information about the AKS cluster, the resource group, the APP IP, and the running Service. The tool also indicates that your application Pod is ready.
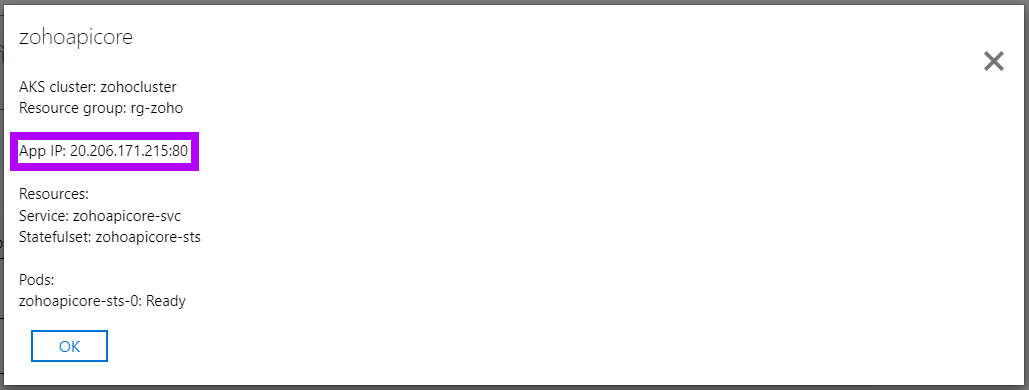 Fig. 37: Reviewing the app deployed to AKS
As shown in the image above, the tool indicates that the application was deployed, and you got an arbitrary App I (in this example, 20.206.171.215) exposed by a load balancer servicing your AKS Pods in the back end.
Copy that IP address and paste it with the /WeatherForecast route on your web browser to check the application. You should see the following contents displaying weather forecasts:
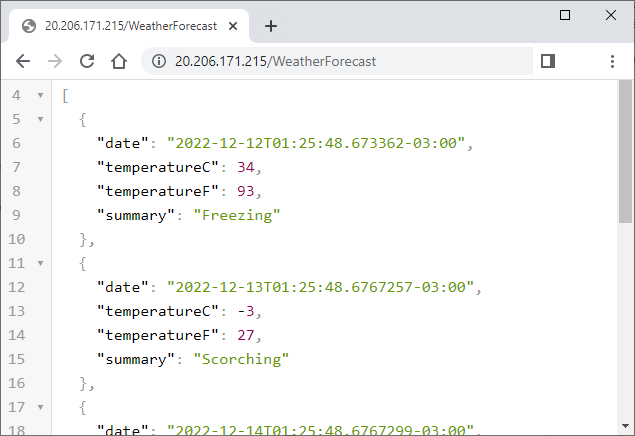 Fig. 38: The migrated ASP.NET Core app running on AKS
Begin by creating and configuring a simple ASP.NET MVC 4 project to use as an example. If you prefer, you can also repurpose any open-source code instead of creating it manually.
First, open the Command Prompt in Administrator mode and enter the following command:
dism /online /enable-feature /featurename:IIS-ASPNET45 /all
The Deployment Image Servicing and Management (DISM) command-line tool above enables Windows features directly from the command prompt. It’s required to enable your local IIS to run ASP.NET 4.5 apps. The /all option at the end of the command ensures that all dependency features are installed.
After right-clicking on the Visual Studio icon, select Run as Administrator.
Create a new ASP.NET MVC 4 project named ZohoNet4. Make sure that “Enable Docker support” is not checked.
Right-click the ZohoNet4 project and click the Publish menu. Select C:\IISPublish\ZohoNet4 as the folder location, then click Publish.
Next, open ISS. Right-click the Sites node, then click Add Website.
Provide the following parameters:
zohonet4C:\IISPublish\ZohoNet4localhost80Return to Visual Studio and click New publish profile. Select the Web Server (IIS) option, choose Web Deploy, and add the following options:
localhostzohonet4localhostAs they appear, click Validate Connection, Finish, and Publish.
The web application will start, and the home page should look like this:
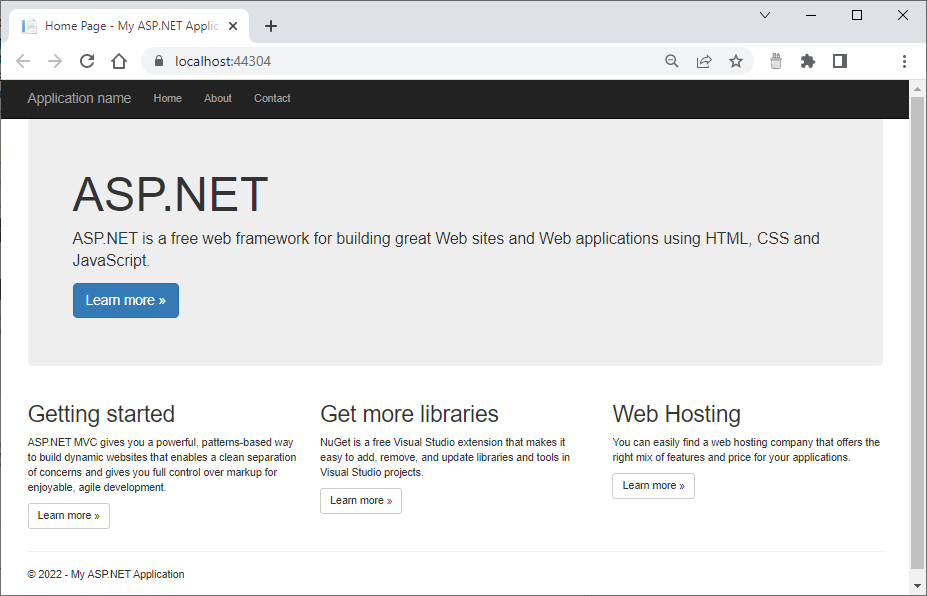 Fig. 39: Running the local ASP.NET MVC 4 app on IIS Express
Now that you have your sample project, you’ll migrate it to AKS using the Azure Migrate tool.
Before migrating your ASP.NET MVC 4 app to AKS, open IIS and check if it’s properly hosting your application. The globe icon at the left of the “zohonet4” name indicates the website was started.
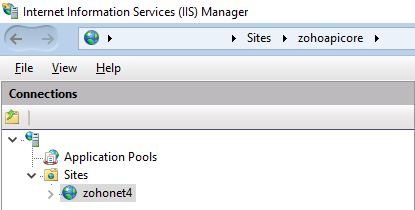 Fig. 40: The ASP.NET MVC 4 website hosted on IIS
Open the http://localhost/ URL to check if the application is hosted and running correctly on the local IIS.
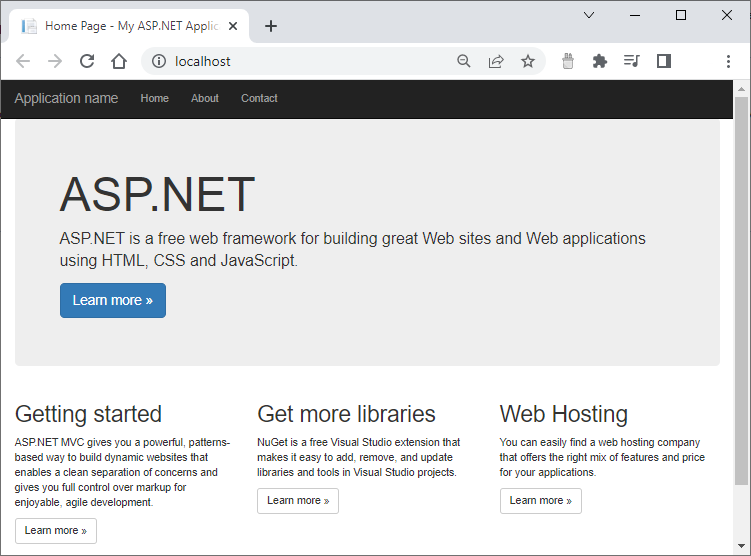 Fig. 41: The ASP.NET MVC 4 app running on the local IIS
Now open the Azure Migrate App Containerization tool URL at https://localhost:44369/. Click the Reset button to clear your previous app migration.
 Fig. 42: Opening the Azure Migrate App Containerization tool
Select the type of application to containerize: ASP.NET web apps. In the dropdown menu for Target Azure service, select Containers on Azure Kubernetes Service.
 Fig. 43: Selecting the target Azure service
In the “Discover applications” section, provide 127.0.0.1 as the Server IP address, enter the username in the COMPUTER NAME\username format, and provide a password with privileges to access your local IIS:
Fig. 44: Providing IIS admin user credentials
Next, specify the target container in the name:tag format as the name for the container image.
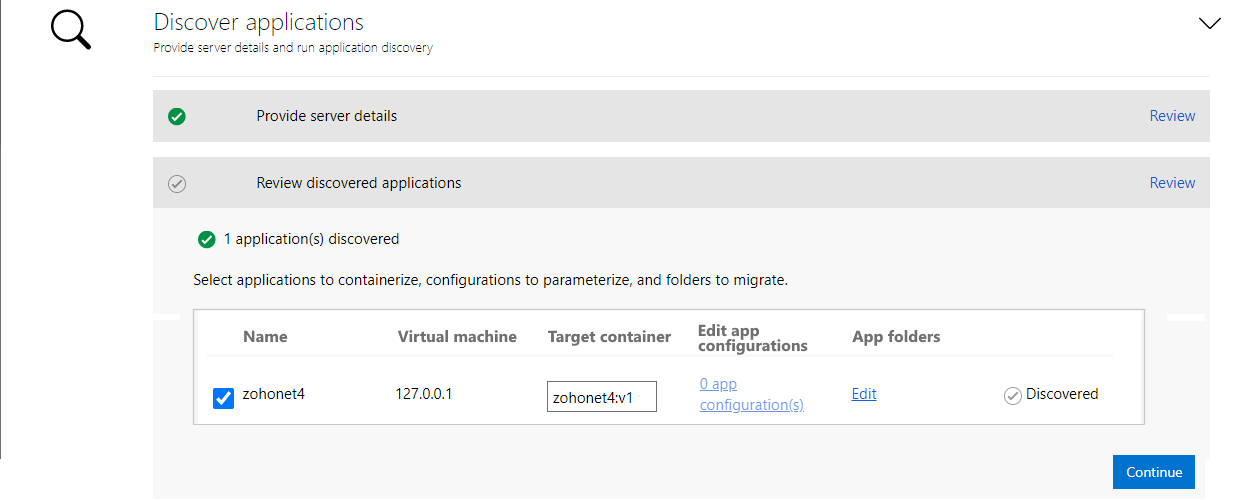 Fig. 45: Discovering local IIS apps
To build a container image, select Azure Container Registry. The Azure Container Registry (ACR) is a repository that stores and accesses container images. ACR lets you pull, push, and distribute the images you build to be used for an Azure service like AKS. Select the Azure Container Registry you want to use from the dropdown menu.
Fig. 46: Providing the Azure Container Registry
You have the option of using a new or existing Azure Container Registry. To create a new one, click on Create new registry. In this case, you’ll provide your Azure subscription, a resource group, a container registry name, a location that best fits your deployment needs, and the SKU (which should be set to basic).
Fig. 47: Configuring Azure Container Registry
Now, you need to edit the Dockerfile that was created at the start of the build step. Click Review to review the Dockerfile.
Fig. 48: Reviewing the Dockerfile
Now edit the scripts below before building the docker image to avoid AKS version compatibility issues and ensure a smooth migration.
Modify the script below from shell form:
# Run entrypoint script.
COPY ./Entryscript.ps1 c:/Entryscript.ps1
ENTRYPOINT powershell c:/Entryscript.ps1
To exec form:
COPY ["./Entryscript.ps1", "c:/Entryscript.ps1"]
ENTRYPOINT ["powershell", "c:/Entryscript.ps1"]
By default, the Dockerfile COPY and ENTRYPOINT commands above come in the shell form. However, since AKS 1.23+, Microsoft recommends the exec form since it ensures that no compatibility errors will occur.
Fig. 49: The Dockerfile details
Select the ASP.NET MVC4 application to build an image for and select Build.
Fig. 50: Building the image
Once built, select Continue to define deployment settings.
Fig. 51: The deployment specifications
You need to specify which AKS cluster you want the application to deploy to. The selected cluster requires a Windows node pool and must be able to extract images from the Azure Container Registry chosen to store the images. To create an AKS cluster, click on Create new AKS cluster.
Fig. 52: Creating the AKS Cluster
Click Create and then Continue.
Then, skip the Specify secret store and the Specify Azure file share steps since this ASP.NET MVC 4 application doesn’t need them.
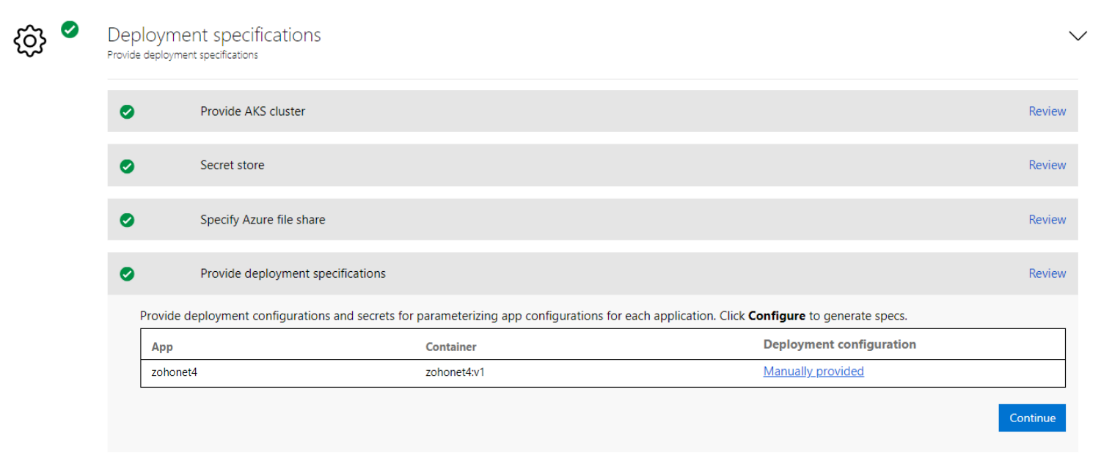 Fig. 53: Finishing the deployment specifications
Under the “Provide deployment specifications” section, click the Configure link. Here you’ll provide the prefix string for resources created in the AKS cluster, the mapped network ports (80), the number of replicas, and the load balancer type. Ensure the values are the same as the ones below.
 Fig. 54: Reviewing the deployment specifications
Then click the Continue button.
Fig. 55: Reviewing the containers to deploy
Now, under the “Deploy containers” section, click the Edit link.
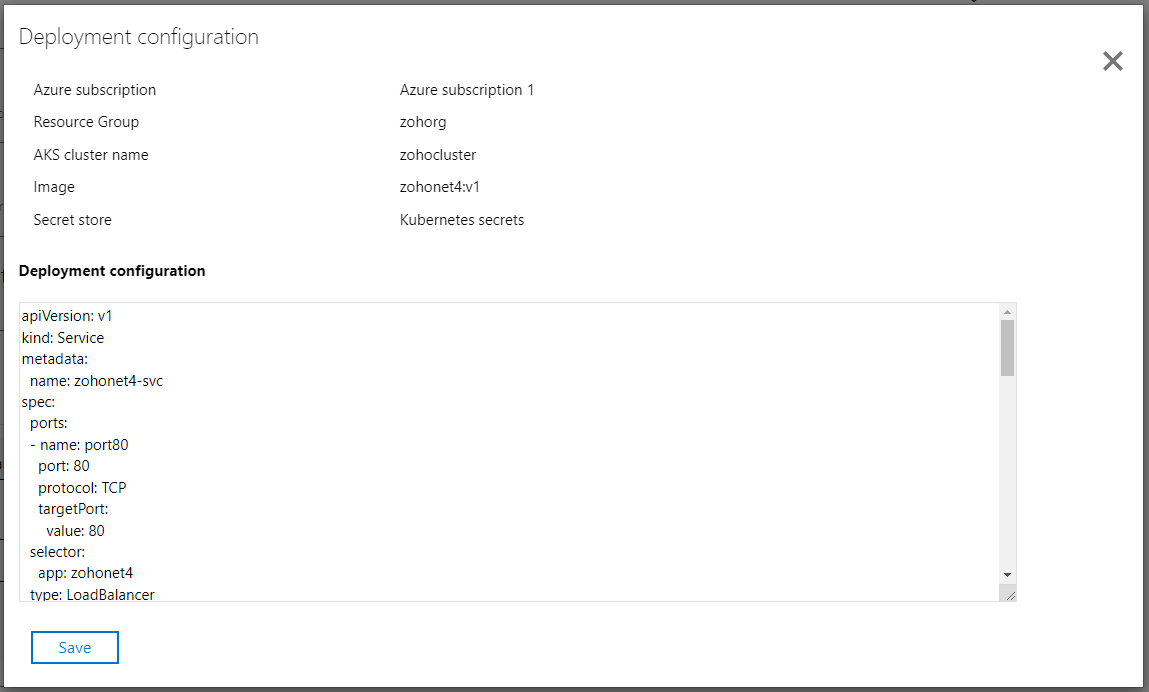 Fig. 56: The deployment configuration details
Like before, leave the configurations as they are and close this dialog.
Next, click the Deploy button and wait until the containerized application is deployed to AKS. This may take several minutes:
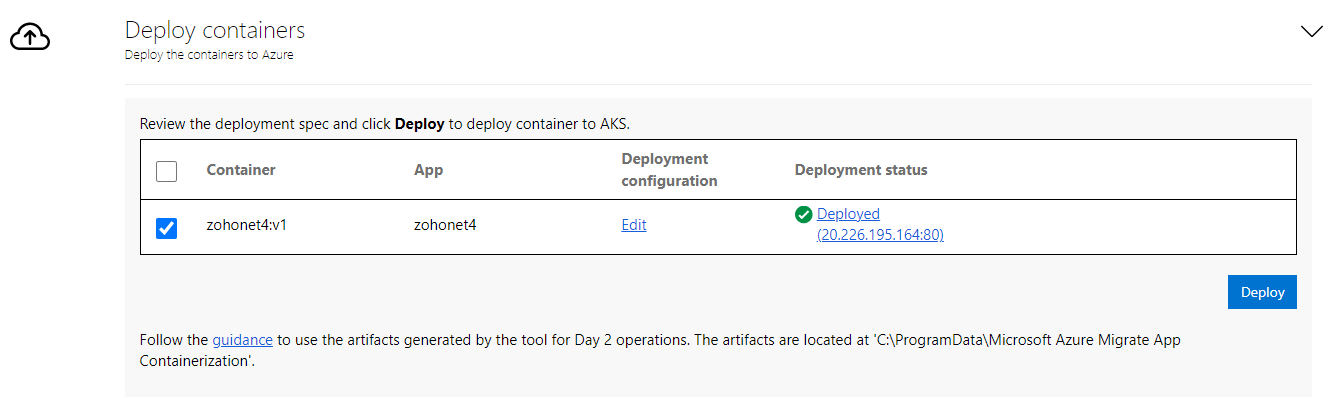 Fig. 57: Deploying the app container to AKS
When you click the Deploy link above, it gives you information about the AKS cluster, the resource group, the APP IP, and the running service. The tool also indicates that your application Pod is ready.
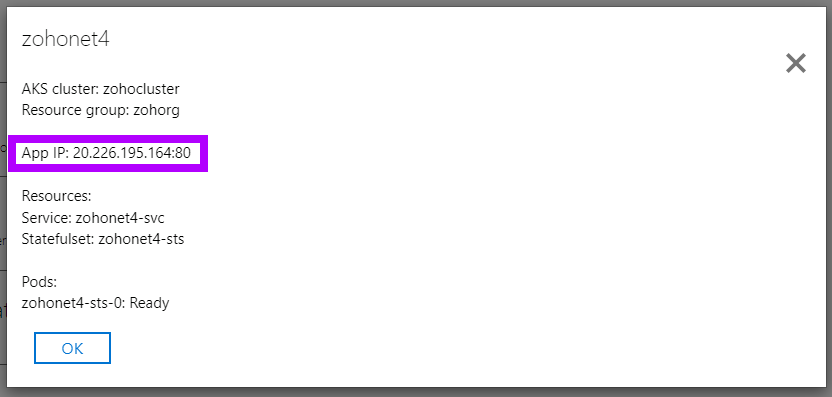 Fig. 58: Reviewing the app deployed to AKS
In the image above, the tool indicates that the application was deployed, and you got an arbitrary App IP (in this example, 20.226.195.164) exposed by a load balancer servicing your AKS Pods in the back end.
Now copy that IP address and paste it on your browser to check the application. You should see your ASPNET MVC 4 website homepage, as shown below:
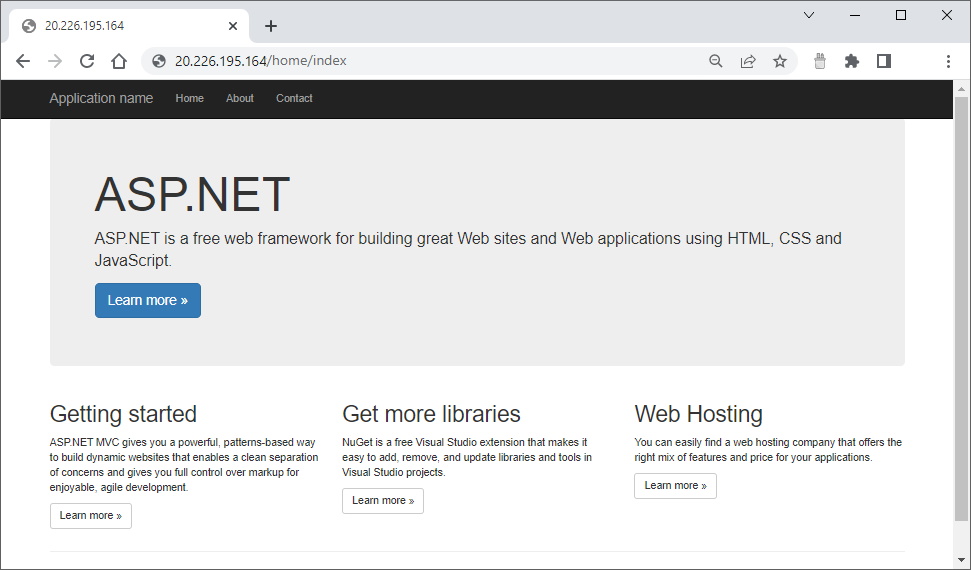 Fig. 59: The migrated ASP.NET MVC 4 app running on AKS
Migrating to AKS has many benefits, from improved performance to scalability to more efficient deployment. Let’s look at some best practices to help you make the most of the migration process.
First, take an incremental approach to AKS migration. By beginning with low-risk Internet projects, you can quickly gain experience working with AKS. This will help you migrate mission-critical applications with confidence.
Migrating to AKS will impact your CI/CD operations, meaning you must adapt your pipelines to properly build the container images and version and deploy them to production. Focus on the YAML manifest definition file since it describes mapping external ports, directories, and other configuration options for your image.
Finally, promote container culture. Handling the container lifecycle requires different approaches for development, deployment, and testing, as well as trained IT personnel. Encourage the learning of container technology within your organization.
This article demonstrated how to create a simple web application on your local machine and migrate them to AKS using the Azure Migrate tool.
Modernizing legacy applications and migrating them to Kubernetes can be challenging, but it doesn’t have to be. With proper planning, process reevaluation, and tools like Azure Migrate, you can easily migrate any project (ASP.NET Core or ASP.NET MVC 4).
Site24x7 provides a dedicated APM agent for .NET that can be deployed within your AKS containers, offering deep code-level visibility, distributed tracing, and performance metrics for your microservices.
You can configure granular thresholds in Site24x7 for metrics like response time, error rate, and CPU/memory usage, triggering alerts via email, SMS, or third-party tools when anomalies are detected.